Set Reviews

Set Review - #71030 - Looney Tunes - Collectible Minifigures

It’s been a bit since we’ve had a new Collectible Minifigure series and now we have the first licensed series of 2021. This one is based on Looney Tunes with a pending release of a 2021 movie. There are 12 minifigures in this series in line with Series 21. This series cost $4.99 per bag in the US which is in line with previous pricing. This series came out on in the US on 26 April 2021.

Overall, the characters are mostly non-standard with only one having a standard minifigure head. The remaining ones have molded heads. For the most part they look pretty good and like the cartoon characters. If you’re a fan of Looney Tunes, then I recommend them. Or if you’re a completionist and addicted to collecting LEGO minifigures. Otherwise, the almost $5 for a minifigure is still a bit high in my opinion. I found them for $3.95 each locally so I can’t complain.

The only thing interesting about this series is the violence of the characters. It’s interesting that LEGO and their non-violent stance would do this series. Especially with the characters that have various weapons to go after each other. Interesting…

Onto the review…


71030_1.JPG

Tweety Bird and Sylvester the Cat are known for going after each other. In this case, Tweety has a large hammer (that can cause the minifigure to tip over if you don’t position it right) and Sylvester has a bat. Tweety is slightly smaller while Sylvester is larger so that works. Sylvester is pretty accurate and I can see where it would be hard for Tweety to be actual size in the LEGO scale.


71030_2.JPG

Road Runner and Wile E. Coyote are two other enemies with Wile E. going after Road Runner in every sketch. Road Runner is a bit larger in scale than the skinny bird from the cartoon, but it works. I’m not sure what the bowl is that he has with him. Wile E. is pretty accurate and I like the brick built anvil that he has to attempt to drop on Road Runner.


71030_3.JPG

Petunia Pig… I don’t remember seeing her ever in one of the cartoons. Maybe she’s new? She comes with a teapot and cup. The bag actually comes with two cups.

Porky Pig looks like the cartoon pig with his blue jacket. I like the “that’s all folks” sign.


71030_4.JPG

Daffy Duck looks pretty accurate and the “rabbit season” sign is fun.

Tasmanian Devil comes with a drum stick and pie. He also has a little spinner plate so you can spin him around like he does when he enters a room. He can also be placed on the usual minifigure stand.


71030_5.JPG

Marvin the Martian comes with his helmet, eyes peaking out from under the helmet, and his ray gun. I almost missed the little skirt thing in the bag, but it fits right in…

Speedy Gonzales looks pretty accurate and comes with some cheese slopes that are decorated like cheese.


71030_6.JPG

Last 2 minifigures…

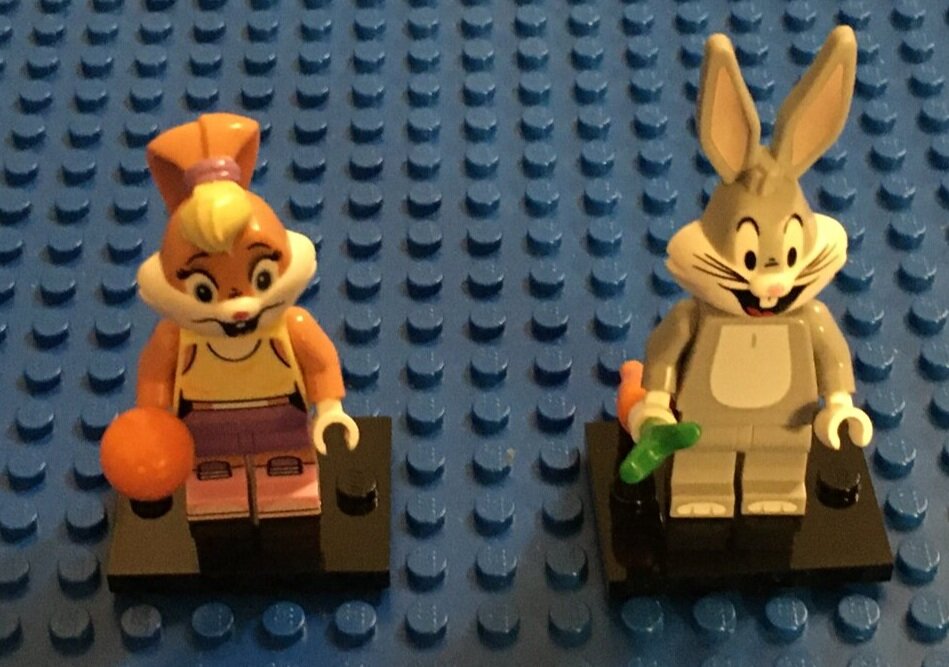
Lola Bunny is… I had to look her up. I guess she’s from the first “Space Jam” movie. I hadn’t heard of her before, but there you go…

Bugs Bunny looks like the classic Bugs. He has the typical carrot that we’re used to seeing him with.

Set Review - #10275-1: Elf Club House - Winter Village - 18+

It’s late April and I’m just reviewing the 2020 Winter Village set… late, yeah I know. It went on sale on 24 September 2020 and quickly sold out and stock levels are just starting to come back. I managed to pick this one locally. It was on sale for $89.95 so I can’t complain. The US retail price is $99.99. With 1,197 pieces, it works out to $0.084/piece.

Let’s dig into the set. The set is branded 18+ with the packaging similar to other 18+ sets. The title is on the front along with the full built set picture. The back shows some details of the set along with the back of the set. One difference with this set is that it lists it on the front as the “Winter Village Collection.” I think this is the first reference we’ve seen in packaging of the Winter Village Theme being an actual theme. I’m not sure I’m a fan of the dark packaging. It doesn’t give off the Christmas cheer and brightness of lights. It looks like the elves live in darkness. Not very merry.

10275_box_front.JPG
10275_box_back.JPG

The contents are 11 parts bags with two instruction booklets packaged up with a small sheet of stickers. There are only bags numbered one to five, but each number has at least two bags with number two having three.

10275_contents.JPG

Here are the instructions and stickers. There are two instruction booklets. Number one goes with bag one and builds all of the smaller accessories to the set. Number two builds the club house itself. No special features or information about the designer in this one.

Only five stickers for this set so I can’t complain too much. While I’d prefer there to be zero stickers, these add a bit of detail to the set and were fairly easy to attach.

10275_instructions.JPG
10275_stickers.JPG

The first set of bags builds a number of items. Elf number one is the only elf to come with a scarf. This elf has only one expression.

Like most other Winter Village themed sets, this one comes with a Christmas tree. Each year it seems it is built slightly different and this year is no exception. I like how this one was done. It’s small, but seems pretty proportional while still capturing what a real tree could look like. The star on top is pretty big, but I can’t complain there. Not bad.

This set also comes with a sleigh and a reindeer to pull it. This is the first time there is a molded reindeer versus a brick built one. It looks pretty good to me. I’m sure these are going for a premium on BrickLink with lots of people looking to build full up teams of reindeer to pull Santa’s sleigh. The sleigh itself is small and can only fit one minifigure with no sack of toys. It also has flames coming out the back.

Additional items are two wrapped gifts, a toy plane, a toy ship, a small piano, and an old school desktop computer. The choice of small gifts are interesting considering some are similar to sets that came out in 2020 and 2021 to include the gift with purchase for Amelia Earhart’s plane, #31109-1: Pirate Ship, and #21323-1: Grand Piano. If you watch the Designer Video, you’ll learn about the computer around the 3:15 mark.

10275_build1.JPG

The second build starts the club house. Like most recent builds, it doesn’t use a base plate, but instead uses a bunch of white plates attached together.

The first floor seems a bit small in my opinion. I was expecting it to be a bit larger for the price tag, but maybe my assessment was wrong. The first floor contains a small breakfast eating area with two seats and place settings, a counter with a pitcher and mug, and then a gift wrapping station. The outside is a nougat color mostly. There are three windows and then the door is brick built to fit pretty snuggly while still keeping in mind what you would expect for an elf house. The clock is installed in this build, but more on that later.

10275_build2a.JPG
10275_build2b.JPG

The third set of bags assembles the second floor. The outside has a nice window design with brown tiles as accents. The build itself has a lot of sand green for those of you who are fans of that color. There is also a small wreath using the rounded 1x2 plates and some tiles.

Inside is a sleeping area for three elves, a small dresser, a chair, and small table with a light. There is a tile with a sticker above the bed that is a December calendar.

If you watched the designer video earlier or you’ve seen other reviews, you know that you can turn the clock and it causes the bed to tip to the side slightly. Since the elf minifigures are made with the small legs, they do not have stud holes on the backs of their legs so they don’t permanently attach to the bunk beds. Then they all fall out to the floor or the ground floor. Cute? Maybe. Did we really need this? No. Is this an 18+ set or an 8+ set? Or is the intent for families to enjoy this set? My preference would be to spend the extra bricks on details for the set and get away from the play feature. At least that’s what I want out of an 18+ set.

10275_build3a.JPG
10275_build3b.JPG

The fourth set of bags adds the roof, some Christmas lights, a small deck with a telescope, a tree out front, and a pole with directional signage (using stickers). I like the roof design and I think the piece usage is fairly simple to achieve some interesting angles for the build.

While not pictured in this review, you install the light brick at the apex of the roof. There is a Technic axle that you put pressure on which hits the light brick. That then lights up the club house. Most Winter Village sets have a light brick and I think it works with this set too.

This bag comes with an elf with a red megaphone. The elf has a smiling face and then a face that looks like he/she is not quite sure about things.

10275_build4a.JPG
10275_build4b.JPG

The last set of bags adds a chimney that is the height of the roof. It is added in the back of the building on a hinge so you can fold it in or turn it out. There is a small stocking about halfway up. If you watched the designer video, this chimney includes the waffle machine. You insert the 1x1 round printed tiles into the slot, move the 1x4 tile arm, and a waffle piece falls out onto a pan. Then you can tip the pan out to feed an elf. A clever design for playability, but again, an 18+ set? Maybe LEGO has done their research and the 18+ crowd wants playability in the Winter Village theme over design and build features…

The last elf minifigure is in this set of bags. It has a smile one one side and then the other side has eyes closed and mouth open. Maybe the elf is enjoying waffles or singing, or perhaps laughing.

10275_build5a.JPG
10275_build5b.JPG

So that’s it. The pictures below show the full set. It’s not a bad build with some fun techniques, good parts usage, and some good colors. The design isn’t all that thrilling and it seems a bit too much like last year’s Gingerbread House (#10267-1) in that it is a themed house for a group of characters to live in. I think we need to expand the line or call it a day. While it has been a great theme, we seem to be running out of new ideas for different buildings. There have been a few in the fan community via Ideas like a ski lodge or a chalet. We just need LEGO to pick one of these different ideas up.

I’m glad I found the set for $10 off as often these are hard to find on sale. Keep looking or find opportunities to use other methods to get discounts or Gifts with Purchase. If you’re a fan of the Winter Village line and haven’t picked this one up, I wouldn’t be in a huge rush unless you just have to have it for your collection. It was just middle of the road for me.

Happy building!

10275_final1.JPG
10275_final2.JPG

Set Review - #10295-1: Porsche 911 - Targa - 18+

Last week I posted my review of the Porsche 911 - Turbo. This week is the Targa build. Having multiple builds is a cool addition to a Creator Expert/18+ type set. As mentioned in the last review, bags one through seven are the same for both vehicles. The differences come after that. For the Targa, you select the parts in bags eight and ten. If you already have the Turbo built like I did, you have to look through the instructions a bit to determine what parts to remove as there are no instructions for how to get from one vehicle to another. This might be a bit of a challenge for non-experienced builders, but if you build sets regularly, it shouldn’t be too hard.

I removed the rear axle, all of the wheels, the engine, the rear wheel cowling, the top of the car from the front wind shield back, and some of the supports for the rear windows of the vehicle.

And here’s what you come up with…

The car is a convertible with a black top that can be removed. The rear windows are slightly different as it uses a bunch of 1x2x5 clear bricks and then a clear rounded wall element of the same length.

The rear wheel cowlings are curved tiles similar to the front of the vehicle versus the curved slope bricks used in the Turbo. Also, the rims are a gray color versus the black in the Turbo.

10295_Targa_final1.jpg
10295_Targa_final5.jpg

Here’s a closer view of the front and back of the vehicle. The back replaced the “Turbo” printed piece with a “Targa” printed piece. Another useful function, you can put the convertible top into the trunk in the front. It fits perfectly and doesn’t cause issues with it closing.

10295_Targa_final2.jpg
10295_Targa_final4.jpg

The engine compartment in the back looks different. I couldn’t tell you what the real differences are between the two vehicles so I’m not going to try and describe the brick changes using engine terms. I initially removed all of the Turbo engine components when building the Targa, but you don’t have to. So look at the instructions before you tear everything out.

10295_Targa_final3.JPG

Not separate to this build, but I didn’t call them out in my last review are the license plates. The set comes with an American plate with New York branding (yellow in upper left of my picture). It has Mike Psiaki’s (lead LEGO designer) trademark plate, only it has a 3 versus the 2 in the last vehicle. The bottom left plate is Japanese and has the set number. The two right plates are German with the “S” being Stuttgart, Germany where the Porsche plant is located.

10295_plates.jpg

I’m a fan of both builds although I think I may like the Turbo better… not sure why. To display it, I’ll probably have it in the Turbo configuration. Or you can buy two and display both (I don’t plan on that).

If you’re into the LEGO 18+ vehicle line, I recommend this set. The base vehicle and the two alternate builds are worth it. I look forward to seeing what modifications the fan community makes to these.

Happy building!

Set Review - #10295-1: Porsche 911 - Turbo - 18+

The former Creator Expert theme and now 18+ has had a number of vehicles. While I have not purchased them all, the last one I reviewed was #10265-1: Ford Mustang. On 17 February 2021, they released the next vehicle in the line, #10295-1: Porsche 911. It retails for $149.99 in the US. I contains 1,458 pieces and works out to $0.103 per piece.

So let’s see what this one has to offer…

The box has the 18+ branding with various gray pieces printed on the bottom. The rest of the box is black with the Porsche logo on the bottom right and “911” in the upper left. The front shows the Turbo version. The bag shows a larger version of the Targa. Then it shows some of the up close details of both vehicles.

10295_box_front.jpg
10295_box_back.jpg

The set contains 11 numbered bags. One for each number with two numbered five. Then there is one bag not numbered with some larger pieces. The instructions are bagged up like most of the larger sets.

10295_contents.jpg

The first bag includes a piece separator and starts to build the base of the vehicle. It uses a lot of Technic pieces and pins to establish the base/frame.

10295_build1.jpg

The second bag adds some of the rear structure to the car to include the start of the wheel well area. It also starts the structure that will hold up the rear windshield area. The main section you see is the rear bench seat. I had to look it up, but the color is called Dark Orange according to Brickset.com which makes it look like it could be a leather seat.

10295_build2.jpg

The rear of the vehicle really starts to take shape in bag three. The main body shape is added pretty smoothly with some different angled pieces. In the back, there is a tile with the “Porsche” name printed on it and then two 1x2 clear tiles with the brake lights printed on. And I’m super glad these weren’t stickers as I wouldn’t have placed them that straight. Additionally, they added in a larger orange bow brick that makes the turn signals up. I think this is the first time LEGO has used a piece like this versus using cheese slopes or translucent bricks/plates. I like how smooth it makes the car look and how it fits right in with the curves of the vehicle.

A few other small details… you can see the the exhaust pipe underneath the driver’s side, rear of the car and then on the rear of the car you can see where the license plate can hook on.

10295_build3.jpg

The fourth bag adds in the driver and passenger seats. Both seats are dark orange for the head rests and then the outer seat sides. The inside portions of the seats is a medium nougat color and it is built with textured bricks. The seats are anchored in the front on the bottom and then rotate forward so a passenger can squeeze into the back seat area of the two door vehicle. In-between the seats is a parking/emergency brake handle.

10295_build4.jpg

The fifth bag builds out the front bumper, what will end up as the bottom of the trunk in the front, the front axle, the gearing to make the front wheels turn when you turn the steering wheel, the steering column, and a shifter to change the transmission (which is really just for show). The front turn signals are a piece that I think is new. I couldn’t find it listed on the Brickset.com site for this set. It’s a 1x3x2 brick curved slope/bow, but unlike the back of the vehicle, this one is a full piece and it is translucent orange.

I didn’t do a direct comparison, but the steering column seems to be fairly similar to the Ford Mustang. Nothing overly special here, but I’m glad they added this bit of functionality.

Last bit to comment on here… you get a large black slope as the bottom of the front trunk. At first I couldn’t figure out why this piece went there, but it makes sense when you go to build the Targa version.

10295_build5.jpg

The sixth bag adds in both doors, the front dashboard, and the front windshield. The doors match the shape and curvature of the rest of the vehicle. There is a slight gap when you close the door, but nothing that I am overly concerned about as it isn’t super noticeable. One advantage over the Ford Mustang is the side mirrors. Instead of being clipped on, they used a 3x3 brick plate with bow (also not on Brickset.com). That piece is white and then a translucent clear 1x2 plate is added on for the “glass.” This makes the mirror solid and keeps it from flopping around like on the Mustang if say one of your kiddos decided to drive the vehicle around on the floor.

The dashboard is the same dark orange color as the seat. It has a few printed pieces for dials to add a bit of realism.

The windscreen is in #10271-1: Fiat 500 and #10272: Old Trafford - Manchester United. It’s a 1x10x4 screen and it’s pretty sizeable, but gets the job done. It’s installed at an angle to achieve the slope of the windshield.

10295_build6.jpg

Bag 7 is the last of the common bags before you have to split off and decide which version of the car to build first. It adds the front of the vehicle to include the hood and headlights. Nothing overly complicated here with this part of the build. I’m a big fan of the printed Porsche logo for the hood versus using a sticker. Given my poor sticker applying skills, this would have been off center or slightly crooked so I’m glad they printed it.

The use of the clear radar dish for the headlights works well. I’m glad they attached then with a shaft/pin type piece instead of using the stud in the back. It makes it stay on a lot better and I think it helped to achieve the angle much better than trying to align a stud to that angle.

10295_build7.jpg

Now you have to decide whether you want to build the Turbo or the Targa. The instructions tell you that you need bags 8 and 9 for the Turbo and bags 8 and 10 for the Targa. I went with the Turbo version first.

You build the roof which is held on in the front by 1x1 clips. If you are going to display the car, then no big deal, but if you plan to play with the car, be careful as it falls off pretty easily (when your kid plays with it).

The engine is installed as well. I’m not smart enough to know what all the pieces are, but the engine in this one is different than what goes in the Targa. You then add the trunk with the rear spoiler (if that’s what it’s called). The rear also had a 2x2 bow piece with the word “Turbo” printed on it.

The rear axle is added along with the rear wheel well and coverings. A larger white, curved bow piece is used to achieve the outer wheel well which is a nice touch.

As shown in the pictures, you can open and close the doors, hood, and trunk. Along with the steering wheel functionality, this isn’t bad for a non-Technic set.

Overall, I enjoyed the build. It has some great piece usage and techniques and it’s an added bonus that there are pieces and instructions for two cars (second car design will be reviewed next week). This isn’t the first Porsche LEGO has done, but it’s a nice middle ground between the larger Technic Porsche from 2016 and the smaller Speed Champions version.

The price is a bit high if you consider piece count. To be fair, there are some larger pieces and no stickers (all printing) so maybe that’s why. If you are looking to pick this one up, look for Double VIP points or a good Gift with Purchase opportunity like I did from Shop @ Home. Don’t forget the cash back sites like Rakuten either.

Happy building!

10295_Turbo_final1.jpg
10295_Turbo_final4.jpg
10295_Turbo_final2.jpg
10295_Turbo_final3.jpg

Set Review - #21325-1: Medieval Blacksmith - LEGO® Ideas

I was not a big Castle theme fan as a kid, although I did have a few small sets. I recall having a few knights, a glow in the dark ghost, and some horses. I was definitely impressed when I saw #21325-1: Medieval Blacksmith be released as Ideas set #33. I was not a day one buyer when it was released on 2 February 2021, but I grabbed one when it was available with a good gift with purchase. This set retails for $149.99 in the US. With 2,164 pieces it works out to $0.069 per piece which isn’t bad.

My set box got a bit beat up in shipping, but I can’t complain. The front shows the full set with all of the minifigures. The back shows off some of the details of the set. The box is branded as 18+ as well. The back, upper left shows how the set is built like a modular in that you can remove the different levels and the roof to have access to the internal details. The back also points out that a light brick is included.

Before moving on, I’ll just say I’m not sure the light brick really adds anything to this build. I think we could have done without it and saved a few dollars on the set or added another minifigure or two in. As an 18+ set, I don’t think most adults like the play feature of being able to turn the light on and off. My preference would be to rig the set up with LED lights instead. That’s just my opinion though. Thoughts?

21325_box_front.jpg
21325_box_back.jpg

The set contains 14 numbered parts bags, a 15th bag without a number that contains some of the larger parts, and the instruction book is wrapped up. This set contains zero stickers. WHOOHOO!!!

Like most of the Ideas sets, this one contains information about the fan designer and LEGO designers in the beginning before you move onto the build.

21325_contents.jpg

I lumped bags one and two together as they both start on the base of the build. Bag one builds the base plate area. I like how LEGO has gotten away from just using a base plate and had switched to using plates of different shapes and sizes to achieve the desired design. It adds in some curves as well which is nice. Bag one comes with the blacksmith minifigure and a husky dog figure.

Bag two adds to the base. The blacksmith’s shop starts to form, the stairs to the second level are started, you get more foliage around the outside, and the area where the water well will be is built up slightly.

21325_build1.jpg
21325_build2.jpg

The third bag builds up the blacksmith’s shop. Besides the walls getting higher, the kiln is built with the light brick. A brick built blower is used to trigger the light which was a clever idea.

On the outside, there is a small garden with a few pumpkin like vegetables growing. Nearby is a bone for the dog.

The inside has a shield and some armor hanging on the wall that you can assume the blacksmith created.

21325_build3.jpg

The fourth bag mostly finishes up the blacksmith shop. On the inside, you get a bunch of tools, some extra “material” to use for tools, a completed helmet, an anvil to work on, and a brick built door with some printed wood patterned tiles. The outside has another anvil and then a barrel of swords that either need work or were finished.

I like what is done on the outside with the mixture of bricks, tiles, and textured bricks to create the medieval style of architecture. The use of brown to show wooden supports is also cool. This is especially apparent on the side with the veggie garden.

21325_build4a.jpg
21325_build4b.jpg

The fifth bag adds a female archer with bow, arrow, and quiver of arrows.

For this build, the biggest part is the apple tree. It’s a different type of tree than we have seen before and I like how they did it. At first I was confused as to where it was going, but it all came together, and I think it looks good with the lime green and green leaf pieces along with the red apples.

You also top off the water well with a small roof over the well and a bucket nearby.

21325_build5.jpg

The sixth bag starts the second floor. This starts work on the kitchen and includes a beverage barrel with tap, a table, a butter churn, and a stove. The stove is in line with the rest of the chimney area on the building and it fits together well.

21325_build6.jpg

The seventh bag continues floor two. You get some brick built chairs which are larger than most we are used to seeing, but actually fit minifigures. You also get some food on the table and there are candles on the wall. On the other side of the kitchen, you finish off the stove area and add in a pot holder attached to the wall. You also get a food preparation area where you get a few tools and a carrot with a section cut off.

On the outer section, you get a small awning with roof pieces and a sign for the blacksmith shop. The sign is printed on a tile. No stickers. YAY!

21325_build7a.jpg
21325_build7b.jpg

Bag eight wraps up the second floor. Besides finishing off the walls and adding windows, you get the brown tiles on the outside which make it look like wood boards. Having been around Europe, I have seen houses with this look and I think the designers did a great job capturing that style of build.

21325_build8a.jpg
21325_build8b.jpg

Bag nine starts the third floor which is the bedroom area. It is mostly the floor with the start of supports for the roof. There is a brick build animal rug on the floor which is a cool design. There is also an area for writing to include a quill and a tile with printing. There is also a chest with a compass and backpack. This is a reference to fan designer Clemens Fiedler and his passion for hiking and being outdoors.

21325_build9.jpg

Bags 10 and 11 add in some more supports, a small window outcrop, a bed with a fun patterned blanket, and more roof support pieces.

21325_build10.jpg
21325_build11.jpg

The 12th bag adds one side of the roof and another window outcropping. The roof pieces are blue, dark blue, and black. There is also some sand green as moss. I have seen a few complaints about the roof and how it was built in other reviews, but I am a fan. I like the coloring and use of tiles and bricks. As I’ve heard from other reviews, feel free to use your own brick stash to adjust the roof if you aren’t a fan of how it was designed.

21325_build12.jpg

The 13th bag completes the roof. On the previous side, you add in the chimney which is in line with the stove on the second floor and blacksmith area on the first floor. The other side of the roof is built in a similar way, but with a few different details. There are some missing tiles where you can see exposed “wood” and then more “moss” on the bottom edge of the roof.

At the top of the peak, there is more sand green and then some brown pieces to complete the top.

21325_build13a.jpg
21325_build13b.jpg

Bag 14 provides two knights. One is an older male with armor, a sword, and a shield. The other is a female with a battle ax and armor. They both come with hair pieces and then helmets.

Additionally you build a horse and carriage. The horse can either be attached to the carriage or you can add in a brick and tile to fill up the space so the horse doesn’t look too weird with the carriage attached.

The carriage comes with an additional shield, a plastic molded bag, and a lantern attached to the carriage. The horse can turn so the carriage turns too. The wheels remain in the same position, but the horse can pivot.

21325_build14.jpg

Here is the final build with the full assembled building. While I have to admit I like the fan design better, I can’t complain about this design. It definitely has the medieval style of architecture and would look great in a castle styled scene. It makes me want to expand to set into a scene… how many times have I said that before? I need more time for building… what is this stupid work thing I have to go to?

Overall, I highly recommend this set. It’s a great build of a great theme of LEGO past. Not sure it will ever go for a discount, but look for opportunities to get a cool gift with purchase, double VIP points, or other bonuses if you want to pick this set up.

Happy building!

21325_finala.jpg
21325_finalb.jpg

Set Review - #21323-1: Grand Piano - LEGO® Ideas

It took a while, but I was finally able to get Ideas set #31. In case you aren’t aware, LEGO now has the ability to set up email notices on Shop @ Home to let you know when an item is back in stock. I got the notice this set was back in stock and by the time I checked, it was already on backorder. I placed my order and was entered into the backorder line. I had saved up VIP points so this $349.99 priced set in the US only cost me $50. With 3,662 pieces, at the full retail price it works out to $0.096 per piece. The release date was 2 August 2020 and this set has spent a lot of time listed as out of stock on Shop @ Home in the US. As of the writing of this post, it is still out of stock. Keep an eye out for it if this is one that you’d really like to pick up.

Onto the review…

The set showed up as a box within a box. While it makes it a bit heavier, it helps to protect the set box. At $350, you definitely want your set to show up looking pristine so I’ll take the extra packaging. For reference, the sticker on my set box shows that it was made in January 2021 in the Mexico production plant.

When I opened the box up, the set was placed with the bottom facing up. After taking the set box out and finally opening it, the internals include a number of bags of parts and then another box with more parts bags inside.

21323_outer_box.JPG
21323_opening.JPG
21323_label.jpg
21323_opening2.jpg

Backing up… forgot to mention the box itself. The front shows the full set with the name in fancy lettering. It highlights that it is an Ideas set and is #31. The bottom right has the Powered Up logo. It definitely gives the set a classier look as opposed to most sets. This set also as the 18+ branding on it.

The back shows the piano in a theater or concert hall. It also shows the piano with the top closed and highlights the Powered Up functions.

21323_box_front.jpg
21323_box_back.jpg

Onto the contents. There are 19 bags once you open the set. It is bags 10 through 21 and then 5. Opening up the other box reveals 33 numbered bags, three un-numbered parts bags, a long Technic axle, three 6x16 tan plates, and then the instruction book which is wrapped.

The instruction book contains some information about the model, about the fan designer (Donny Chen), and some information about the LEGO Designers Woon Tze Chee and Steen Sig Andersen. Throughout the instructions, there are numerous quotes about music scattered throughout. There are 563 pages in the instruction book if you count the back cover. So get ready!

21323_contents1.JPG
21323_full_contents.JPG

There are 21 sets of numbered bags. Instead of going through them all one by one, I’m going to try and group them together to get you through the set quicker. Builds 1 and 2 assemble the main base of the piano and then add in the Powered Up battery box, motor, and sensor. It also adds the gears that will eventually make the keys move in self-play mode.

Seeing the size of this section of the build makes it clear how big the piano is going to be when you’re done.

Of note, one of my bags numbered one was opened when I opened the box and the pieces were all over the place. I ended up not having one piece. Not sure where it was lost, but I was able to account for it from my parts stash. I wrote LEGO about it, but never heard back. Hopefully my issue was a one off and not a repeat for multiple people.

21323_build1.jpg
21323_build2.jpg

Builds 3 and 4 add in the Technic elements that will connect to the hammers that hit the strings. Adding them became a bit repetitive, but it wasn’t too bad. After that, you add a top layer which covers the Powered Up elements. Thankfully, you can still access them very easily so don’t worry about them being stuck in there and having to take the model apart to get to them.

21323_build3.JPG
21323_build4.jpg

Build 5 adds more to the top section and then expands on the outer black cover of the piano.

21323_build5.jpg

Build 6 and 7 step away from the first section of the build. You move onto the front of the piano which is added to the rest of the piano next.

21323_build6.jpg
21323_build7.jpg

Build 8 adds the section built in 6 and 7 and adds some pieces to round out the front. Additionally, it adds the “strings” to the piano. Definitely a lot of gold colored pieces in this build.

21323_build8.JPG

Build 9 finishes up the outer shell/covering of the piano. I’m impressed how they captured all of the angles without making large gaps. You’ll notice from the picture that you add a door to the shell. This allows you to easily access the battery box to turn it on/off or switch out batteries as needed. Smart thinking!

21323_build9a.jpg
21323_build9b.jpg

Build 10 adds the legs to the piano which are all on wheels that can change direction as you need to roll your piano into the appropriate space. It also adds the pedals to the piano. Only one of the pedals actually has a function which is the far right “damper” pedal. Pressing the pedal will eventually lift up the dampers so that your note or notes continue to vibrate instead of stopping when the damper hits it (or at least mimicking the function of what a real damper pedal would do).

21323_build10.jpg

Builds 11, 12, 13, and 14 build the keyboard. There are 10 black keys and 15 white keys. They all move independently. This section of the build is a bit repetitive, but not too bad. Just make sure you follow the directions carefully or you may build the keys incorrectly and they won’t fit together. You also have to make sure all of the pieces line up evenly. Otherwise, if a 1x1 is slightly angled, it will rub against one of the adjacent keys and cause it to not work as freely.

Build 11

Build 11

Build 13

Build 13

Build 12

Build 12

Build 14

Build 14


Build 15 has you install the keyboard. The instructions just show you placing the keys in and really there are no attachments. It is fairly easy to remove the keyboard if required. You build a sub assembly, if you want to call it that, which is attached via Technic axles. You remove the axles, slide the sub assembly out, and then you can pull the keyboard out.

21323_build15.jpg

Build 16 is the cover for the keys. Like a real keyboard, you can raise or lower it. Of note, one of the pieces on the inside of the cover has the word “LEGO” printed in gold on it. A nice touch as this is where the piano logo would be located.

21323_build16.jpg
21323_build16a.jpg

Build 17 adds the music stand. The stand can be raised or lowered and can hold the sheet music provided or your phone. You can also completely remove the stand fairly easily if you’d prefer it to not be there. Finally, you install some Technic pieces which will end up as the arm to hold up the top cover to the piano.

21323_build17a.JPG
21323_build17b.JPG

Build 18 and 19 build the cover. It is a bit bigger than I expected and uses all black pieces.

21323_build18.jpg
21323_build19.jpg

Build 20 finalizes the cover and then you can install it on the piano. You can completely close it, just open the front, or open up the whole thing. Definitely cool how they re-created the actual function of a real Grand Piano.

21323_build20a.jpg
21323_build20b.jpg

Build 21 finishes up the build. You build an adjustable seat. This build was pretty impressive in my opinion. At first, I couldn’t understand where the build was going, but it made sense and works in a cool way. I’m a big fan. You also get a large tile which has the song the fan designer wrote to go along with his original Ideas submission.

Overall, this was a great build. It uses some great techniques, it was pretty challenging, and has some great piece usage. I hooked up the Powered Up, but my batteries died. I need to get some new ones to test both of those functions. Even without Powered up, it’s a cool build. I highly recommend it. VIP points definitely helped to soften the blow of the cost. Not sure if this one will ever go on sale so save your pennies.

Of note, my Non-Lego Spouse (NLS) said this might be a set she is willing to display in our house outside of my bricking space so I’ll take it. It looks good!

What are your thoughts on this one?

Happy building!

21323_build21a.JPG
 
21323_build21b.jpg
 
21323_build21c.jpg

Set Review - #80107-1: Spring Lantern Festival - Chinese Traditional Festivals

I finally finished building and taking pictures of the second 2021 Chinese Traditional Festival set. This one is #80107-1: Spring Lantern Festival. The first one was #80106-1: Story of Nian in case you missed my review. This one was also released on 11 January 2021 in the US. It retails for $119.99 and contains 1,793 pieces. This works out to $0.067 per piece.

This set sold out very quickly on Shop @ Home and shows on backorder at the time I’m writing up this post. I found it here locally at one of the few stores deemed “essential” to be open during Germany’s winter lockdown. As an added bonus, the set was on sale for $99.95. $20 off a brand new, hard to find set. Done! I grabbed the last one off the shelf.

Onto the review… the box is similar to #80106-1. The front shows the whole set, highlights the minifigures on the bottom right, has a drawing of an ox in the upper right for the “Year of the Ox,” and has the Chinese Traditional Festivals logo on it. It highlights in the lower left that this set contains a light brick. The back of the box shows off some play features and details. This set is built similar to the modular buildings in that it has Technic pins to connect it to itself or other buildings. This is a nice addition we have yet to see in other sets.

80107_box_front.jpg
80107_box_back.jpg

The set contains 15 numbered parts bags numbered one through eleven. There are two dark grey base plates. One is 32x32 and the other is 16x32. You also get a sealed instruction book (actually two) and some plastic streamers. Like set #80106-1, there is a two page spread in the instruction booklet with a cartoon showing the spring lantern festival.

contents.jpg
streamers.jpg

The streamers I mentioned are here. They have Chinese writing on them which I have no idea what it translates to. Hopefully LEGO got it done right and it’s not making fun of us. The streamers are a thin plastic, but not too flimsy. I don’t recall seeing this type of thing in a set before. Usually it is the cloth like pieces that become minifigure capes. Have these appeared before?


Before I begin, I didn’t picture it, but you get a piece separator with this set. Bag one starts with the 32x32 plate. You build up an outer sidewalk and then start to lay in the outer base of the festival area. Lots of bricks to include 2x6s. Bag one contains a male minifigure with a spoon, bowl, and a 1x1 round tile with printed food. I didn’t picture him until bag two (sorry).

80107_build1.jpg

The second bag continues with the base. It lays in where the pond area is located and some of the walkway. Like many sets, LEGO used different colored parts to help you with the build. You don’t actually see them later on so if you want those pieces or colors, you can easily swap them out from your parts stash to use them elsewhere. Bag two has a female minifigure holding a smart phone 1x2 tile. She is pictured along with the minifigure from bag one.

80107_build2.jpg

The third bag adds in the pond with a lot of 1x2 translucent blue tiles. I wasn’t sure I would like the finished product, but I think the tiles over the dark green plates work as a pond. Some of the tiles have printed koi fish on them with which helps to add to the scene. I’m a fan!

80107_build3.jpg

Next up, you continue to build out around the pond adding some green plates for grass. You also add in a few light gray pieces to be used later and then build up a round stand for your brick built ox to stand on. The brick built ox is mostly red with some gold. It fits in well with the box art and the head is on a ball and joint so you can turn it as desired. The light brick is used here and you push the ox’s rear to light it up. Then it looks red.

Two minifigures in this bag. A male and a female with matching 2021 shirts. The male has a cup with a straw and the female has a selfie stick and 1x2 tile smart phone. Not the first time we’ve seen a selfie stick, but the first time I’ve seen a cup with a straw. The straw is one of the poseable minifigure pieces that I think I first saw with the collectible minifigures. Maybe in #71026: DC Super Heroes?

80107_build4.jpg

The fifth bag adds the sidewalk over all of the colorful pieces you spent time laying down and a bridge over the pond. It also adds part of the fence around the festival area. The bridge is pretty simple, but has some good aesthetics to it with the curves and light grey round pieces. The sidewalk isn’t just studs or tiles. It is a mix of studs, a few tiles, and some modified tiles. I think my preference would be to have fewer studs showing and more of the modified tiles. I guess I can do that myself instead of complaining about it…

80107_build5.jpg

Next up, we add some plant life in the form of bamboo type plants in the corner and them some lily pad type plants on the pond. You also get some lanterns hanging from posts behind the ox. There are two 2x2 tiles with more calligraphy on them. The streamers are added in this part of the build on poles on the fence. I assume the thought is these would be blowing in the breeze so you could actually see the one behind the other. Back to the brick built world, you put one streamer in front of the other and can’t see it unless you move it with your fingers. I guess it doesn’t matter since I have no idea what they say anyways.

This bag comes with a minifigure. It’s a boy with a scarf on and he is carrying a lantern on a pole similar to the cartoon in the front of the instruction book.

80107_build6.jpg

As for the seventh bag, I have failed you as a reviewer. I finished the step, but didn’t take a picture of it. Don’t fear though as you will see the completed set at the end which includes the last part of the build on the 32x32 plate. This build adds the wall around part of the festival area with the entrance. It also adds a small tree.

I apologize for missing this step.


Back to the review… Bag eight starts the build on the 16x32 base plate. Much like the last one, it builds the base and a sidewalk on part of it. This one has Technic pins so you can connect it to the other base plate.

This bag comes with a male minifigure with a camera.

80107_build7.jpg

The ninth bag starts to build up the… um… is it a temple? a gazebo? a hut? Anyways, you build up a base and then start to build the supports to connect the roof to the base of the small shrine like area.

This bag includes a girl minifigure. She has a toy rabbit on wheels as pictured in the cartoon in the front of the first instruction book.

80107_build8.jpg

The tenth bag puts the dark blue roof on the hut structure. The design is pretty intricate with some great piece usage. I like the dark blue colors and the way the angles make it rounded. The dark blue banana pieces are the key for me. #80106-1 had teal blue colored banana pieces. This one also has a 2x4 tile with printed calligraphy on it. Again, I’m not sure what it says.

80107_build10.jpg

#11 finishes up the build with some extra details. You get plant life, some lanterns strung on string between poles, the wall with a portal to enter the space, a lamp with some lanterns on it, and then a red minifigure statue.

80107_build11.jpg

Here’s the final picture of the set assembled. I’ll be honest and say that I wasn’t completely won over by this set. The build was just okay. Nothing overly complicated, but some good piece usage. There are some good pieces for MOC builders and the minifigures are good. Maybe it’s the price and then what you get at the end. $120 for a park scene? I realize the number of pieces involved and some of the cool pieces used, but this one just didn’t do it for me. Maybe I would have to put it together with a city scene or something in order to get the full effect.

What are your thoughts? Am I out to lunch or right in line with my opinion on this set?

Happy building!

80107_final2.jpg

Set Review - #80106-1: Story of Nian - Chinese Traditional Festivals

The Chinese Traditional Festivals theme started in 2019 with sets that were just released in the Asia-Pacific region. Now we’ve had set number six here and seven will be reviewed shortly that have been released to the world. This line started in 2019 and #80106-1: Story of Nian was released on 11 January 2021 in the US. The set retails for $79.99 with 1,067 pieces. This works out to $0.075 per piece. I found it for $69.95 and can’t complain about $10 off.

I had never heard of “the story of Nian” before this set came out and used the internet to learn about it. I won’t go into the Chinese tradition here, but I recommend searching it on your own to see what it is about. It makes the build make more sense as you go.

The box front has the full set displayed on the front along with the “Chinese Festival Special Edition” logo and a golden ox highlighting the year of the ox (2021). The back of the box shows some of the play features and details of the set.

80106_box_front.jpg
80106_box_back.jpg

The set contains eight numbered parts bags, two 8x16 white plates, a bag with translucent orange “fire” pieces, and instructions and stickers packaged up for protection. The instructions include a two page “cartoon” of the story of Nian, but other than that it is a standard instruction booklet. To be honest, I had to look up the story before I understood the cartoon. It made more sense after I read it.

80106_contents.jpg

Only two small stickers in this set. I can’t complain. The rest of the details are printed on pieces which is great!

80106_stickers.jpg

The first bag builds up the “snowy” base. It also starts the foundation of the façade of the building and some of the snow build up. You also get the start of the doorway. This bag has one male minifigure who has a small bag to carry with him.

80106_build1.jpg

Bag two completes a good chunk of the façade. I like the large amount of textured bricks with the brick texture (both light and dark gray). The red windows are cool as well. The doorway has some simple details and thankfully the red tiled scrolls are printed. This bag includes a girl minifigure.

80106_build2.jpg

The third bag builds a lot of the roof area. The overhang has some snow with icicles dripping off. I like the detail of the icicles and how the snow build up on the roof is “connected” to the icicles. You also get a boy minifigure who is excited to throw a snow ball.

This bag adds the doors which are not just solid pieces. They are made up of plates and tiles connected by clips to a bar. Then the two stickers are applied to the doors. The door handles are two gold ring pieces which get placed over a stud. The red with the gold handle and then gold trim around the door looks really good.

80106_build3.jpg

The fourth bag builds the overhang over the doorway. It has roof (dark gray) and then snow covered roof. I like how the designers used bricks to show snow build up in certain areas with melt towards the bottom. There are also two red lanterns that get added in the doorway. This bag contains an older female minifigure with a shovel to remove snow.

80106_build4.jpg

The fifth build adds some more of the “snowy base.” It also includes a ladder and bucket for the older male minifigure to use his sponge to clean up.

80106_build5.jpg

Bag six adds some final details to the main part of the build. This includes some fireworks that attach behind the façade, fire crackers exploding, and a snow man. The minifigure is a person dressed up as an ox. He/she is holding a large string/rope of fire crackers.

Side note… look up a video of firecrackers on a string/rope going off. It’s pretty cool to see how it works.

Last piece is some plant life to include various small trees/saplings with snowy branches and some flowers popping out. There are three dispersed across the set with one towards the front and two towards the right side.

80106_build6.jpg

Bags seven and eight build the Nian itself. I’m not sure what the creature is supposed to look like, but I think this LEGO built creature is awesome! There are some great details, pieces, colors, and movable pieces in the creature. It all fits together very well and besides the studs sticking out, it could be looked at as not a brick built model. I’m a big fan!

80106_build7.jpg
80106_build8.jpg

That wraps up this set… Should you get it? If you’re a fan of the Chinese Traditional Festivals line, definitely pick it up. The details are great, you get 6 minifigures, and the Nian is an awesome build. The downsides… I wish there was more to the building then just the front, but this is in line with some of the previous sets. For MOC builders, you get some great pieces to include some good colors and some of the printed pieces.

I am glad I got it on a discount locally. I’m not sure how the pricing is in the US right now, but LEGO Shop @ Home hasn’t had a lot of stock on hand. It sold out soon after being posted on sale. You might have to wait to get this one, but don’t wait too long as these sets are usually out for just a year.

What are your thoughts?

Happy building!

80106_final1.jpg

Set Review - #75980-1: Attack on the Burrow - Harry Potter

Finally got the last of the 2020 Harry Potter sets. I ordered it back in December 2020, it was out of stock, it showed up, it shipped, USPS “lost it,” I’m working with LEGO on a replacement, and I reordered to have to wait for it to come off back order to actually get it. So let’s hope it’s worth it…

Released back on 3 July 2020, #75980-1 contains 1047 pieces and retails at $99.99. This works out to $0.096 per piece. Not too bad, but I have yet to see this set on sale (even in Germany). Onto the review…

The box shows both sides of the set on the front with some designed features. The back shows all of the different play features like most sets do.

75980_box_front.jpg
75980_box_back.jpg

The set contains seven numbered parts bags, an un-numbered bag with larger plates, and the instructions are sealed up with the stickers.

75980_contents.JPG

Here are the instructions and stickers. Nothing special about the instructions. No special write ups or pictures. There are two sticker sheets which are both fairly small. One is the normal sheet and the other is clear stickers. There aren’t a ton of stickers so I can’t complain too much. As a technique, I’ve started using the piece separator to apply stickers versus my fingers. It’s actually worked very well. Maybe you all already do that, but if you haven’t, give it a try.

75980_instructions.jpg

The first bag contains a piece separator and starts the base of the building. It is connected with hinges so you can get to the inside later on which works out nice for play features. You get a pig with this set… I didn’t even know they had pigs, but I won’t complain. You also get Arthur and Molly Weasley.

For the rest of the build, I decided not to include the minifigs by bag and I’ll bring them all up at the end.

75980_build_1.JPG

The second bag of parts builds out the living space. You get a table loaded up with a breakfast of eggs and waffles. There’s a small little sink area as well. The living space has a couch, a chair, and various decorations to include lamps, candles, and plants. Outside, you can see some of the clear stickers which actually look pretty decent. I managed to put them on without getting any air bubbles in them so that was good.

75980_build2a.jpg
75980_build2b.JPG

The third bag finishes up the inside of the first floor and starts on the roof. Inside, you can see the fireplace where they enter the floo network. The fireplace is connected to a Technic axle that you can spin between flames and the floo network green. I show it in translucent green here and then in the translucent orange below.

75980_build3a.jpg
75980_build3b.jpg

Here’s the orange, “normal” fire place. On the other side of the fire place, you see a clock which shows where everyone in the family is located. There’s also a picture on the wall and a book shelf.

75980_build3c.jpg
75980_build3d.JPG

Bag four finishes up the roof on the ground floor and adds a room on the second floor. I assume it is Ginny’s room with the hair brush and mirror. The bed has multiple colors and then a sticker that matches the colors. It was tricky to line up the sticker with the parts, but I think I got it close to being right. The downside to this set up is the sticker is smaller than the tile it goes on so there is a gap between the sticker and the sloped bricks which from far away isn’t a big deal, but close up looks bad.

75980_build4a.jpg
75980_build4b.jpg

The fifth bag starts the next level. This eventually becomes Arthur and Molly Weasley’s room. For now, there is a chair with some magical knitting going on at it. There’s also a family picture on the wall.

75980_build5a.jpg
75980_build5b.jpg

The sixth bag puts a bed in Molly and Arthur’s room with a quilt on it. It also adds in a room above. Maybe Ron’s room? There’s a bed and a picture on the wall, but that’s it. From the room, there’s a small stair way that leads up to a small upper porch area. That area has a broom so you can either sweep it off or fly away from there.

75980_build6a.jpg
75980_build6b.jpg

The last bag finishes the roof and adds a chimney. You also get two owls to include Hedwig. The roof is made with 45 degree slopes, but they vary in color so it adds to the design other than just using one color. I’ll cover the last part of this build with the minifigures.

75890_build7a.jpg
75890_build7b.jpg

The set comes with eight minifigures. Seven of them are unique to this set and then #8, Harry Potter, also comes in #75967-1: Forbidden Forest Umbridge’s Encounter. As mentioned in the bag seven section, it includes more besides the roof. It also includes a section of flames as can be seen in the sixth movie. The two minifigures included in bag seven are Bellatrix Lestrange and Fenrir Greyback. They both come with wands.

The remaining six as shown in the picture are Nymphadora Tonks, Ron Weasley, Ginny Weasley, Harry Potter, Molly Weasley, and Arthur Weasley. They all come with wands as well.

I think this is a pretty good mix for the set and you get a decent amount. For minifigure collectors, you get seven unique Harry Potter minifigures so not bad.

75890_build7c.jpg
75890_minifigures.jpg

Here’s the final set. I like how they created the offset angle of the upper level. My Non-LEGO Spouse originally saw it and thought I didn’t connect everything. I had to explain that it was built that way. A nice touch.

Overall a good set that closely follows the Harry Potter version from the movie at an age 9+ range with just over 1,000 pieces. There are some good building techniques, but nothing overly challenging. For MOC builders you get some good pieces to pick from for your own builds. Price wise it is not bad, but it could be cheaper. I didn’t find it on sale, but I did get it with a freebie so that helped. If you wait a bit longer, you might be able to pick it up on sale. Just don’t wait too long and have it retire.

And that closes out the 2020 Harry Potter line for me. What are your thoughts on this set?

Happy building!

IMG_2024.jpg
IMG_2025.JPG

Set Review - #71029 - Series 21 - Collectible Minifigures

Yeah, yeah… I complained about them and now I finished the collection thanks to SteineHelden.de. These 12 minifigures were released on 1 January 2021 and are still available at the time of this post. I had a not so fun time trying to get all of these, but I finally managed. Supposedly the new box of 36 has three full sets. Only where do you get a full box?

I paid the full $4.99 from LEGO Shop @ Home, I bought a few from LEGO.de for ~$4.84 and then SteineHelden’s price worked out to about $4.50. Not my ideal price, but I can’t complain as compared to prices in the US.

If you’ve read any of my Collectible Minifigure reviews, I’m a big fan of the non-licensed versions. I think the designers come up with some creative minifigures that can be used in individual scenes, in cities, or whatever MOC you are working on. Series 21 is no different. Despite having only 12 in this go around, I think the mix of minifigures is good between costumed minifigures, fantasy and historical minifigures, and modern day city people.

If you’re a fan of Collectible Minifigures, definitely pick these up. Try and find sales if you can as these things are not cheap in my opinion.

A quick write up on each figure is below. What are your thoughts?

Happy building!


71029_1.jpg

Two costumed minifigures in this set. Ladybird Girl as Brickset refers to it comes with the ladybug wings, 2 1x1 round tile printed ladybugs, and a hat with antenna. This one is pretty cute.

Pug Costume Guy is a fun dog that comes with two toy bones to hold onto. I like the ears on the dog helmet.


71029_2.jpg

The Paddle Surfer is decked out with a lot of gear. You get a surf board, a paddle, a life jacket, and a dolphin. The minifigure head is either sun glasses or without on the other side. This one is good for any beach scene and the dolphin is a great add for any city beach or even a pirate scene.

The Shipwreck Survivor has his bottle to put a note in and a small hermit crab to go with the minifigure.


71029_3.jpg

Two kids in this series. Violin Kid comes with a kid sized violin and then he uses a wand as his bow. This one is pretty creative and I like the idea of minifigures with instruments.

Airplane Girl come with a full up airplane costume along with a helmet and goggles. She also comes with a hair piece if you want to use her without the costume. Has anyone seen the Amelia Earhart gift with purchase release coming out? I wonder if these two are tied in?


71029_4.jpg

The Beekeeper is a fun concept. I could see someone making some bee hives to go with a farm scene.

Space Police Guy is a nod to the space fans from back in the day. I still have some of the original space police sets and it’s cool to have another more modern figure to go with them.


71029_5.jpg

Ancient Warrior seems to be from the Aztec type days. Or maybe Mayan? I’m not sure, but it’s cool looking.

Alien comes with a crystal and a crow bar. Your chance to be creative here to come up with what that alien could be doing.


71029_6.jpg

The Cabaret Singer comes with a microphone stand, a microphone, a giant head piece, and a cape. This picture is big only because of the next minifigure and I couldn’t fit them in together…


71029_7.jpg

The Centaur Warrior is cool looking, but my only complaint with the set. She comes with a quiver of arrows for her back, but if you put the quiver on, you can’t put her hair on without her head sticking up. I tried to angle the head slightly, but the hair still doesn’t fit. The simple answer is to take the quiver off. Then why have the bow and arrow? Maybe she can just hold the apple…