Brickcon 2022 - Swag

If you go slightly earlier in the Blog, you can read about my BrickCon ‘22 virtual experience. Prior to the start I pre-ordered some swag. My shipment arrived shortly after Brickcon ended (like a few days later). I think I paid a little over $100, including shipping for my swag. Here’s what I received:

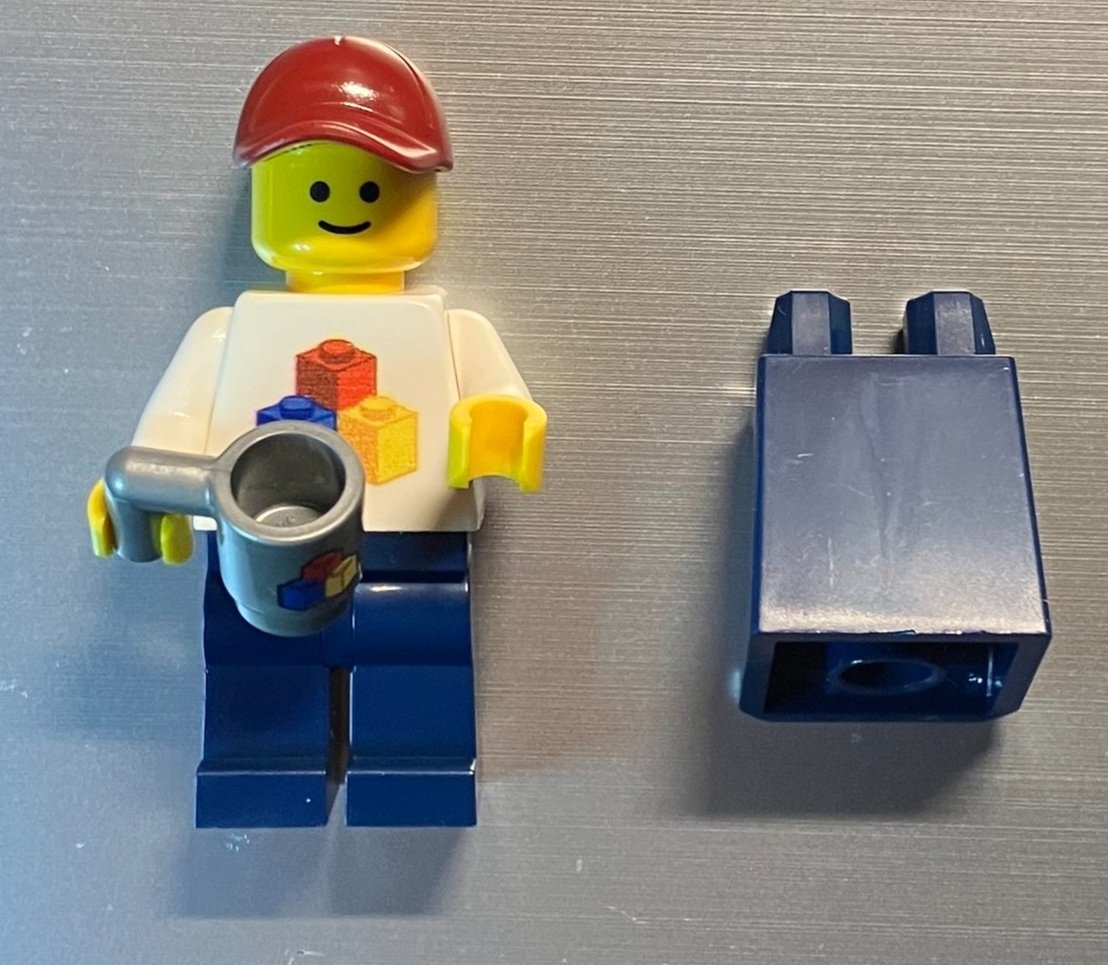
A custom printed minifigure is the first item. This one came with pants and a dress. The torso has the BrickCon logo on the front and then “Established in 2002” on the back. It has the original yellow minifigure head with smiling face and then a red hat. Also included is a coffee mug with the BrickCon logo printed on it. I like it!

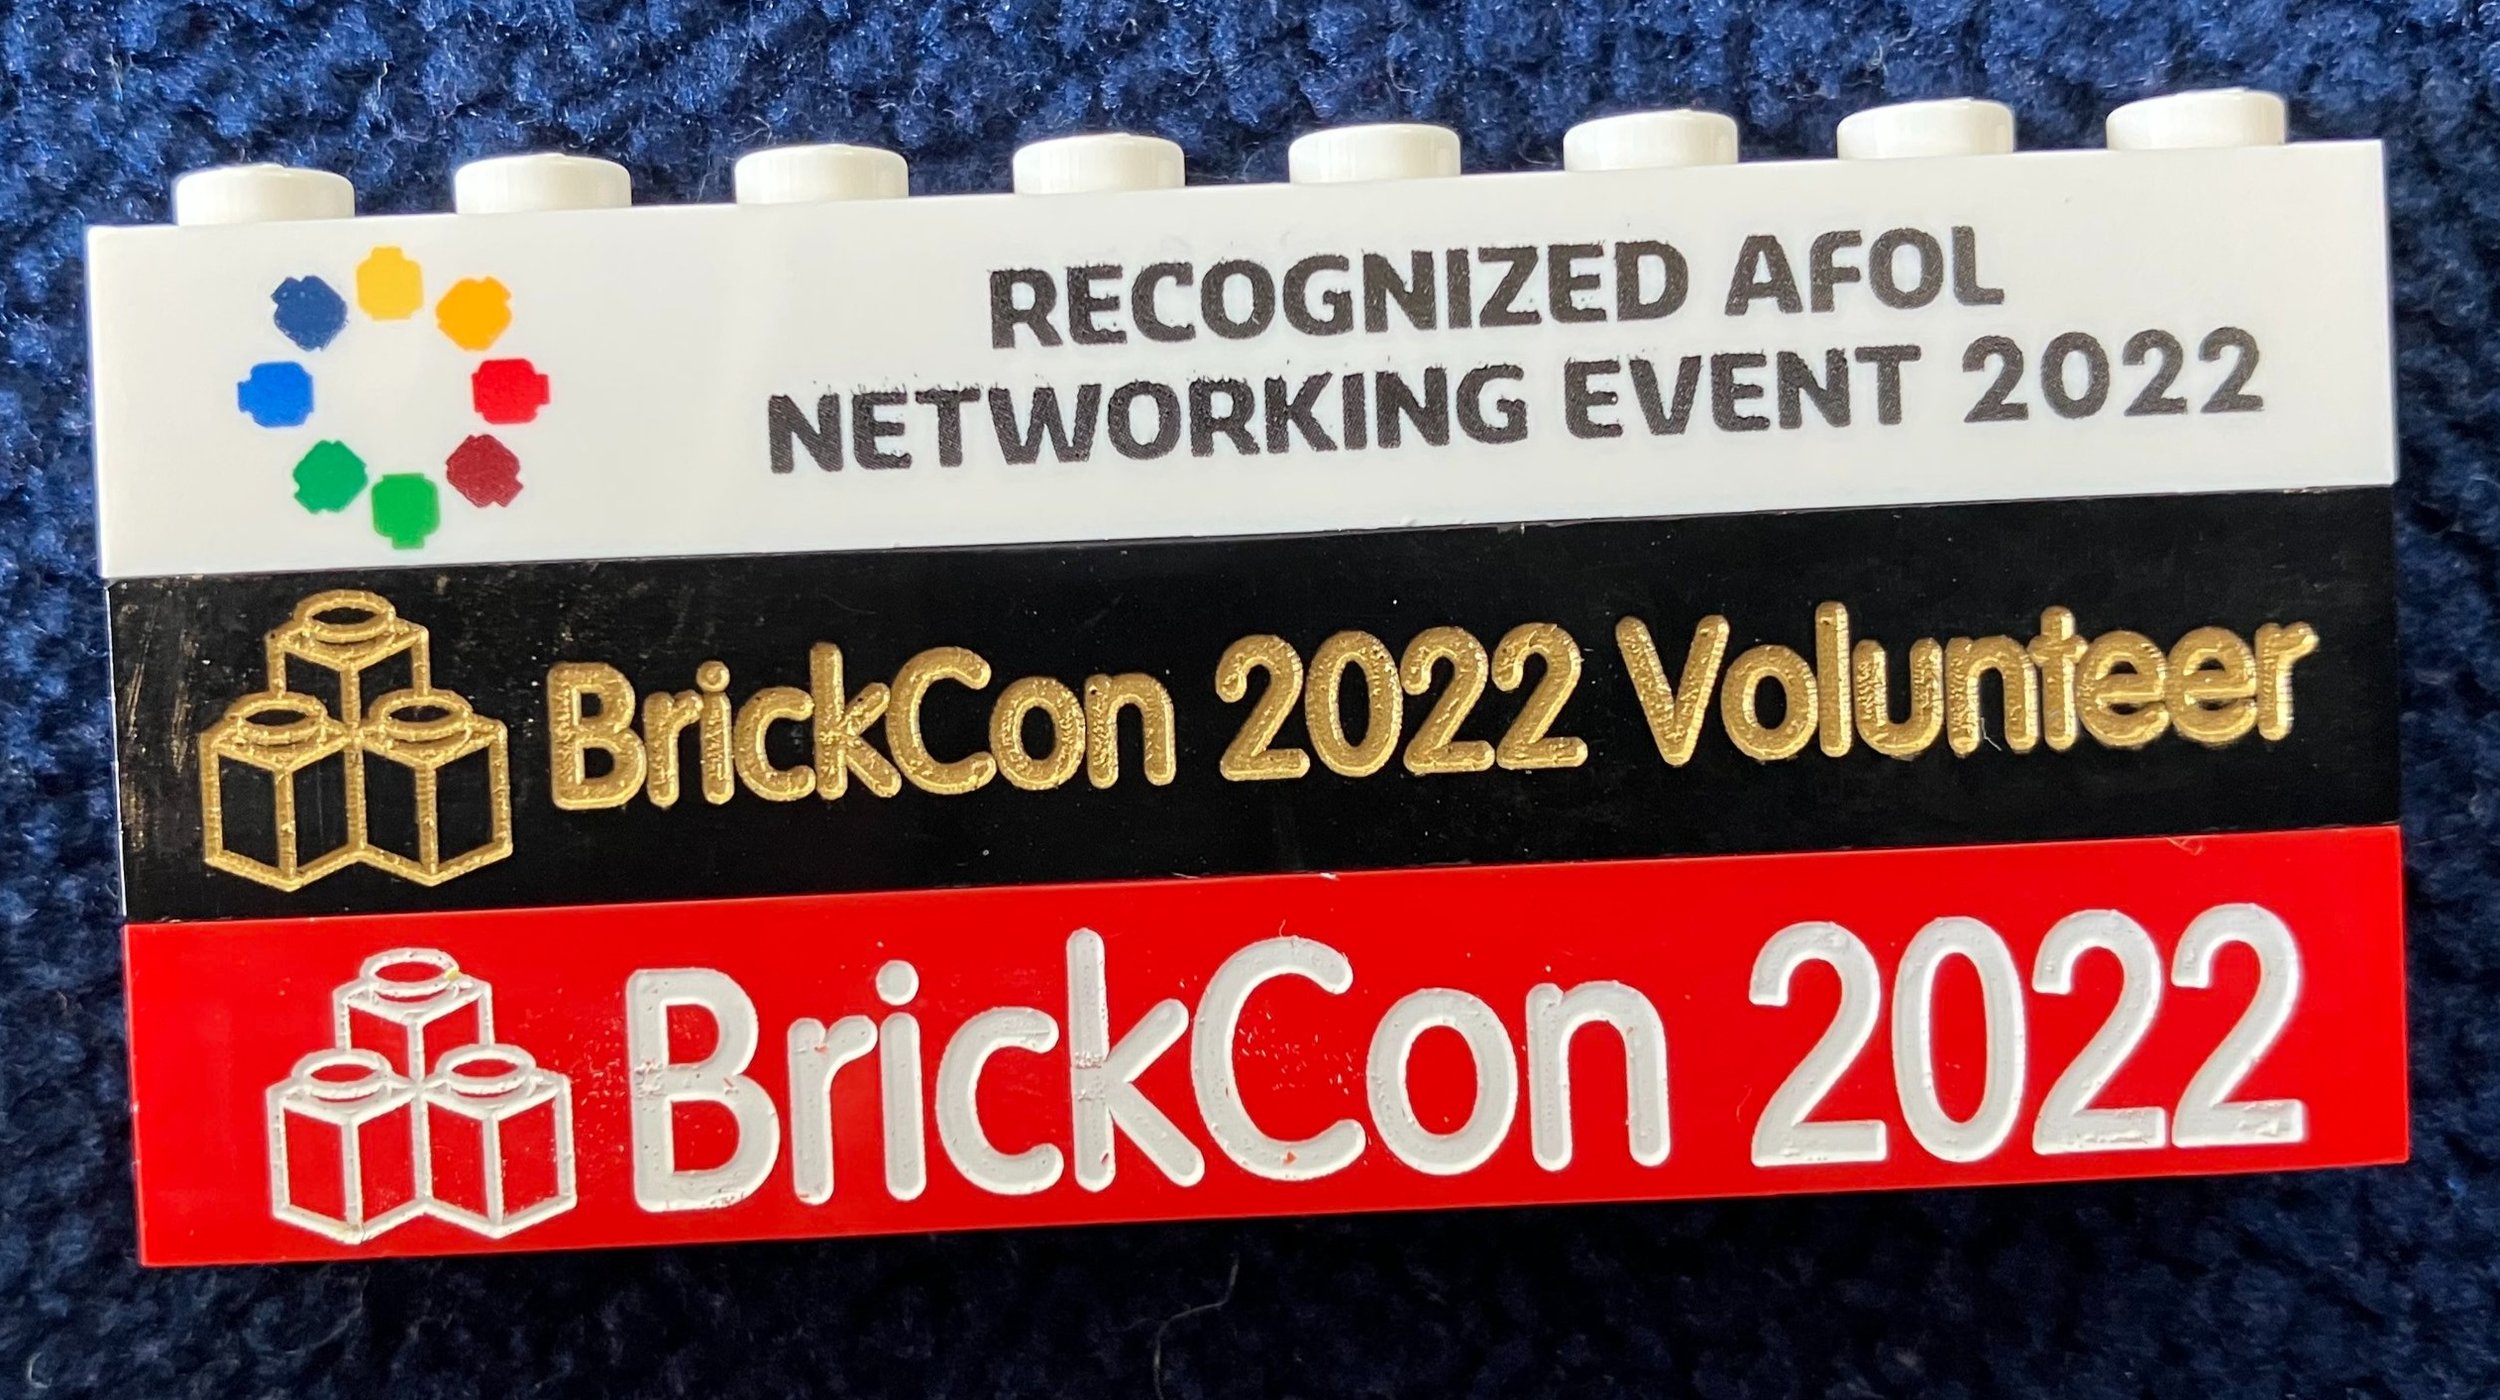
Next up were printed bricks. You could get 2 custom bricks so I ordered one for each of my kiddos. One was yellow with black lettering and the other was blue with white lettering. They were excited to receive them. I also received a BrickCon 2022 brick, a BrickCon Volunteer brick for being a Trusted Virtual Guide (TVG), and then a Recognized AFOL Networking Event 2022 brick. My collection continues to grow.

Next was a small kit of parts to assemble the BrickCon logo in brick form. I did built and I proudly have it displayed on my desk. Perhaps I’ll have to look into making a bigger version.

This year also included a collectible metal cup with an engraved BrickCon logo on it and then a BrickCon deck of playing cards. I haven’t opened the cards yet, but hopefully they have something related to the theme versus the standard playing card design.

Also included was a back pack/bag branded by BrickNerd. Probably super useful to carry around the actual convention for storage purposes.

I purchased the shirt separately. As it was the 21st year of the convention, they felt like a party theme fit in so you get a cocktail of some sort with brick ice cubes.

Much like my last time, I got a bunch of bricks for trading. Since I wasn’t there, I didn’t get to trade, but they are some good pieces that they get through LUGBulk. I haven’t looked them all up on Brickset yet, but they all seem like bricks that aren’t super common. I got a bag of printed tiles from the Haunted House set. Not sure what I’ll do with all of them, but there they are. Anyone want to trade?

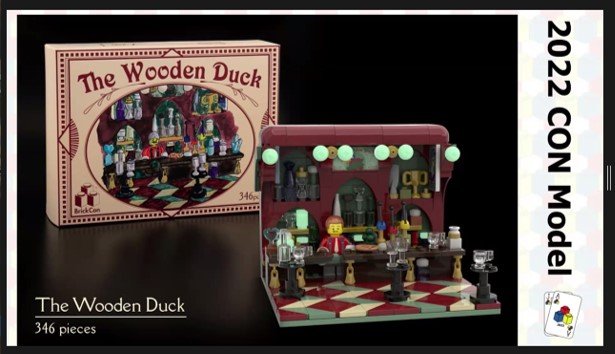
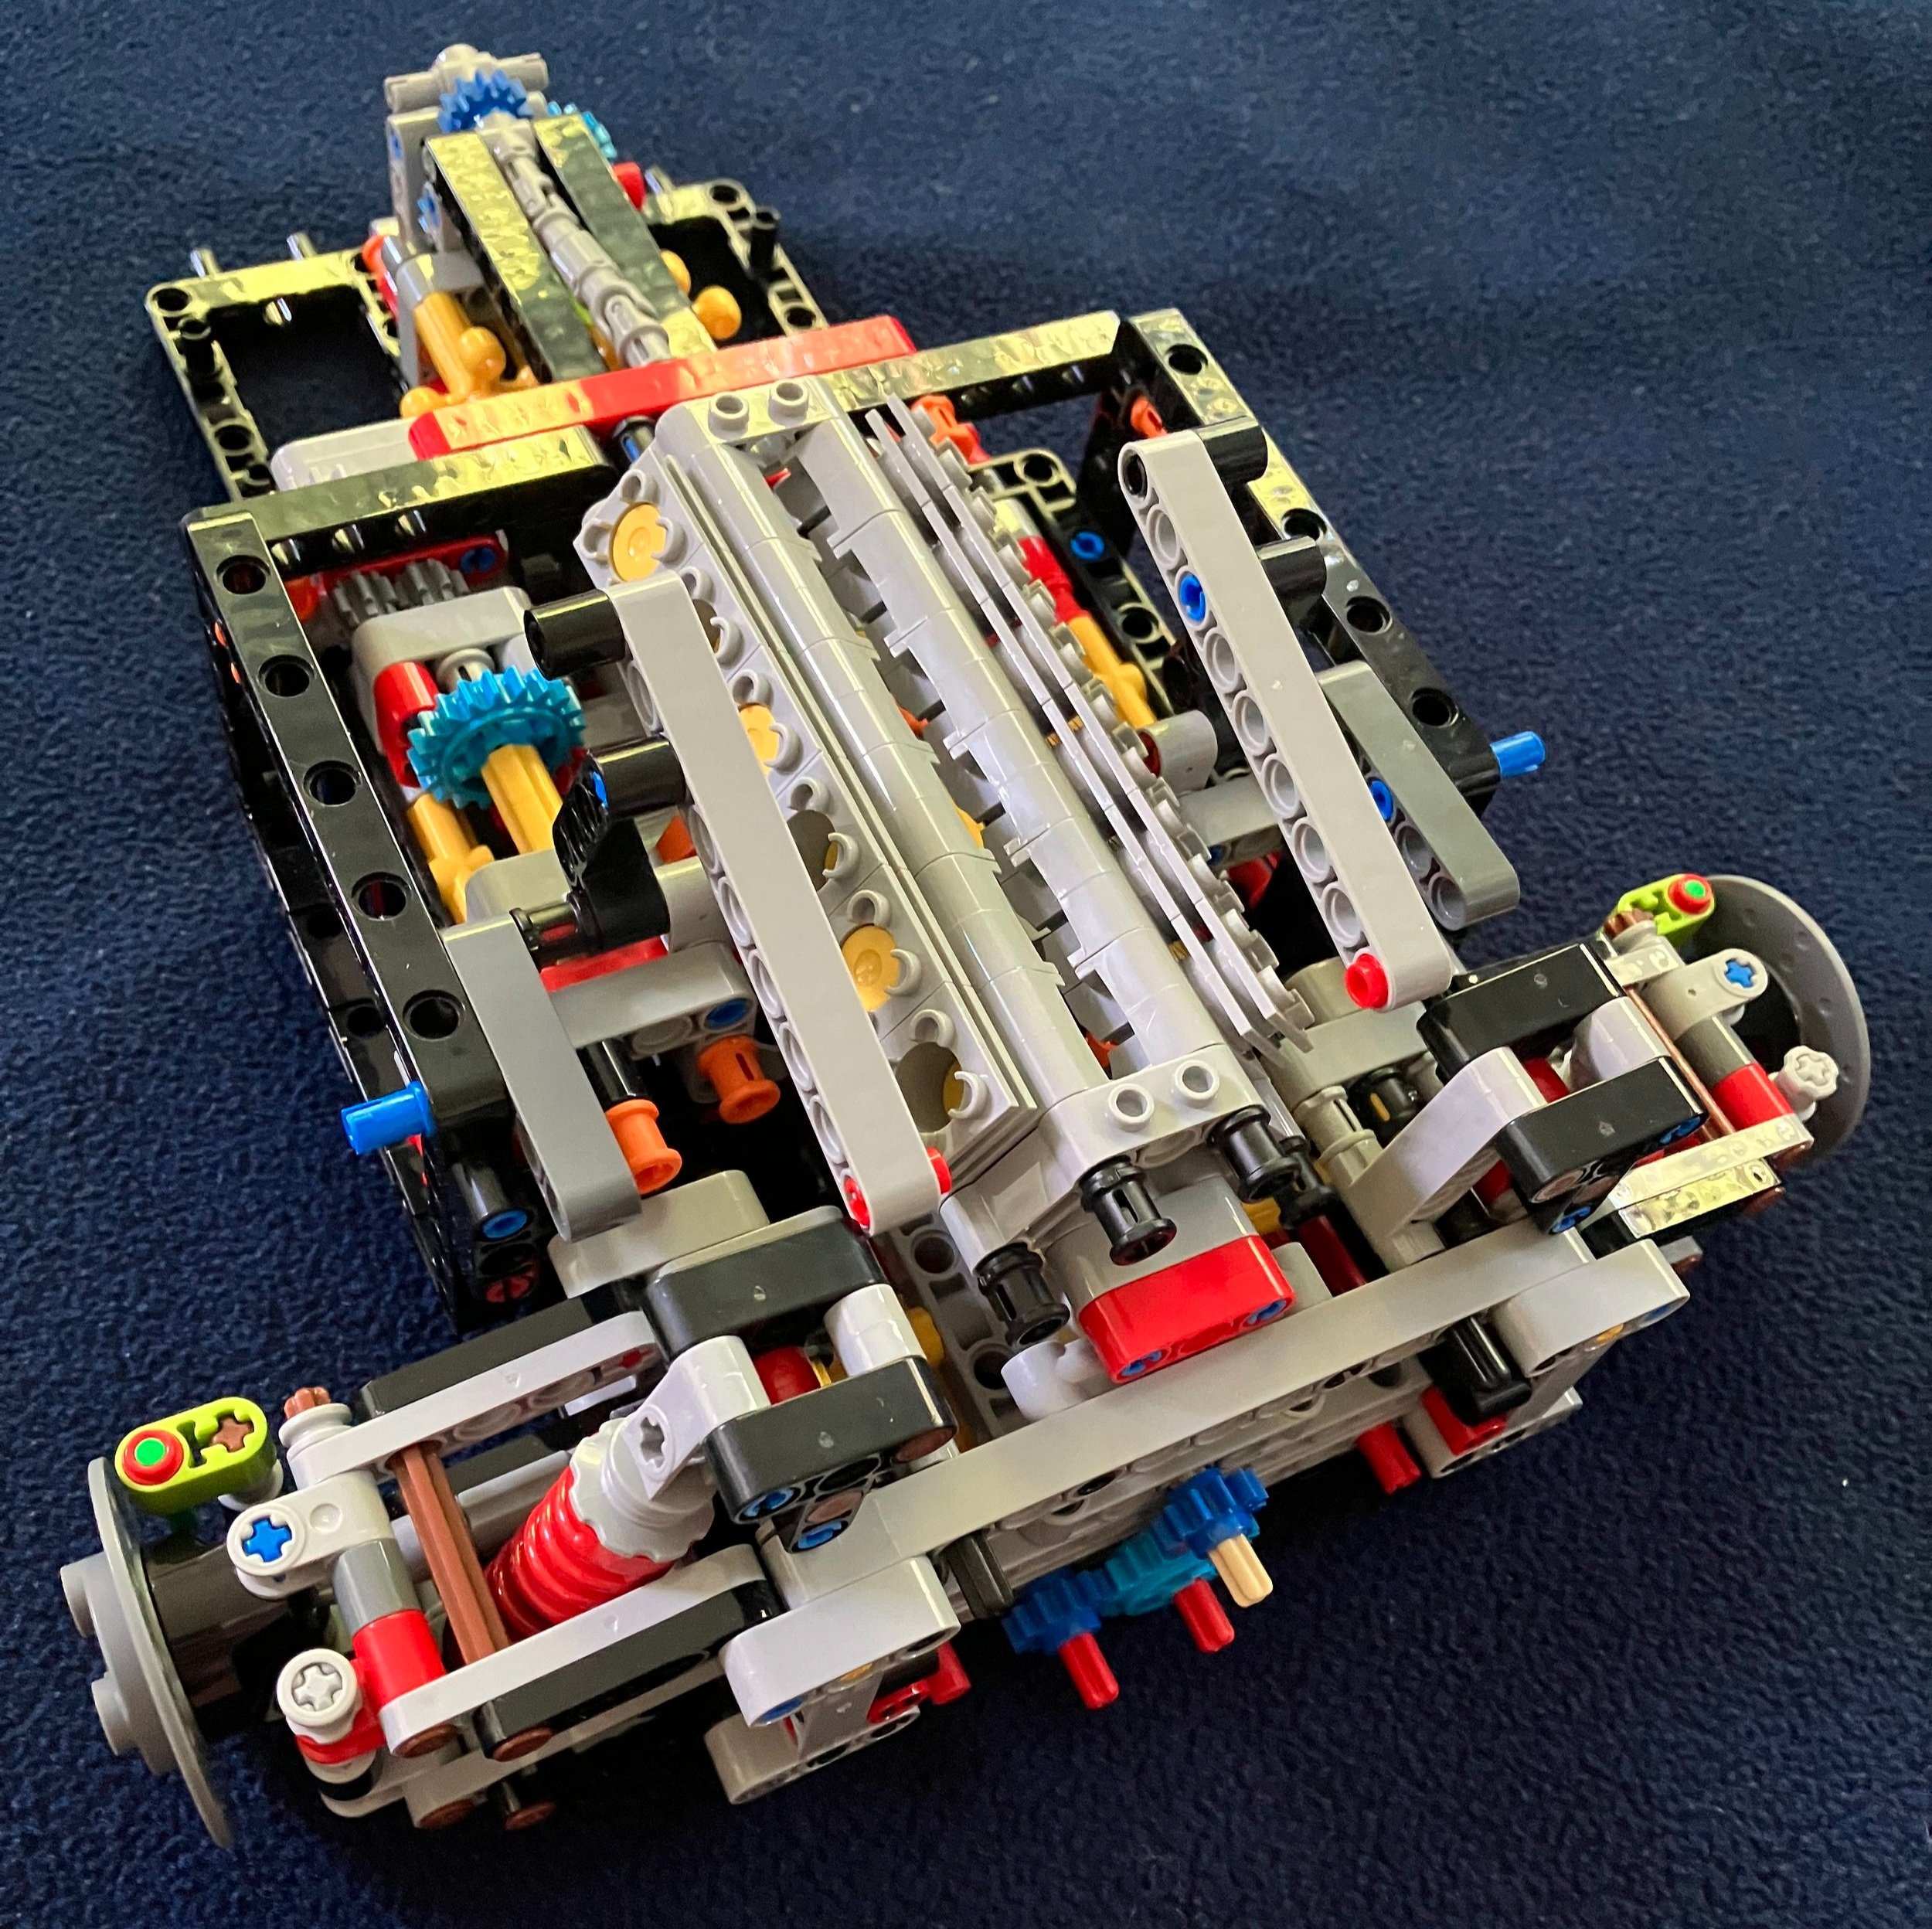
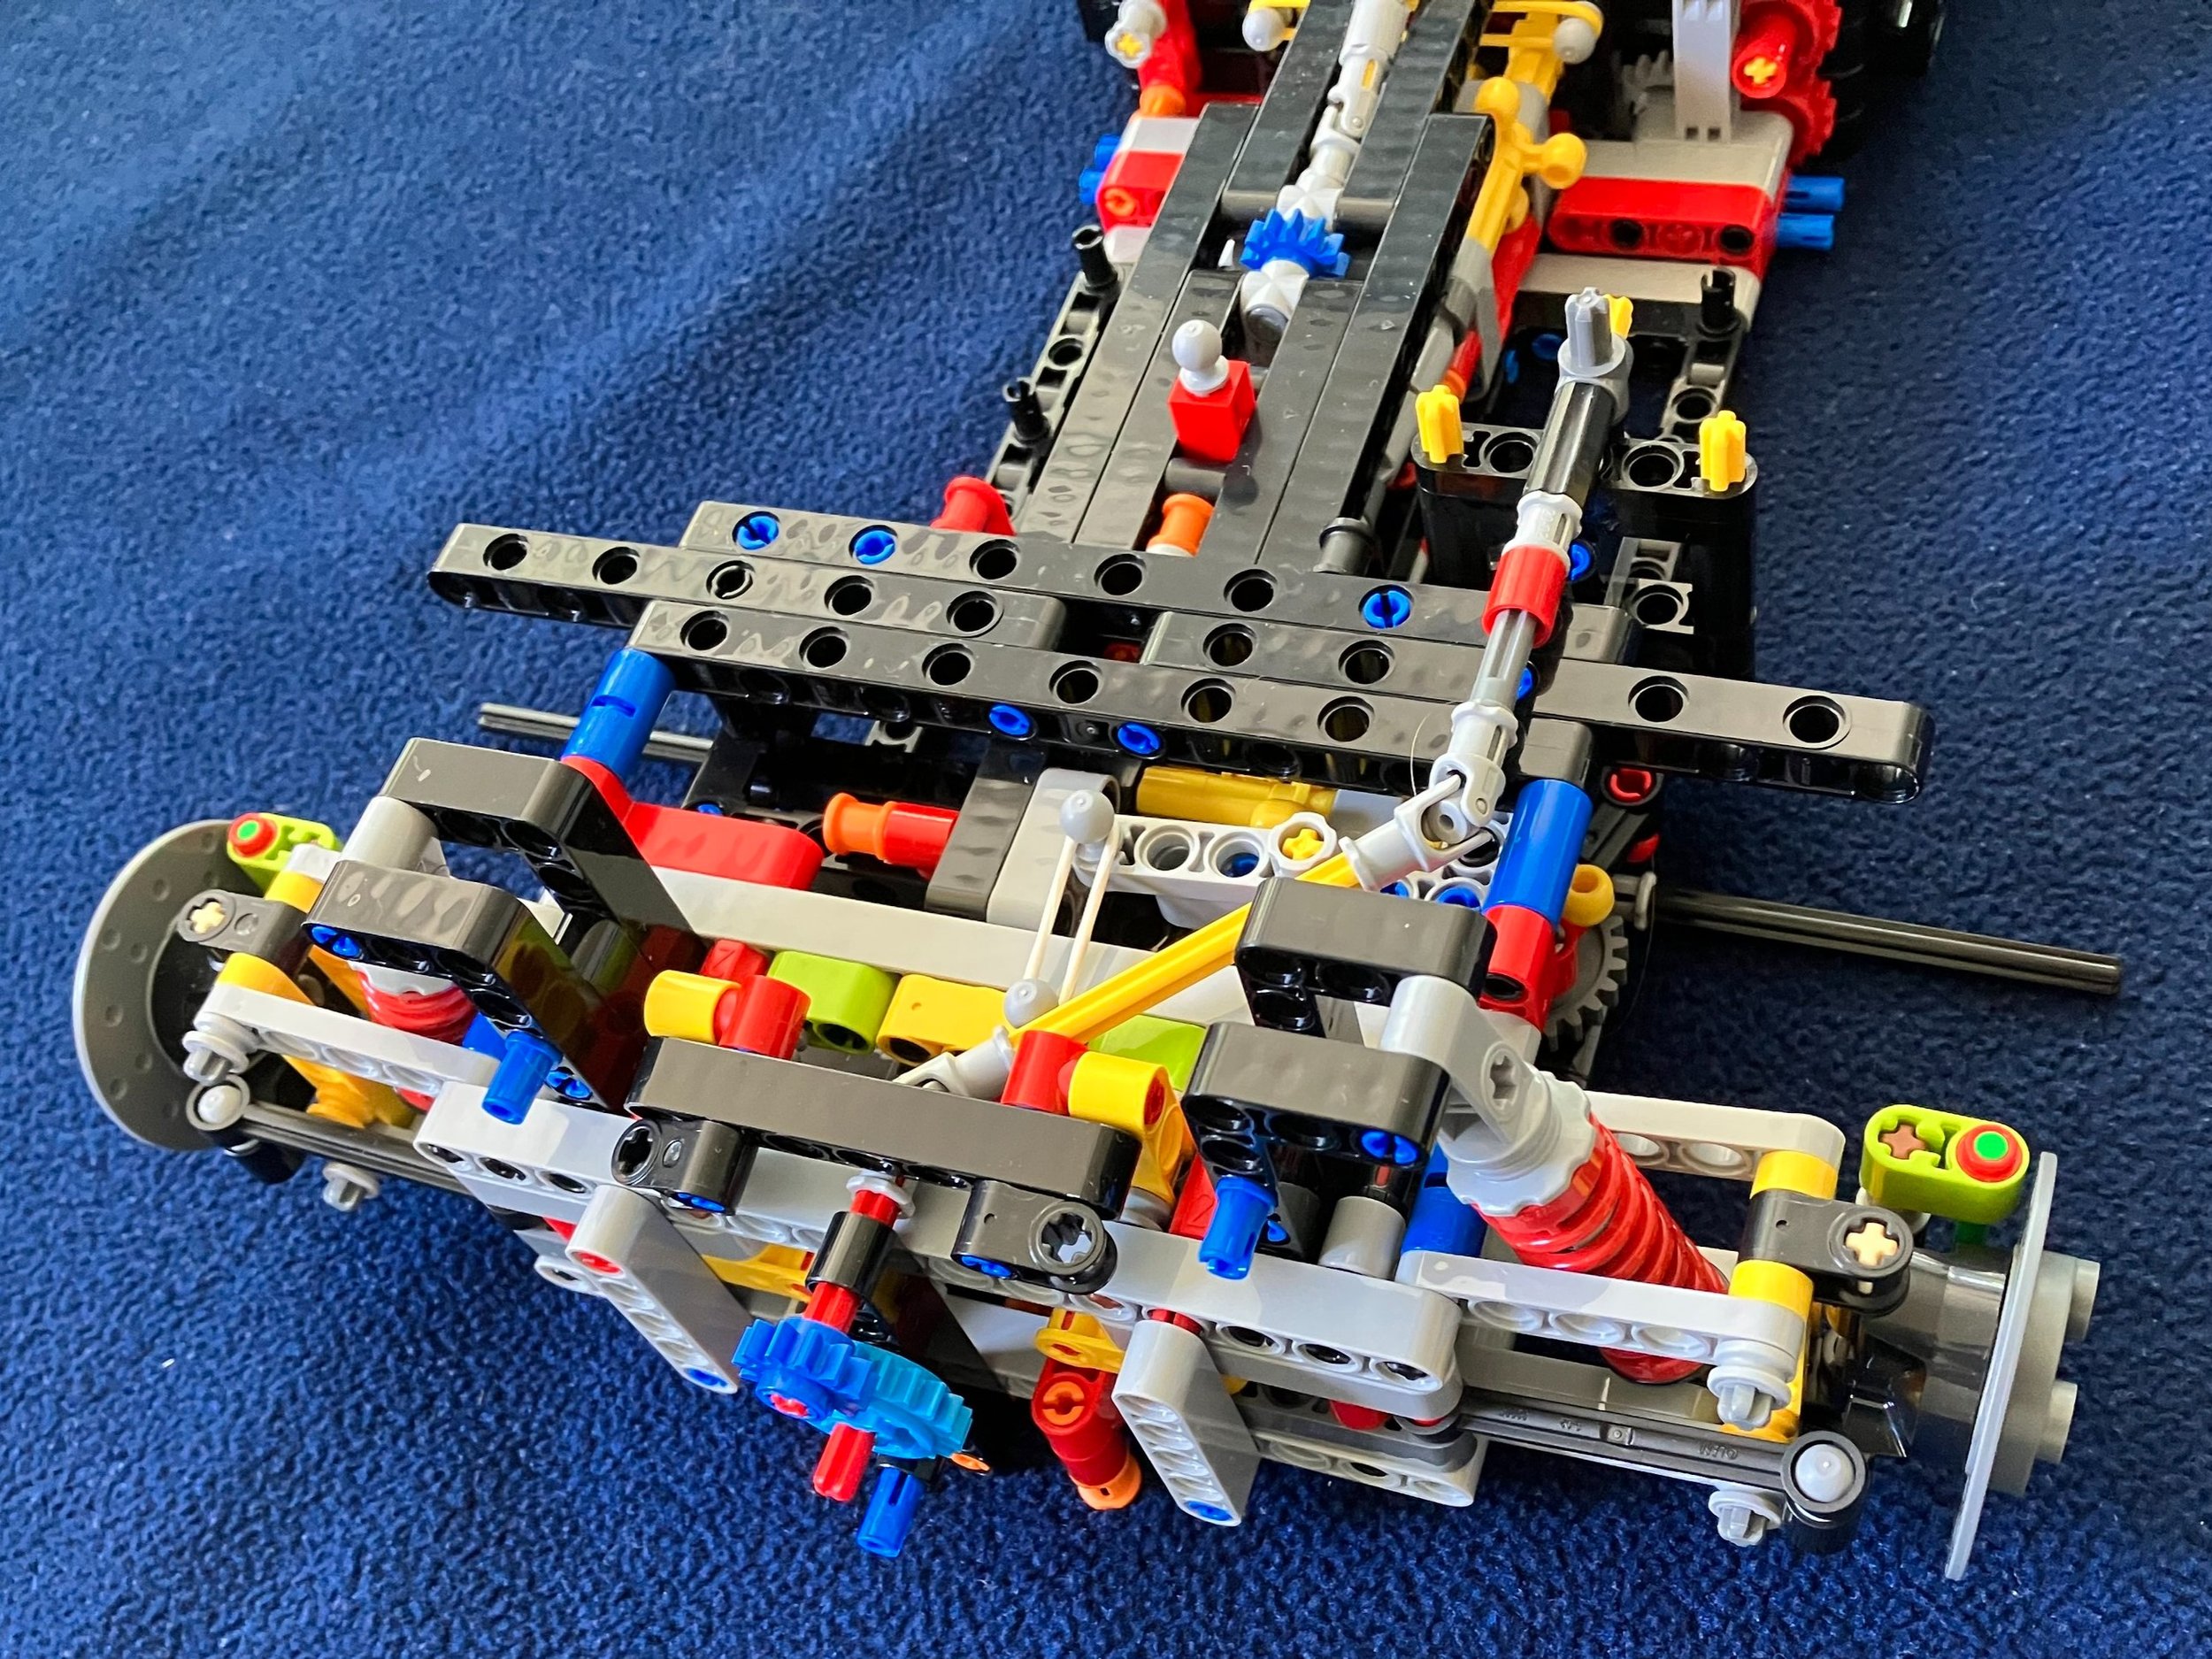
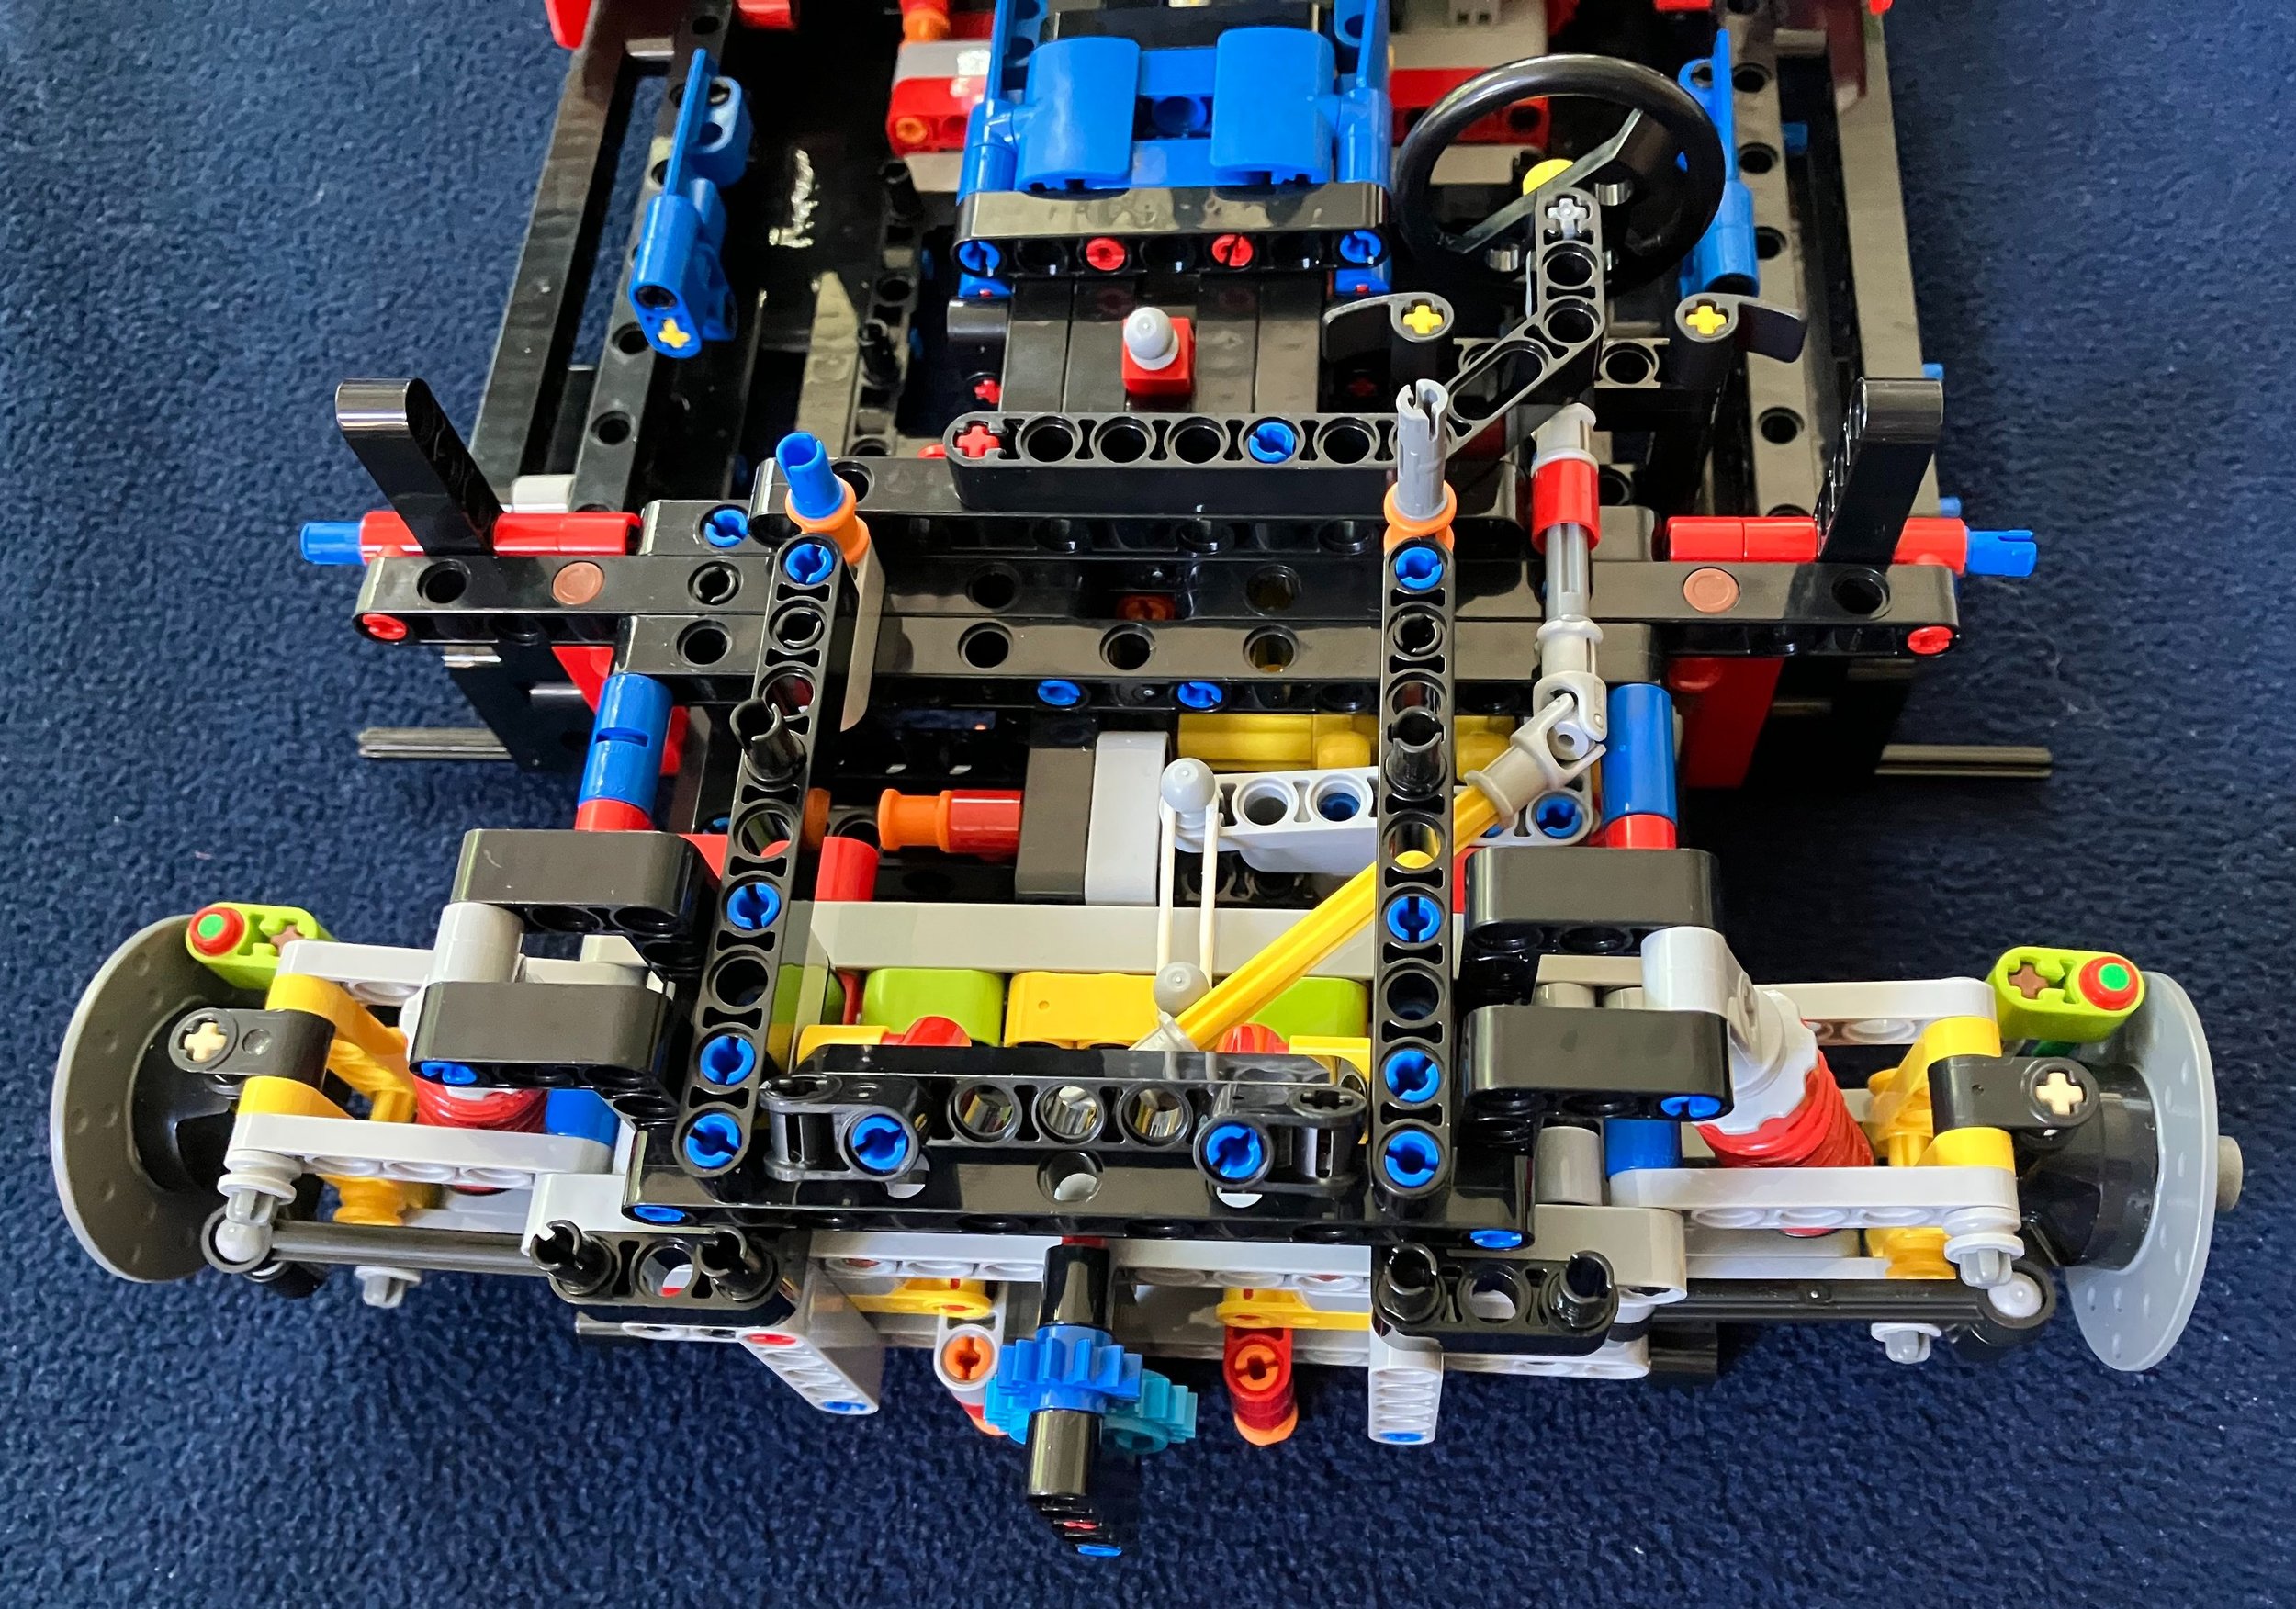
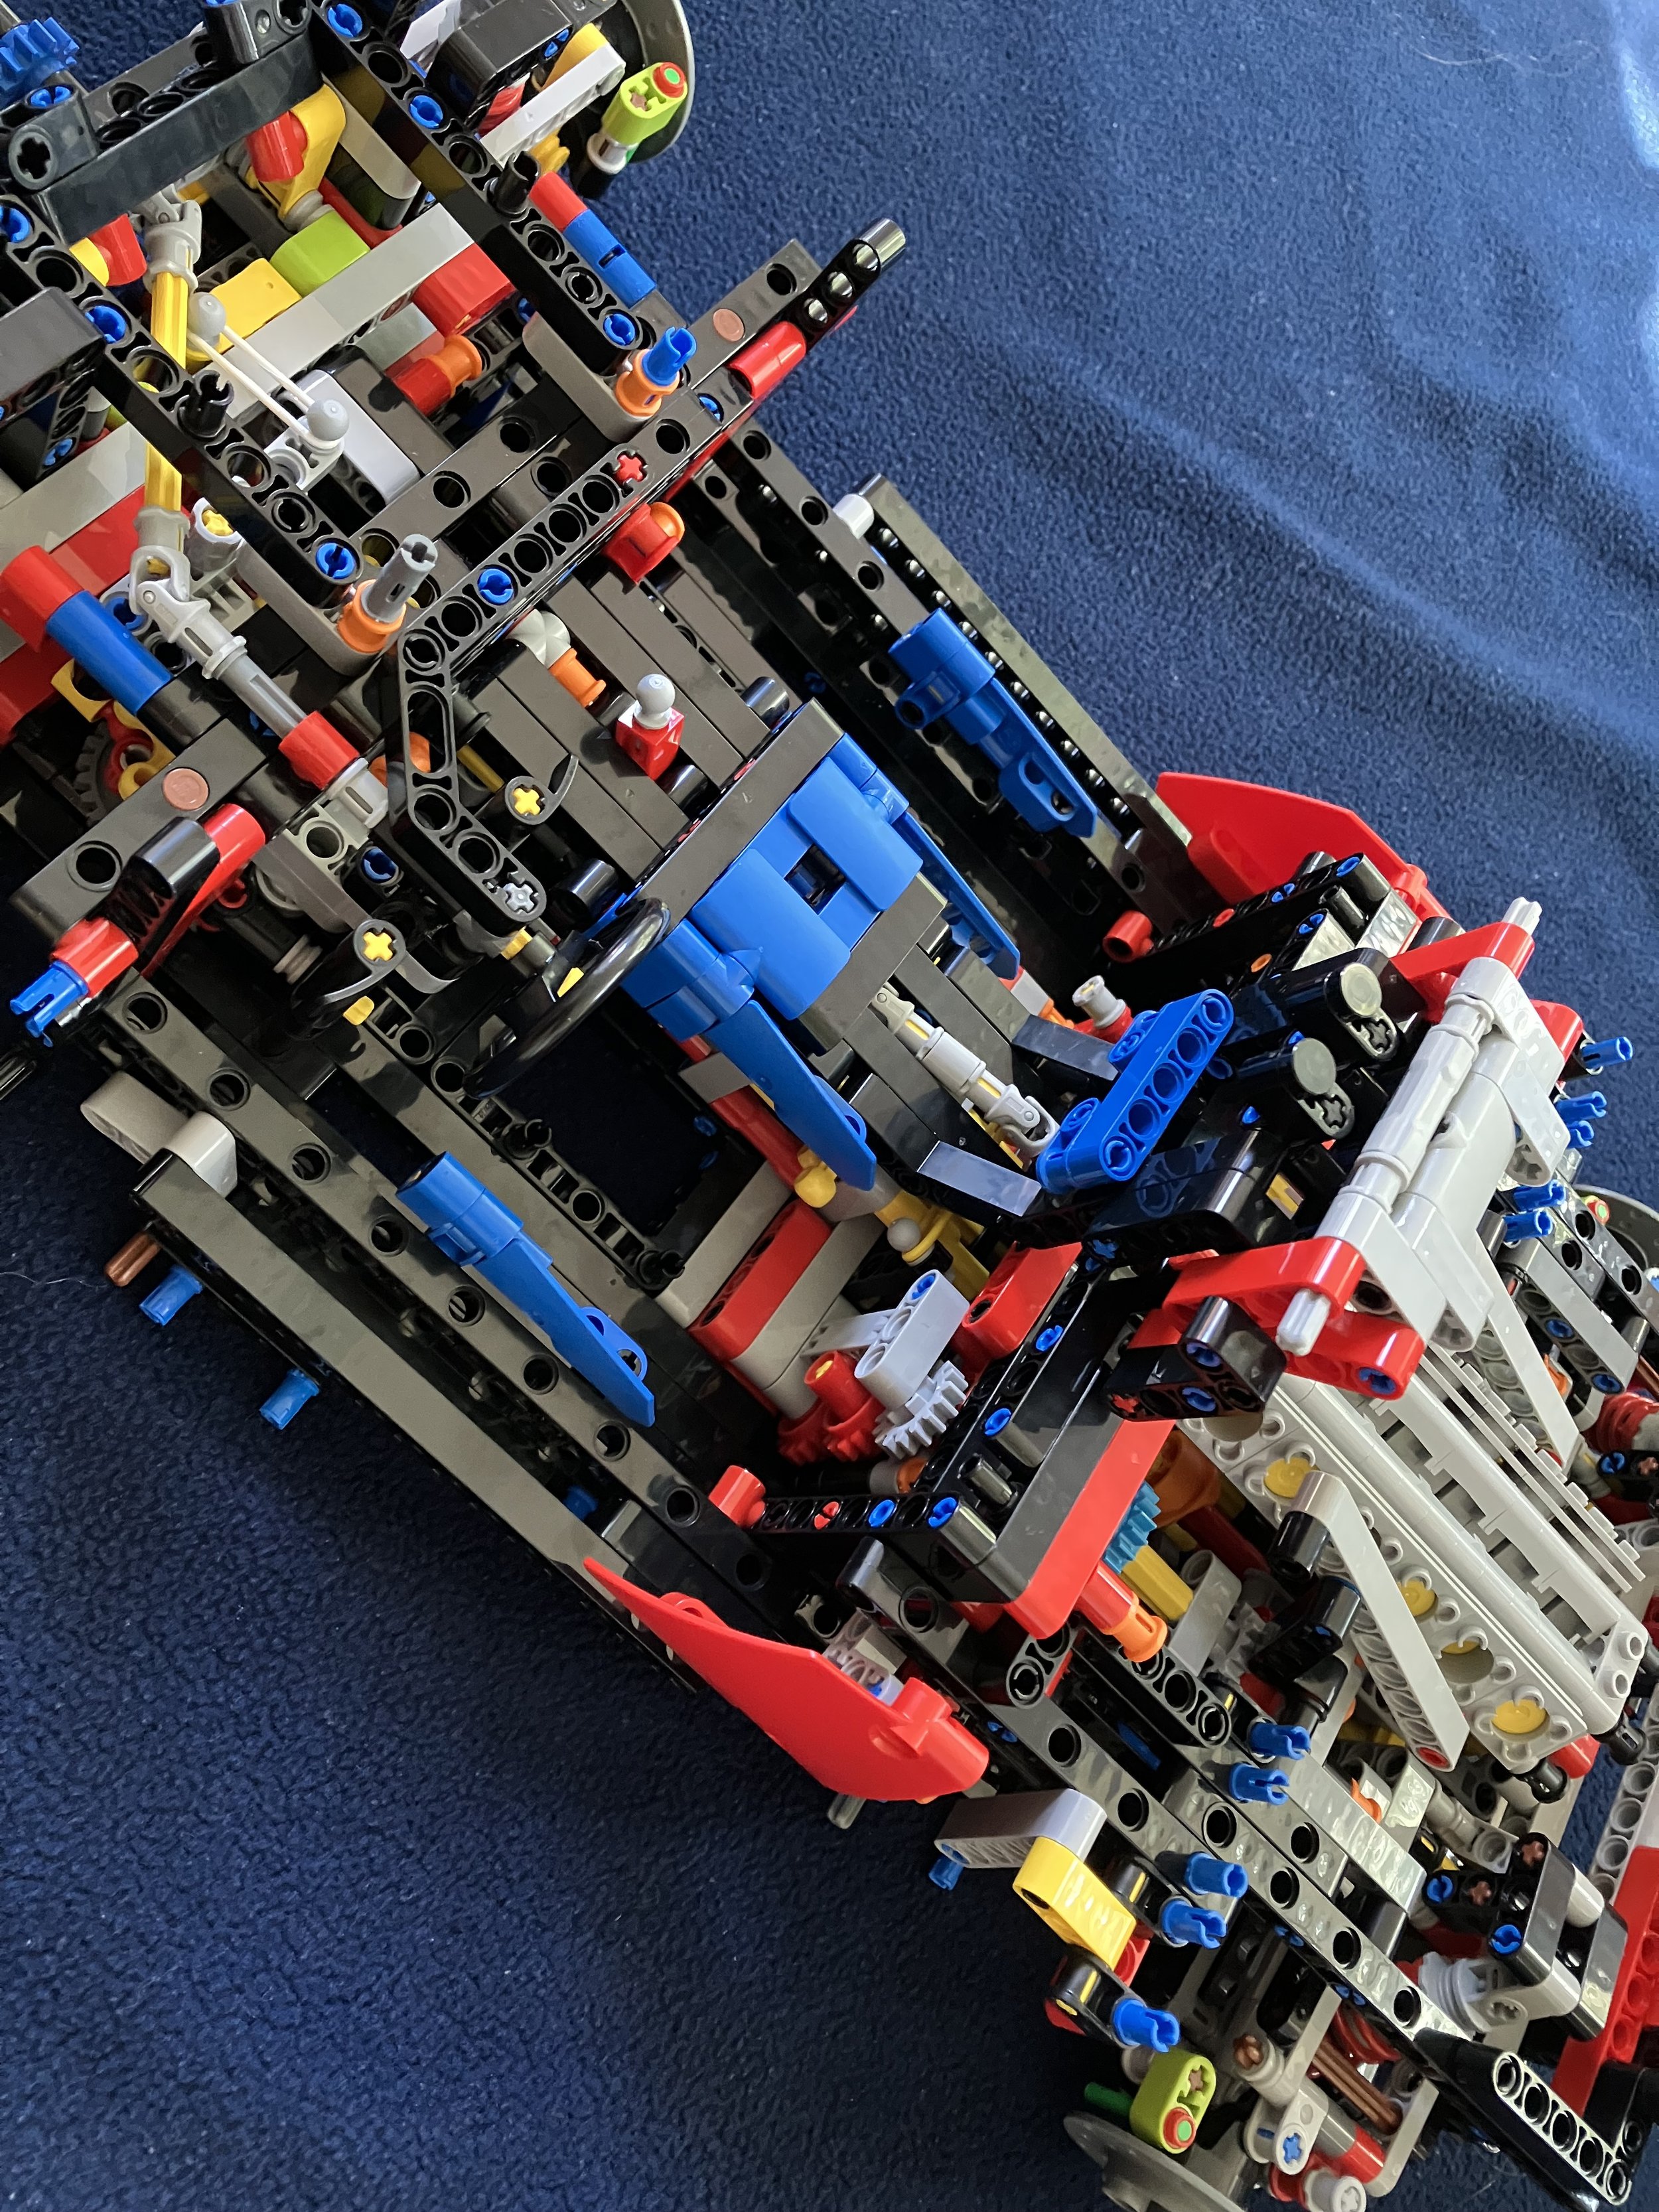
Lastly, I received convention model #184 of 250 made for the convention. The set box got a bit smashed during shipment, but it’s all good. I intend to build it versus adding it to the store. Sorry if you were looking for one. I will do a separate review of the set during another post.

Happy building!

Creations for Charity 2022 - Open Now - 15 October to 30 November

Our campaign for 2021 supported Creations for Charity and while this year we will give to another worthy cause, it doesn’t mean you can’t support more than one. The 2022 Creations for Charity drive started on 15 October 2022. You can see their start post here. If you don’t remember them or you’re new, you can check out what Creations for Charity is about here. Most importantly, you can visit their shop to purchase cool custom MOCs and minifigures. Last year they raised over $35,000 to give to kids at 15 different locations across 7 countries. It would be great to see them expand that further this year.

Also, it’s not too late to donate a MOC. There’s a link on the shop page if you want to do that.

If nothing in the shop looks enticing, you can donate cash as well through their PayPal link.

Lastly, stay tuned for the 24-hour live stream hosted by Beyond the Brick.

Happy building and thanks for giving!.

Set Review: #71034 - Series 23 Collectible Minifigures

We’re at the last collectible minifigure series of the year. #71034: Series 23 contains 12 new minifigures and they were released in the US staring on 26 July 2022. They still retail for $4.99 per bag. This series contains 8 costumed minifigures which is quite high compared to past offerings. Not saying that’s a bad thing, just different from the past. There are also a number of holiday themed minifigures as this series will take us through the end of the calendar year and past Thanksgiving and Christmas LEGO Shop @ Home still gave an initial cap of 16 bags and 2 boxes for 28 minifigures total. We’ll see if that remains or if they end the cap later. I’ve been able to purchase collectible minifigure series offerings from Target and Walmart online with caps on individual orders, but no overall cap.

I don’t see the price changing anytime soon, but of note, I saw Series 22 on sale at Target and Best Buy before it retired so perhaps if you wait, you may see Series 23 go on sale in December closer to when it will come off the shelves.

My comments on the individual minifigures is below. Happy building!


Green Dragon Costume Guy comes with a dragon tail, the wings, a head piece and two horns on top. I think it’s a pretty cool looking minifigure.

Ferry Captain is fun with the giant boat that he’s wearing, but I think the red smoke stack is slightly in the way. I guess you could just remove the one in front of him if you wanted.


Next is two Christmas themed minifigures with Reindeer Costume Girl and a female Christmas Elf. They both come with some extra accessories which is good. The elf is a new torso and hair piece from any of the previous ones so that is a nice addition for anyone looking to add to their Winter Village themed layouts.


Wolf Costume Guy comes with a bag and is licking his lips so he just ate something or maybe hopes to eat something. This one is reminiscent to Series 19’s Fox Costume Girl with the sack and looking for food.

Knight of the Yellow Castle is the name Brickset.com and Bricklink.com list for this one. I’m guessing this is a reference tot he yellow castle of old, but I find it odd that it is colored pink. Wouldn’t it be yellow?


Cardboard Costume girl flashes back to some of the minifigure robots we’ve had in past series. This time, it’s a costumed minifigure.

Popcorn Costume guy has shown up in a lot of great MOCs on line with Series 17’s Corn Cob guy.


Oddly, the Snowman was the hardest one for me to find. I eventually got it and then another so who knows. This one is actually a costumed minifigure. There is a minifigure head underneath the snowman head. Interesting that they chose that option versus just molding a solid snowman head.

Turkey Costume guy is the first Thanksgiving reference we’ve seen in a CMF series, right? This one is pretty fun and comes with a pumpkin.


Lastly we get Sugar Fairy girl. This one is very similar to Series 17’s Butterfly Girl in terms of size and the wings. This one comes with a tutu, candy cane, and a tiara.

Finally, the Nutcracker comes with a sword and a 1x1 round tile printed nut to crack. This figure looks similar to some of the Pirate themed soldiers from the past. You might be able to mix him into a MOC without anyone spotting it.


BrickCon (Virtual) 2022 - Day 4

The last day of BrickCon!

First, I tuned into a Q&A session with Steven Walker about BrickCon and future events. Next year, the physical convention is moving to Bellevue, WA for the first time in 21+ years so there were a lot of questions about that. On the virtual side, they said they will keep it going as long as they can get at least 50 people to attend and they’d like to virtual side to go on 24 hours a day if possible during the convention as they know there are folks in different time zones. Maybe someday, I’ll make it to BrickCon in person.

Next up I attended the BrickCon Commerative Model Q&A with Chris Malloy. Chris has been designing the BrickCon models since 2017-ish. He lost count on the number he’s done in total. Chris went through the design process, challenges with parts, creating the box, designing the instructions, and getting the parts.

Here’s his slide where he introduced himself.

Here’s the final model design. Chris said designing the model was pretty easy. The challenges came in the rest of the process.

Chris mentioned challenges he had with new pieces not being in Stud.io, trying to make sure all the parts could be sourced using the LUGBulk program, and then some issues with printed pieces as seen in some of the examples below.

Here’s the copy of the box. Chris showed how he did a pencil sketch, colored it in, and then it became the box.

The custom tile is original to this set only. The left side shows some of the draft versions before the center one became the final version.

Chris mentioned that he had to add a lot of pieces during each step in the instructions to keep the instructions to a specific page count. This kept the price lower. They considered digital instructions, but decided the better option was to go with printed ones so people could build them at the convention and they wouldn’t have to worry about keeping the instructions active online for years to come.

Great presentation and great model Chris! Thanks to you and the BrickCon team for putting this together. I can’t wait for my set to arrive.

Next up was Stuart Harris from the LEGO® House again. He talked about how they go about developing the exclusive models sold at the brand store in the LEGO® House. Here are the last 3 sets.

Here are some concept models of #40501-1: Wooden Duck. Stuart built the concept models and then turned them over to another designer for the final production model. He also showed how they advertised the set within the LEGO® House.

One interesting note, Kjeld Kirk Kristiansen is the one who approves the sets and Stuart said that while he’s honored that Kjeld is the one to approve, it is pretty nerve wracking to bring a set to his office.

Here is #40502-1: The Brick Moulding Machine. It started off as an idea to make the moulds, but then turned into the machine that you can see in the LEGO® House today.

Next, Stuart talked about #40503-1: Dagny Holm - Master Builder. He talked about Dagny, getting the set built, and choosing what they would go with in a final set.

Stuart talked about the models they design for the LEGO Insider Tour as well, but the more popular discussion was this 3D printed duck below. Here’s an article from Bricket.com on the duck. This was recently released at the AFOL Fan Media Day as well as at Skærbæk Fan Weekend (I think). There were a lot of questions on this duck and a ton of interest. Stuart had one on hand to show off. He mentioned that it may return in a wider offering sometime in the future so we’ll see what happens.

The last presentation I participated in was by Becky Gorlin. She is a middle school level educator and LEGO Robotics Instructor at Granite Falls School District in Washington (about a 50 minute drive from Seattle and the convention area). I sadly didn’t catch the whole thing, but it sounded very interesting and it was cool to see how she uses LEGO in all aspects of education. I’m hoping they post this one online later.

Lastly, the closing ceremony. There were words of thanks, some admin notes, info on future conventions, lots of prizes, and then awards. I didn’t capture all of the awards, but here are the honorable mentions and winner of the Best in Show awards.

First, the 2 honorable mentions. These winners got a copy of #10497-1: Galaxy Explorer. Not sure how the group is going to share the set, but great build!

And the winner got a copy of #10305-1: Lion Knights Castle.

Nice work MOC builders!

It was a great convention, even if I did attend virtually. Thanks to those who worked hard to put it on and safe travels to everyone on their way home.

I will post more once my swag and the convention model arrive.

In the meantime, happy building!

BrickCon (Virtual) 2022 - Day 3

Back for more fun!

We started the day watching a tour of the convention floor before the public was allowed in. It was quick but great to see everything. I hope it gets posted online so I can go through it again and hit pause to look at things.

The first presentation I attended was by LEGO® House employee Stuart Harris. I have heard presentations by Stuart before and am familiar with the LEGO® House based on my 2019 visit there. I tuned in to get an update on some of the changes which was good. Beyond that, a lot of it was a repeat, but that was okay. Stuart was in person at the convention so that was a nice change versus having a lot of the LEGO® employees online.

The next event I attended was titled “Building Feedback: Peer Review in the LEGO Community” and it was presented by Kyle Keller who also writes for the Brothers Brick. Initially, I thought it was a bit ridiculous. Have we lost the ability to communicate with each other without hurting feelings or being rude? I would think this should be obvious, but I need to step out of my box and understand that the world is different. It was probably a good thing for people to realize that they can’t hide behind their online firewalls and need to give good constructive feedback. Kyle gave some lessons and then did practice with some pictures of old builds that he had. Props to Kyle for handling a challenging topic.

The last presentation I attended was by Deb Banerji titled “Lego Mosaics: Algorithms, Software, and Other Fun Stuff.” Deb built an open source program to take pictures and turn them into mosaics out of LEGO parts. He explained how he optimized the program, some challenges still involved, and a lot of other higher math that was above my brain. Very interesting though. The link to his site is below or you can find it here.

The awards ceremony was on day 3, but it was a bit late for me. I hope the best folks won!

BrickCon (Virtual) 2022 - Day 2

Day 2 was another great day. I started off by attending a few presentations. The first one was “The Lego News Room: Working at the Speed of Social Media.” This was about how LEGO in the US handles social media, carries on conversations across multiple channels, and keeps up with real time popular items. I’m not great at social media by any means so this was eye opening to me and it was interesting to hear what they had to say.

The next presentation I joined in on was “New Element Design from a Mechanical Engineering Perspective.” Two engineers from LEGO in Billund, Denmark talked about some of the parts they’ve designed, some of the challenges they’ve encountered, and what their experiences are working on the team.

Here are a few copies of slides they presented with examples of some parts the presenters worked on. They did specific parts, not the full minifigues.

They also showed us some of the software they use to make changes to parts. The picture below is an example of a part that they walked us through to talk about how they adjusted a part to improve its quality.

The next session I joined was an Ask Me Anything session with Jordan Paxton of the AFOL Engagement Team. Jordan helps run the LEGO® Ambassador Network (LAN) and while I have been a part of conversations with the LAN and AFOL Engagement Team in the past, this one was very heated and emotional. I was actually quite shocked how passionate people were. I’m not 100% certain on what is going on, but I guess a few LEGO User Groups (LUGs) were removed from the LAN and with that, they lost access to support from the LEGO Group and discount parts.

Two notes I did take were that we shouldn’t expect to see new set reveals at conventions and the brittle brown bricks issue has been solved, but LEGO has done a poor job advertising it. I guess the brown parts were stored at the top of the warehouse (warmest) and there was a color change issue that took place. Since then, they have added fans to warehouse and the issue has been fixed. What are you all seeing with your newer brown pieces?

The last thing I participated in was the Keynote presentation which was given by Angus MacLane. He is probably best known as a Director with Pixar, but is also an AFOL. I didn’t know it, but he was the fan designer behind set #21303-1: WALL-E. He stated that he was in the perfect position for the build as he was a part of the movie team so he knew about WALL-E well in advance and could start working on a LEGO version. Also, he was the one to approve the IP for Pixar so the LEGO designers had to work with him on any changes they made.

His introduction was given by someone in a Buzz Lightyear costume which was awesome!

He bragged that in making the Lightyear movie, he made sure the ship had a yellow windscreen to make sure that LEGO produced another yellow windscreen part. I don’t know how true that is, but I’m not sure I care. Glad the piece is out there now.

His talk was awesome, well put together, and very relatable for LEGO fans. As someone mentioned, this session was well worth the $25 registration fee to sign up. I actually think it may end up on YouTube in the near future. If it does, I’ll add a link.

The main purpose of the talk was to present how he goes about building MOCs. He uses the SUCCS method (defined below) and he went through various examples of builds he’s done and how he used this method. I don’t think I could do the talk justice here so just stay tuned for the video.

Onto day 3! Happy building!

BrickCon (Virtual) 2022 - Day 1

I took some time off from work to attend BrickCon 2022 virtually. It was also a good opportunity to do some building, sorting of parts, and organizing my store so I’ll take it.

Day one was pretty slow. This is due to the physical show just setting up so most of the attendees are assembling MOCs in the main hall.

For those of you not familiar, BrickCon is held in Washington state and this is the 21st year it has been held. 2020 kicked off the virtual side with COVID and BrickCon kept up a hybrid version in 2021. 2022 has a hybrid version as well. You can attend sessions via Zoom, there are games for virtual sessions only, and you have access to a Discord server just for attendees.

The first session I attended was titled BrickCon 101 which was an introduction to attending a virtual Con and was a good overview of the events going forward. I got to hear about some of the events like an auction happening over the weekend and some of the speakers. Also, Stuart Harris from the Lego House popped in to say hi.

Next up, I observed a speed build. I missed the sock build (build a set wearing socks on your hands). The speed build took set #31100-1 and an alternate build to the set was presented to the builders to assemble. The first one to finish won. The alternate build was a windmill and there were 5 participants. I was the only observer and then the BrickCon virtual host. As an observer, you’re supposed to heckle, but I kept my mouth shut mostly and watched. They finished pretty quickly and then a few of us chatted for a bit.

I re-joined my family for dinner and kiddo bedtime prep after this ended.

Next up was the opening ceremony. The virtual crew got to watch the opening ceremony going on live in Seattle. The presentation had a lot of administrative notes and then some information on moving the location in future years.

There were also prizes. In person attendees won a bunch, but the virtual crew also won a few to include…

This guy!!!! WOOHOO!!!

I won #71773-1: Kai’s Golden Dragon Raider from the Ninjago line.

This wasn’t new to those present in person, but for the virtual crew, we got to see the Convention Model for the first time. It’s titled “The Wooden Duck” and it contains 346 pieces. I don’t remember how much it cost, but I should get it sometime in mid to late October. I’m looking forward to it!

Lastly, I checked in with the virtual late night social for a bit before getting to bed. They were playing a LEGO based bingo game online. I played two rounds. You go to a web site, enter your info, and get a card. Then the host did random generated picks of various LEGO elements, minifigures, and other related items. I didn’t win, but it was fun and it was impressive to hear how many people knew which sets some of the obscure pieces were from.

I’m looking forward to day 2. It should be a few presentations and the key note speaker in the evening.

Happy building!

Set Review - #10497-1: Galaxy Explorer - Icons

About a year ago, LEGO ran a vote for the favorite theme to bring back for the 90th anniversary of the company. The votes were tallied and Castle ended up winning. The #10305-1: Lion Knight Castle was the resulting set from the vote. As a bonus to fans, we also got this set which is #10497-1: Galaxy Explorer. This set is a remake of 1979’s set #497: Galaxy Explorer. The original set had 338 pieces and retailed for $32. The new set contains 1,254 pieces and retails for $99.99 in the US. This works out to $0.08 per piece. The set was released on 20 June 2022 in the US and it is still out at the time of this post. I purchased the set on pre-order straight from LEGO Shop @ Home, but Walmart has had the set on sale for $75 for the past week or so. I’m not sure how long that sale will last, but it’s crazy to see a new set discounted so quickly after it’s release. It makes me wonder if the set isn’t selling as well as LEGO had hoped.

The box is designed after the old box style and is similar to #21322-1: Pirates of Barracuda Bay. It has the 90th anniversary logo on the bottom right on the front and a few other changes like the “18 years and up” for the age versus sets from the 1970s and 1980s. The back of the set shows some of the various play features of the set.

The contents of the set are 9 parts bags, an 8x16 black tile, the instructions (in a sealed bag), and a sheet telling you that some day LEGO will switch over to paper parts bags, but in the meantime you can keep throwing out your single use plastic bags.

The build starts with some inner substructure made of mostly Technic elements. You also build what will become the landing legs that extend down and then retract.

I failed to add it in the picture, but you get a space minifigure in a red suit here as well as a brick separator.

The second bag starts to give the ship it’s shape and adds some of the crew compartment. It’s great to see the printed tiles and bricks from the past return. From the bottom view, you can see the three landing legs. Each of them have a piece that is flat on the bottom and then has studs on top to connect with the rest of the ship. I’m not sure if this is a new piece or not, but it’s a cool use of this part.

Builds three and four help to create more of the shape of the ship. The use of LEGO geometry to create the angles is impressive. Not only are plates used, but the various leading and trailing edges of the ship still match the angles with very little gaps. Well done LEGO design team!

I found the build to be a bit fragile as I was putting it together. There were a lot of parts that kept coming off. This was rectified by the end, but just a note to be careful as you assemble the set.

Throughout the instructions, LEGO included various fun tidbits about the set which were nice to include. You’ll notice the use of colors. The designers only used colors available back in 1979 except for the light gray which was slightly different back then.

Bag three adds another space minifigure. This time it is in white.

Build 5 adds more detail to include the “shooters” on the front, some colored tiles on the top, and the start of the crew compartment. Initially, you attach an assembly of parts to the main structure of the ship with a Technic pin. For a while it just looks awkward as it sits at a weird angle and looks out of place. As you go further, you see that it fits right in and matches the angles perfectly. The fifth bag also includes another red colored space minifigure.

The sixth bag adds more detail to include additions to the crew compartment (beds that support leaving your oxygen tank on), storage for gear, the rear storage section for the space buggy with a ramp that folds out, and the start to where the engines connect.

Build 7 includes a white space minifigure and finishes off the crew compartment. You get additional control panels to add into the back compartment. You also add in the two yellow windscreens. I heard numerous complaints about these screens being scratched, but I didn’t have any issues. The set also comes with more printed parts to include the Classic Space logo and the numbers on the side.

Build 8 completes the rear tail, storage compartment, maneuvering thrusters, and the functionality that lets the rear compartment flip open to let the vehicle out.

This set comes with 4 space minifigures. While we didn’t get any new colors from the past, it’s still great to have additional space suited minifigures to add to the crew. Also included is a robot/droid. It wasn’t in the original set, but was in some of the other Classic Space sets. This one can carry coffee mugs which is fun considering they are in space and the coffee wouldn’t actually stay in the cups.

Here’s the final set. The ninth bag adds the engines. Two are on the sides in the back and two are attached to the back. The two on the sides can be removed and you can stick a minifigure on top to ride them. The ninth bag also adds the space buggy. You can open the rear of the ship, pull out the ramp, and it slides out. This is another cool addition to the set.

I highlighted the landing gear earlier and I took a picture of it extended here. The new piece is great and I like how it extends out to land and then folds up and tucks into the ship to allow it to swoosh away.

Overall, it’s a great set. I think it’s priced well and $75 is an even better deal if you grab it from Walmart. As a Classic Space fan as a kid, I was pumped to see space return and I appreciate the addition of this set to the line. Side note, I voted for the M-Tron theme to return…

I recommend this set for fans into the nostalgia of older LEGO sets as well as new fans. My 5 year old enjoyed playing with the space buggy and minifigures and I’m sure others as well. Also, it’s a great way to get into the 90th Anniversary sets without dropping $400 on the Castle.

Happy building!

2021 Bricklink Designer Program - Round 2 Sets Finally Delivered!

I lost track when I made the initial order. The last estimate I saw, it was 10 months ago. Well, they’re finally here. The 2021 Bricklink Designer Program Round 2 sets are shipping or maybe already arrived to you all. In case you aren’t familiar, the Bricklink Designer Program for 2021 was a chance to bring back some of the non-licensed Ideas sets that received 10K votes, but didn’t make it to production. LEGO, through Bricklink, crowd funded these sets and selected the ones that achieved 10K pre-orders. I managed to get the five that made it and they just arrived. A quick rundown of the sets is below. I’m not sure which ones I will build and which ones I will add to the Bricks for Bricks Bricklink store. You’ll have to check the store for updates.


#910003-1: Mountain Windmill
2,085 pieces
Retailed for $179.99 in the US
$0.086 per piece

The design of this one is cool, but I saw something that it was originally supposed to have minifigures and then they were removed before production. I’m thinking I may add this one to the store at a later date. We’ll see.


#910009-1: Modular LEGO® Store
2,149 pieces
Retailed for $179.99 in the US
$0.084 per piece

The box I received had a few rips to the printing on the box on the side. Nothing major. I like the concept of a modular building that fits with the others, but I’m not sure if I’ll build this one. We’ll see.


#910013-1: Retro Bowling Alley
2,779 pieces
Retailed for $229.99 in the US
$0.083 per piece

The idea of this one is great and the design is cool. Sadly my box showed up pretty beat up. As you can see by the picture of the back of the box, there is a large crease. Some of the seals showed up detached from the box. I will most likely keep this one, but am not sure whether it will be a display piece, if it could fit in a city scene, or if I will build it and then store it for a future date.


#910015-1: Clockwork Aquarium
874 pieces
Retailed for $64.99 in the US
$0.074 per piece

This one is a fun concept, but I’m not sure what I’d do with it. This one will end up in the store at some point.


#910023-1: Venetian Houses
3,470 pieces
Retailed for $289.99 in the US
$0.084 per piece

I think this one is awesome. This is a definitely must build on my part. Sorry if you were hoping it’d end up in the store!


Set Review: #42143-1: Ferrari Daytona SP3 - Technic

The LEGO Group has me hooked on a few of their product lines and one of them is the Technic Supercar series or now referred to as the LEGO Technic Ultimate Car Concept series. You can see my reviews of the previous cars here. This one is #42143-1: Ferrari Daytona SP3. It was released in the US on 2 June 2022 and contains 3,778 pieces. The initial retail price was $399.99 which worked out to $0.106 per piece. Then the LEGO Group raised prices on a bunch of sets to adjust for their input costs and it now retails for $449.99 which works out to $0.119 per piece. Yikes! I thankfully picked it up prior to the price increase and I cashed in a bunch of VIP points to make the purchase not as bad. However, it hurt and these suckers keep getting more expensive. I can’t wait to see what the 2024 car is going to retail for… or not.

The shipping box for this one is much different from the previous three. It is a smaller box and it showed up with the set in a box only in one box versus the set box being inside a box which is inside another box. My set came with a May 2022 production date on it so not bad considering the June release.

Here’s the set box with the build on multiple sides, the Ferrari logo on top, and the bottom has tire tracks that you can’t see in my photo.

Opening the box reveals three boxes that contain the parts and look like the rear of the vehicle which is some pretty cool packaging.

The first box contains the two instruction books on the top and some parts bags on the bottom. I’m not going to dive into the instruction books, but they have some information about Ferrari, the model, the design process, and then some pictures of cars and designs.

Box two is all parts and box three is parts, the wheels, and the hub caps.

The first build is labeled as the gearbox and engine in the instruction manual. This is one of the more challenging sections of the build. There’s a lot to pay attention to in order to make sure all of the gears, pins, and axles are in the right spot. It’s a lot of work for a transmission that is buried within the car. You can see the transmission from the bottom though so it’s not for nothing. Also, you will be able to lift the rear up so you can see the engine.

I don’t remember the previous cars well enough to know how similar this build is to the others, but I didn’t feel like I was building the previous cars all over again.

The second set of bags builds the suspension. You add in the front of the car frame, the front axle, and the steering system. To me, it’s amazing how all of this comes together to see how it looks now and how it looks at the end.

The third set of bags is the car frame/chassis. Here you install the start of the seats, the steering wheel, the pieces that will allow the doors to open and close later on, and a few other parts. The choice of blue and black for the seats is interesting as it’s a red car, but it works.

The fourth set of bags builds the front of the car. Thankfully, there are no stickers to install so the Ferrari logo on the hood, steering wheel, seats, and elsewhere are all printed. Yay! There is a trunk space in this car, but it does not come with a luggage bag like some of the earlier cars which is fine by me.

I like the use of System pieces to add detail to the car. The use of offset stacked plates on the bumper is a cool technique to replicate the shape on the actual car. It’s a nice touch here.

The fifth set of bags builds the rear hood. It also adds the front “windscreen” and some of the roof. Like the previous vehicles, there isn’t an actual windscreen and that’s okay.

The rear hood was a challenge for me to build as I had a hard time following what the instructions wanted me to do on some of it. I figured it out in the end. Note that there are a few errors in the instruction books. I went online and found some good articles highlighting them. Some I caught without looking them up, but a few required me to see why I had extra pieces left over at the end of a section.

The rear hood can be raised which is a nice addition. You can get a good look at the engine instead of burying it like in the last two cars. It doesn’t stay up well as it’s heavy, but I got it to stay long enough to take a few photos.

One part of the build that intrigued me was the use of rubber tubing to hold on some of the structure and give it a curved shape over the rear wheels. I wasn’t sure what the instructions were getting at initially, but when I saw the pieces installed, it’s cool to see how the shape was created with Technic pieces.

The sixth set of bags builds the doors and seats. I failed to get separate pictures of them. The doors swing up in the actual car and the Technic version does the same. The doors were a challenge for me to assemble as the instructions show you connecting pieces, but don’t always show where. One picture will show you assembling a section and the next will tell you to install it. Either I missed something or you have to be smart enough to figure out how to install it.

The seventh set of bags is the final part of the build. It completes the rear of the vehicle, adds the wheels, and the display plate. The rear of the vehicle uses a lot of System pieces to achieve the detail similar to the front. I like the look and the offset plates. There is another error in this section where the instructions don’t have a few parts listed, but I found them online and got it squared away. The wheels are a similar size as previous vehicles, but the rims are a silver color. The 1x1 round tile with the Ferrari logo on the rim is a nice touch.

The Lamborghini had a display plate, although much smaller, and the Ferrari has one as well only this one is larger. The plate is printed so I’m thankful to not have a sticker, but I’m not sure it really adds to the model. I could have done without the plate if it saved a few dollars in production costs and on the final set price.

Overall, it’s a very sleek vehicle. The build was great and it challenged me throughout. I enjoyed putting it together. I’m not a Technic fan or MOC builder so I’m not sure if I’d use the pieces elsewhere, but there are a lot to pick from. The price is high and I can only imagine the price going up for future vehicles so get ready. VIP points are the only way I purchased this one. I highly recommend this one if you’re into the Technic vehicle line or if you’re a System builder and you’re looking for a challenge outside of your building comfort zone. Look for ways to save on this one whether it is double VIP points, cool GWPs, or some other method.

Here are the 4 vehicles. My NLS has let me display them in the house as they are up high and out of the way. I’m sure she can’t wait for me to have a LEGO room of my own some day to contain the spread of ABS. This is a pretty cool line up in my opinion. I wonder what car will be next?

Happy building!