Creator

Set Review - #31109-1: Pirate Ship - Creator 3-in-1

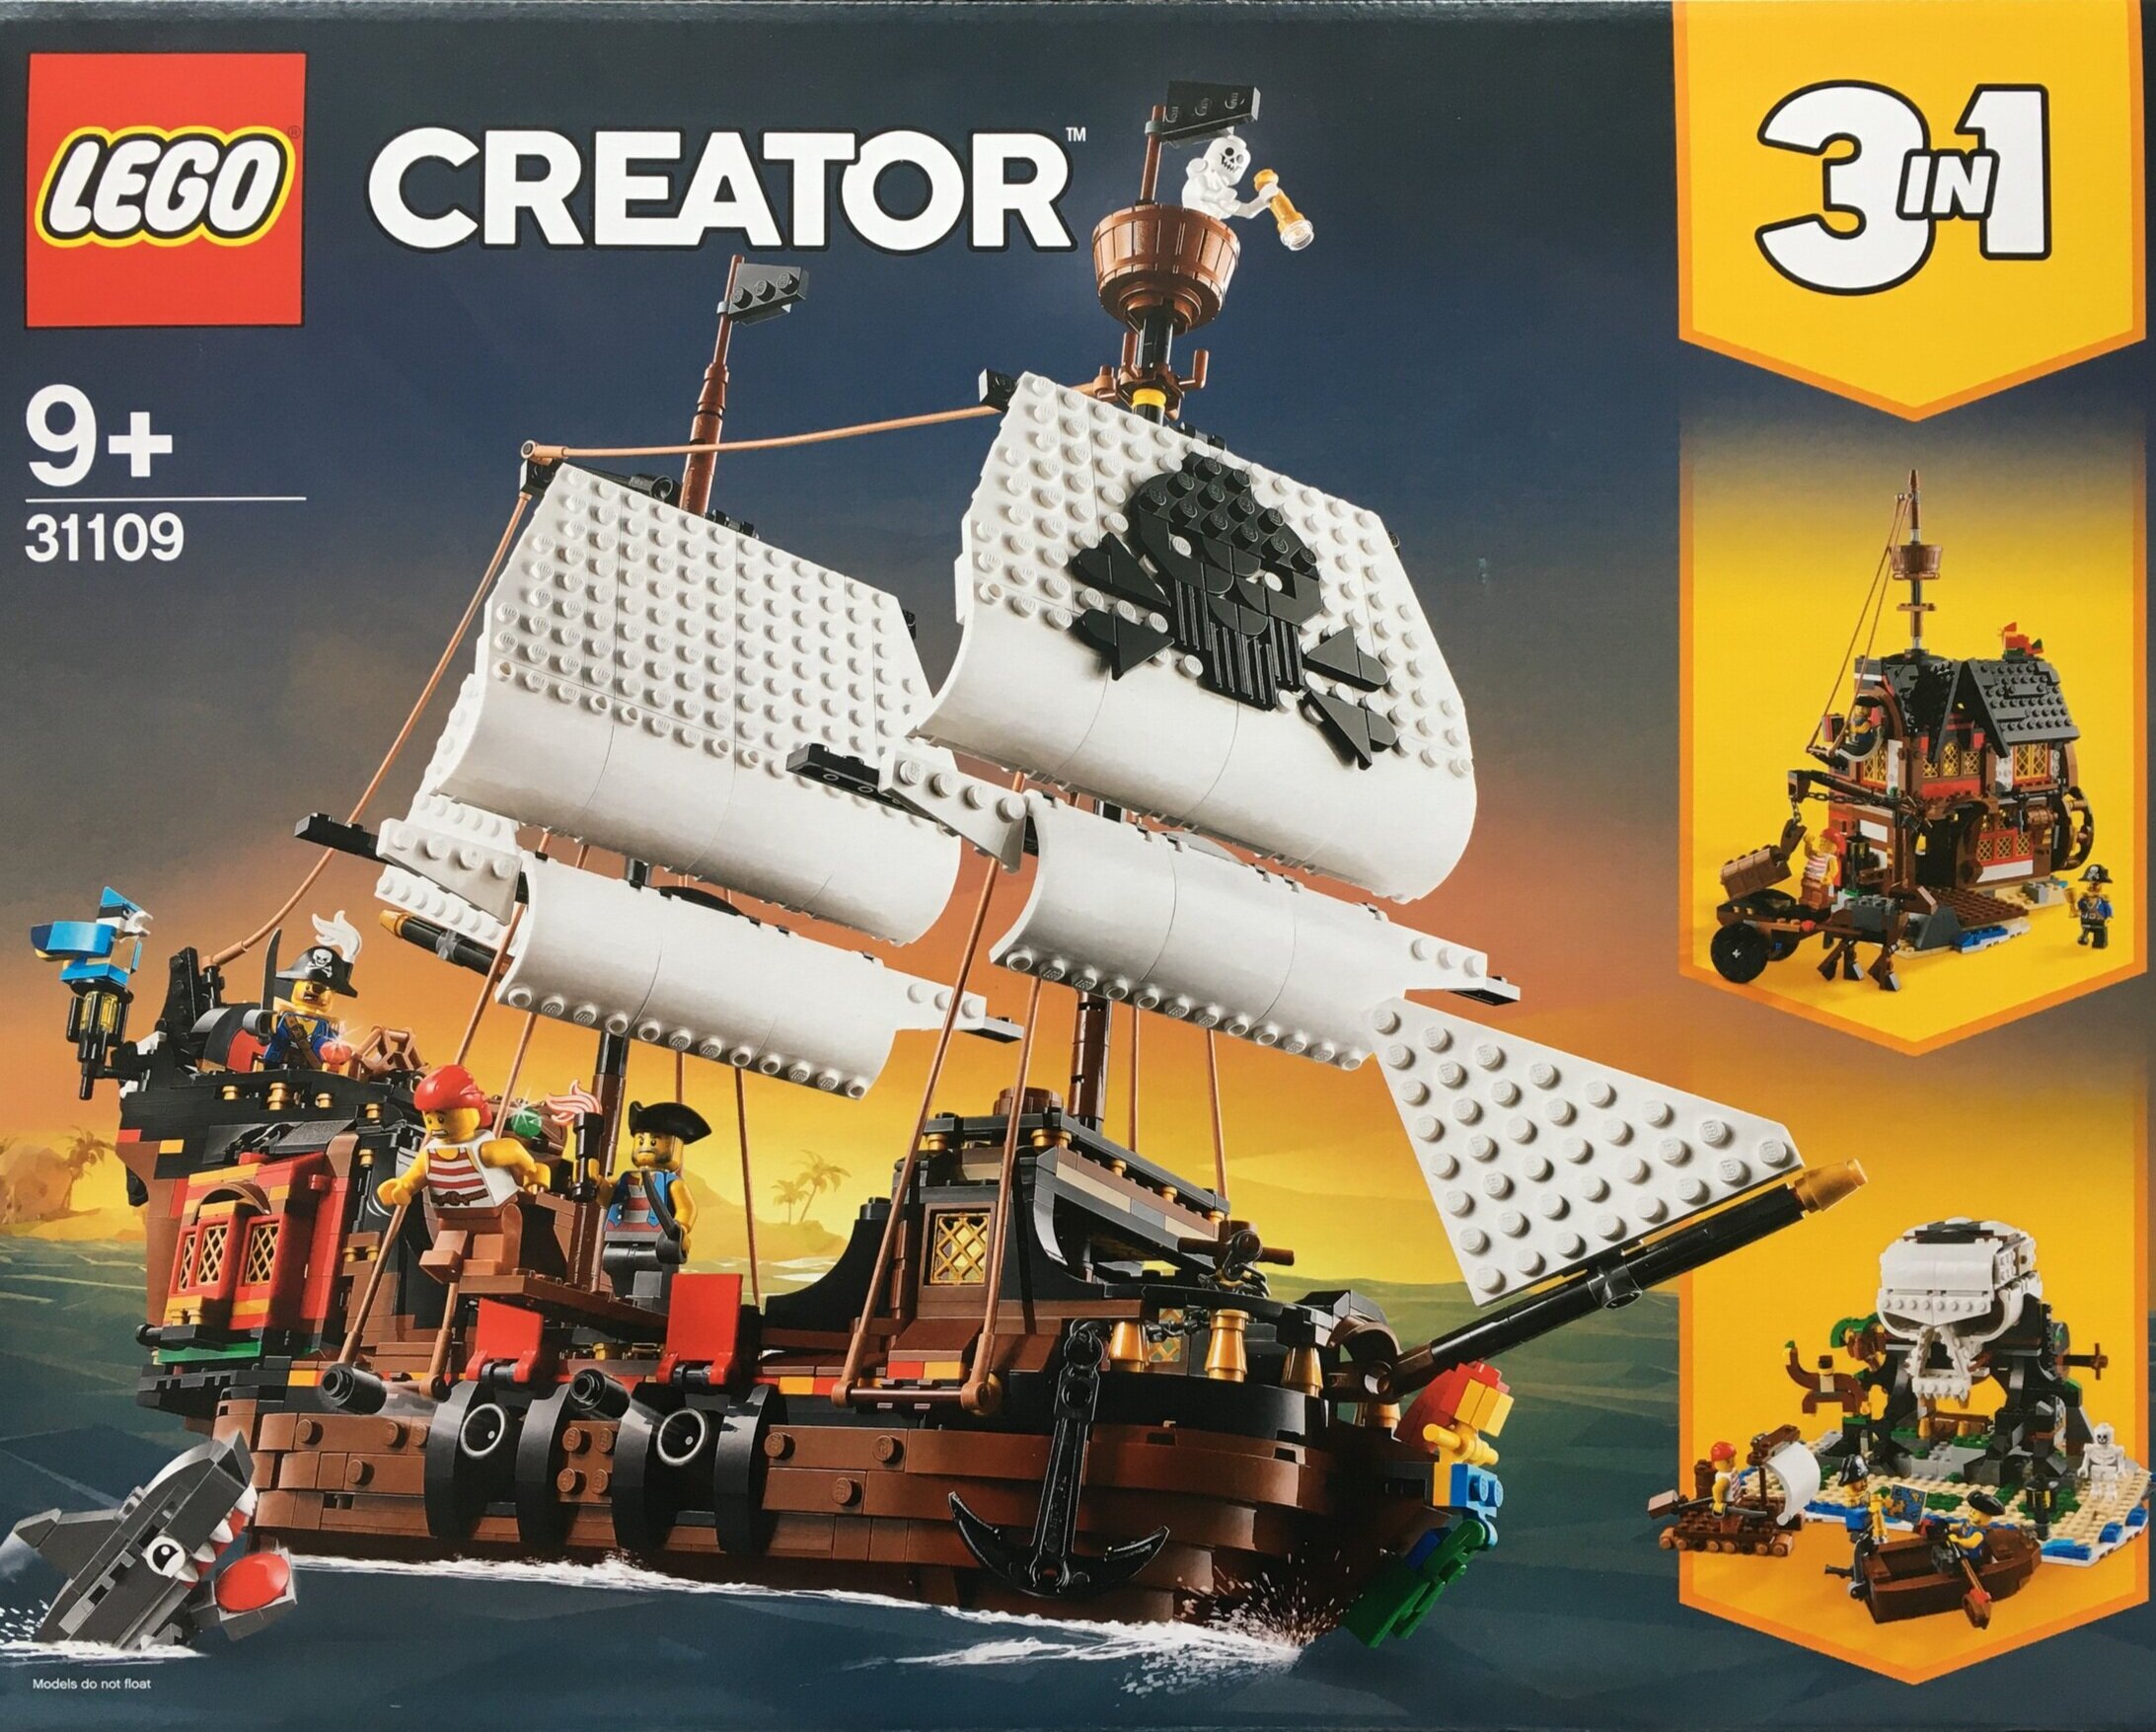
The LEGO® Pirate theme is not back, but they found a way to bring back Pirates in some other themes. We had the LEGO® Ideas #21322-1: Pirates of Barracuda Bay and now this set #31109-1: Pirate Ship which is part of the Creator 3-in-1 theme. The set was released in the US on 24 August 2020. It contains 1,264 pieces and retails for $99.99 which works out to $0.079 per piece. I picked it up locally here for ~$74 as the set has been out in Germany since June 2020 so the stores are running discounts 3 months later already.

Is the set worth it?

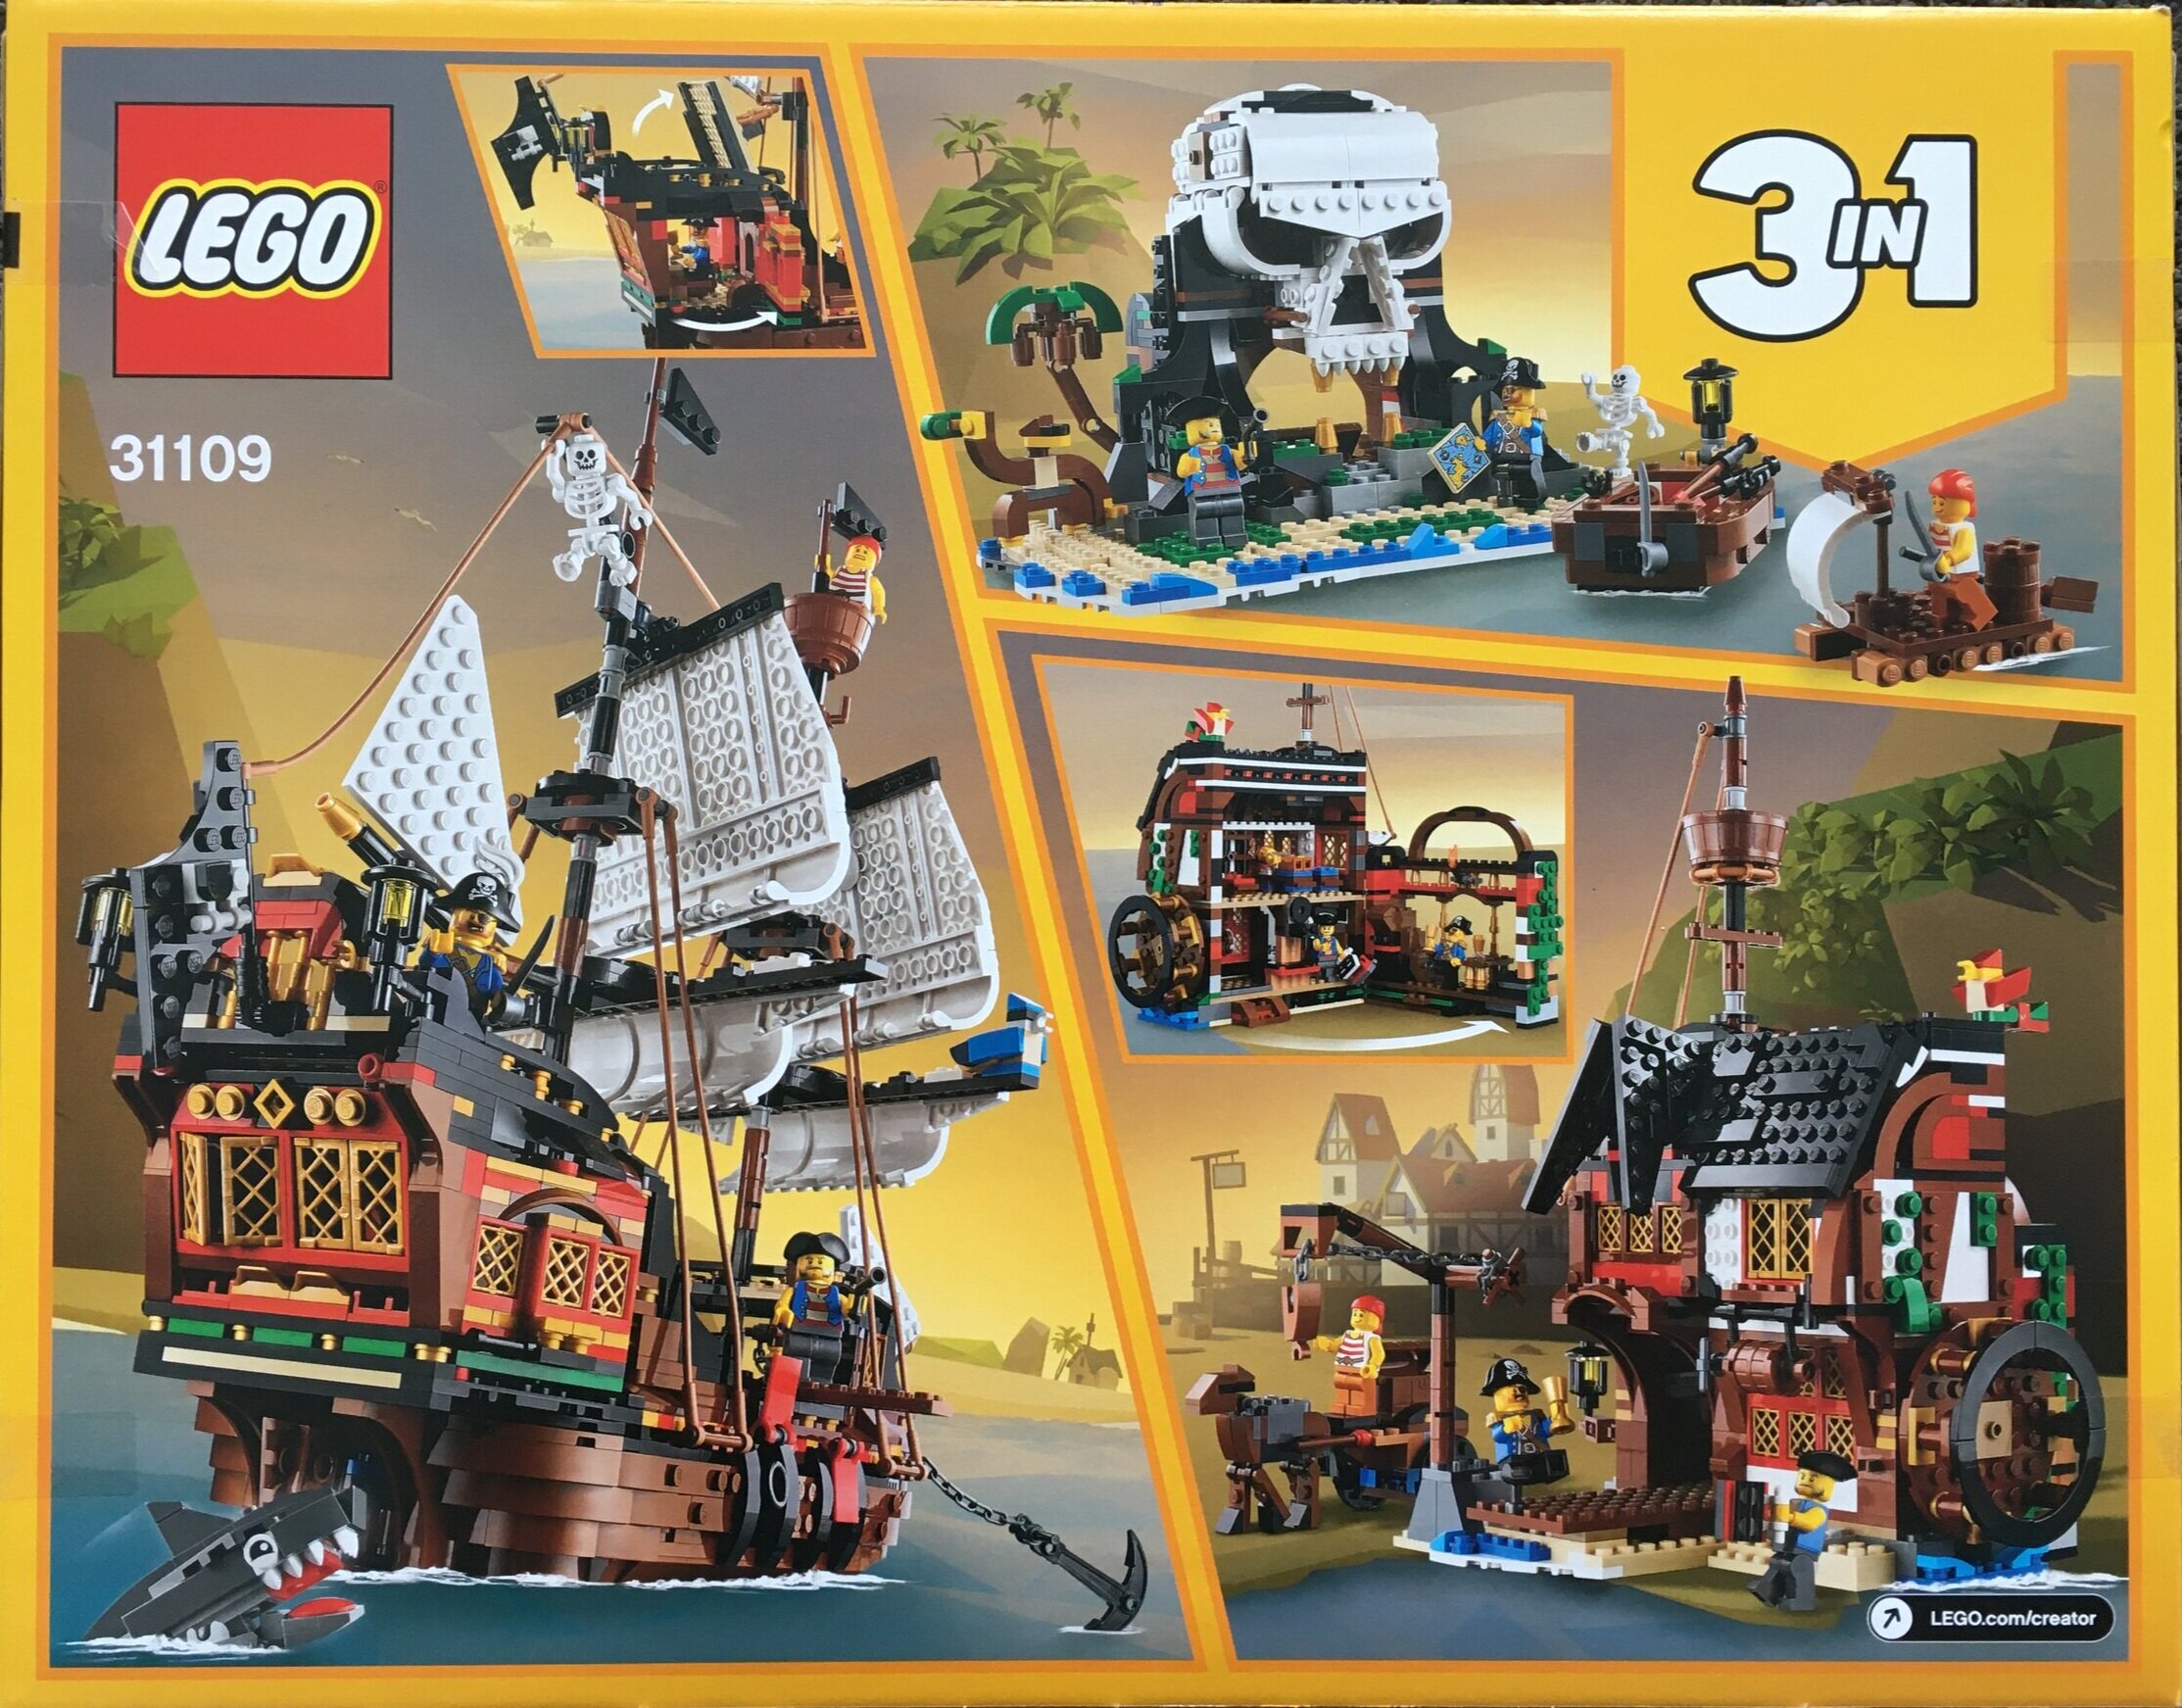
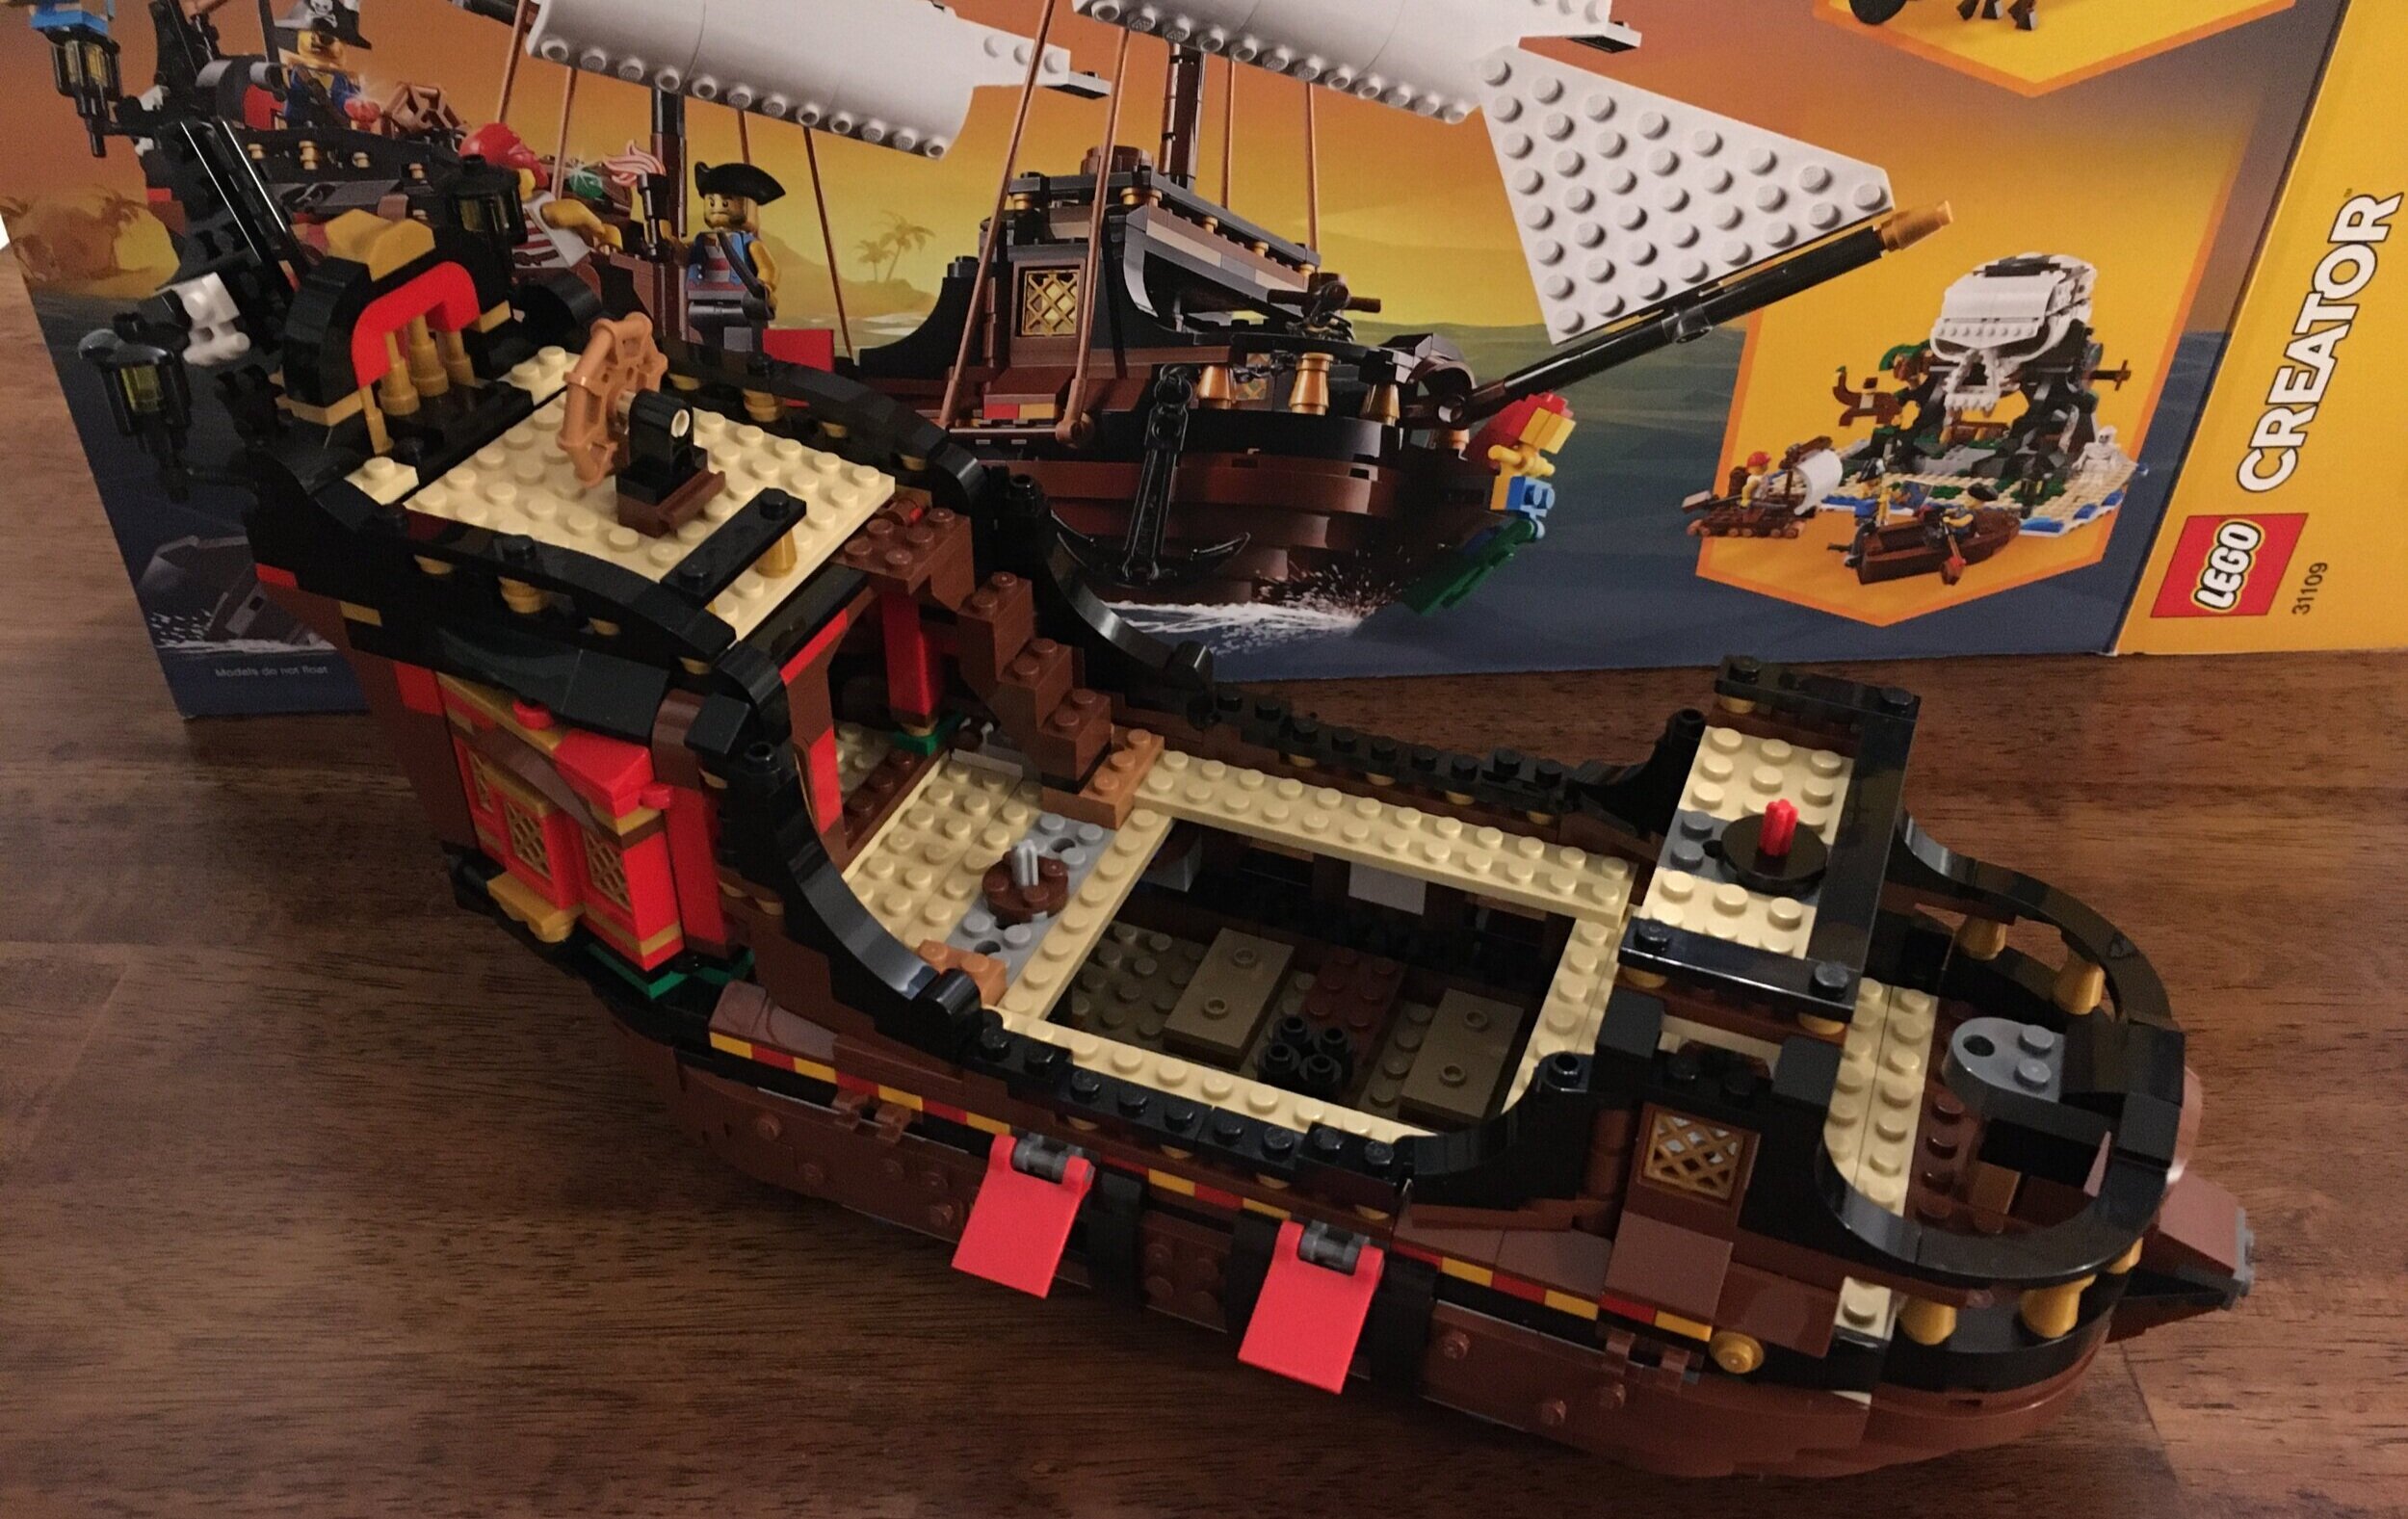
The front of the box shows the pirate ship with the Pirate’s Inn and Skull Island designs smaller and to the side. The back shows a few of the play features and shows the sets at different angles.

31109_box_front.jpg
31109_box_back.jpg

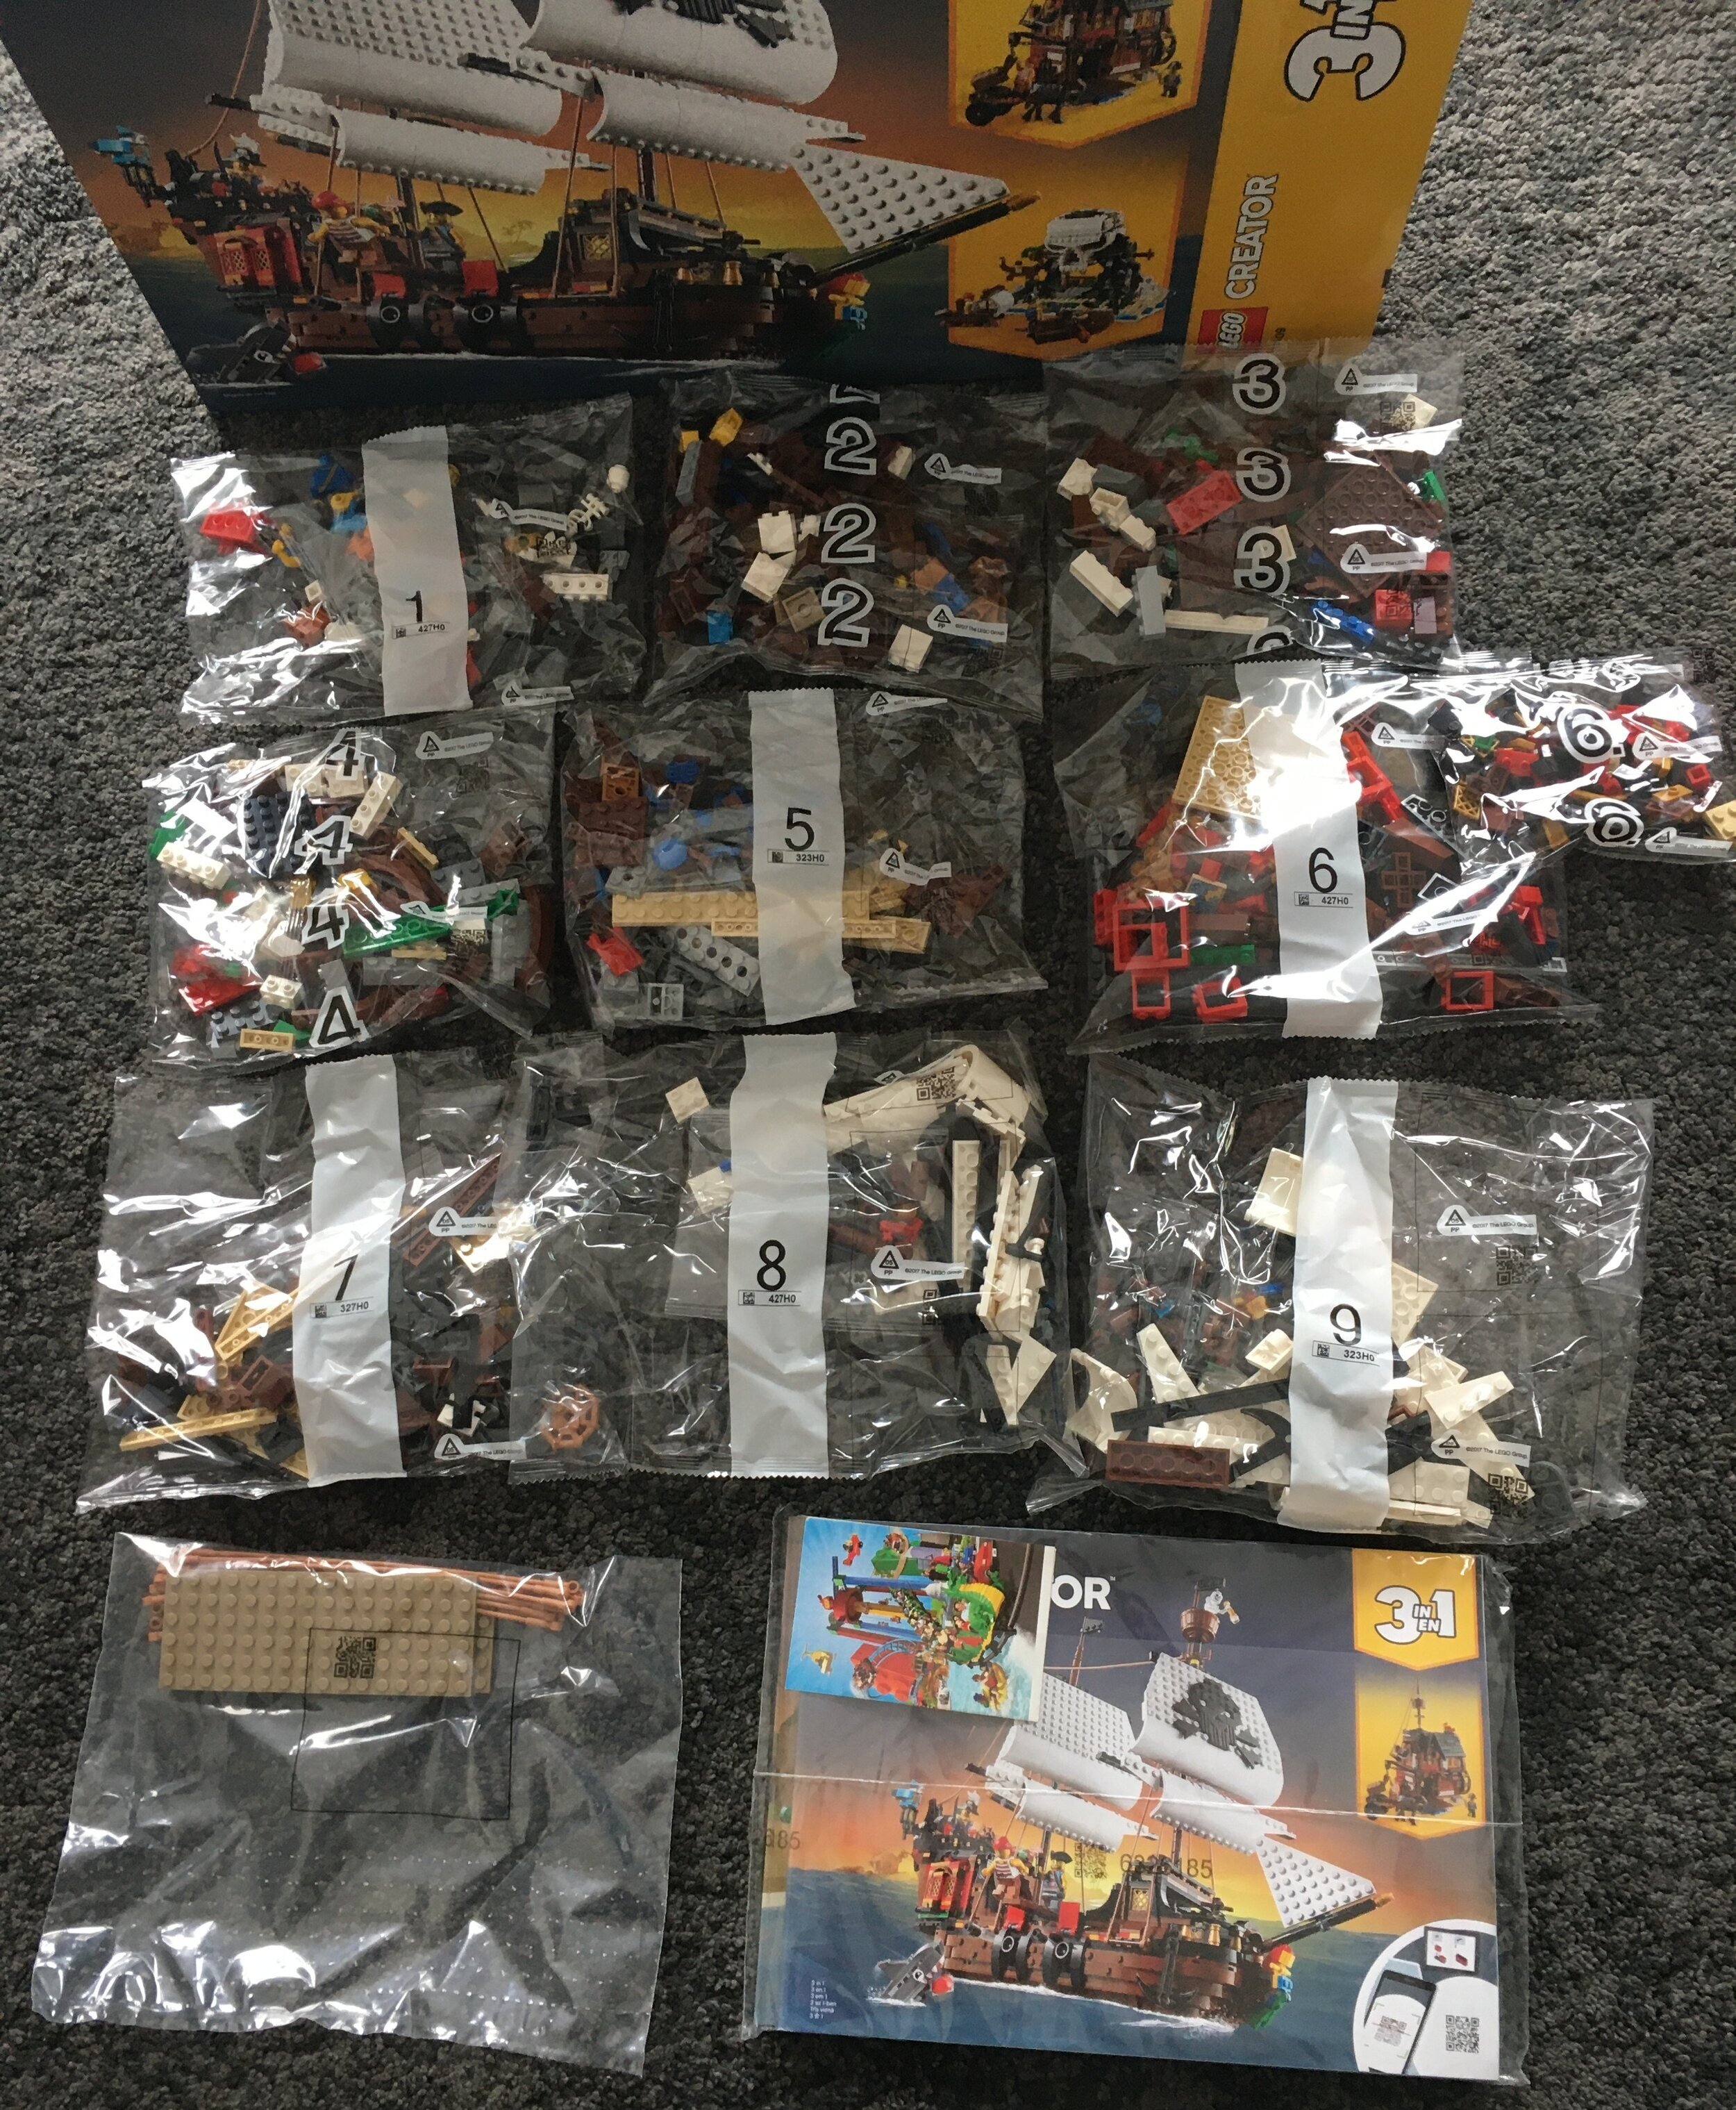
The set contains 11 parts bags. The bags are numbered one through nine. There is one of each with two numbered six. There is also a non-numbered bag with some larger parts. There are no stickers. WOOHOO!!! There are two instruction booklets wrapped in plastic. The larger booklet has the instructions for the Pirate Ship and Pirate’s Inn. The second booklet has the Skull Island instructions.

31109_contents.jpg

I started with the pirate ship. The ship instructions follow the numbered bags while the other two just have the parts, but not by bags.

Bag one builds some of the accessories to the ship. To start, there is a shark which is brick built. I like it much better than the 2-piece molded shark from the pirates theme. The tail moves along with the side fins and mouth. Plus you can adjust pieces to create movement.

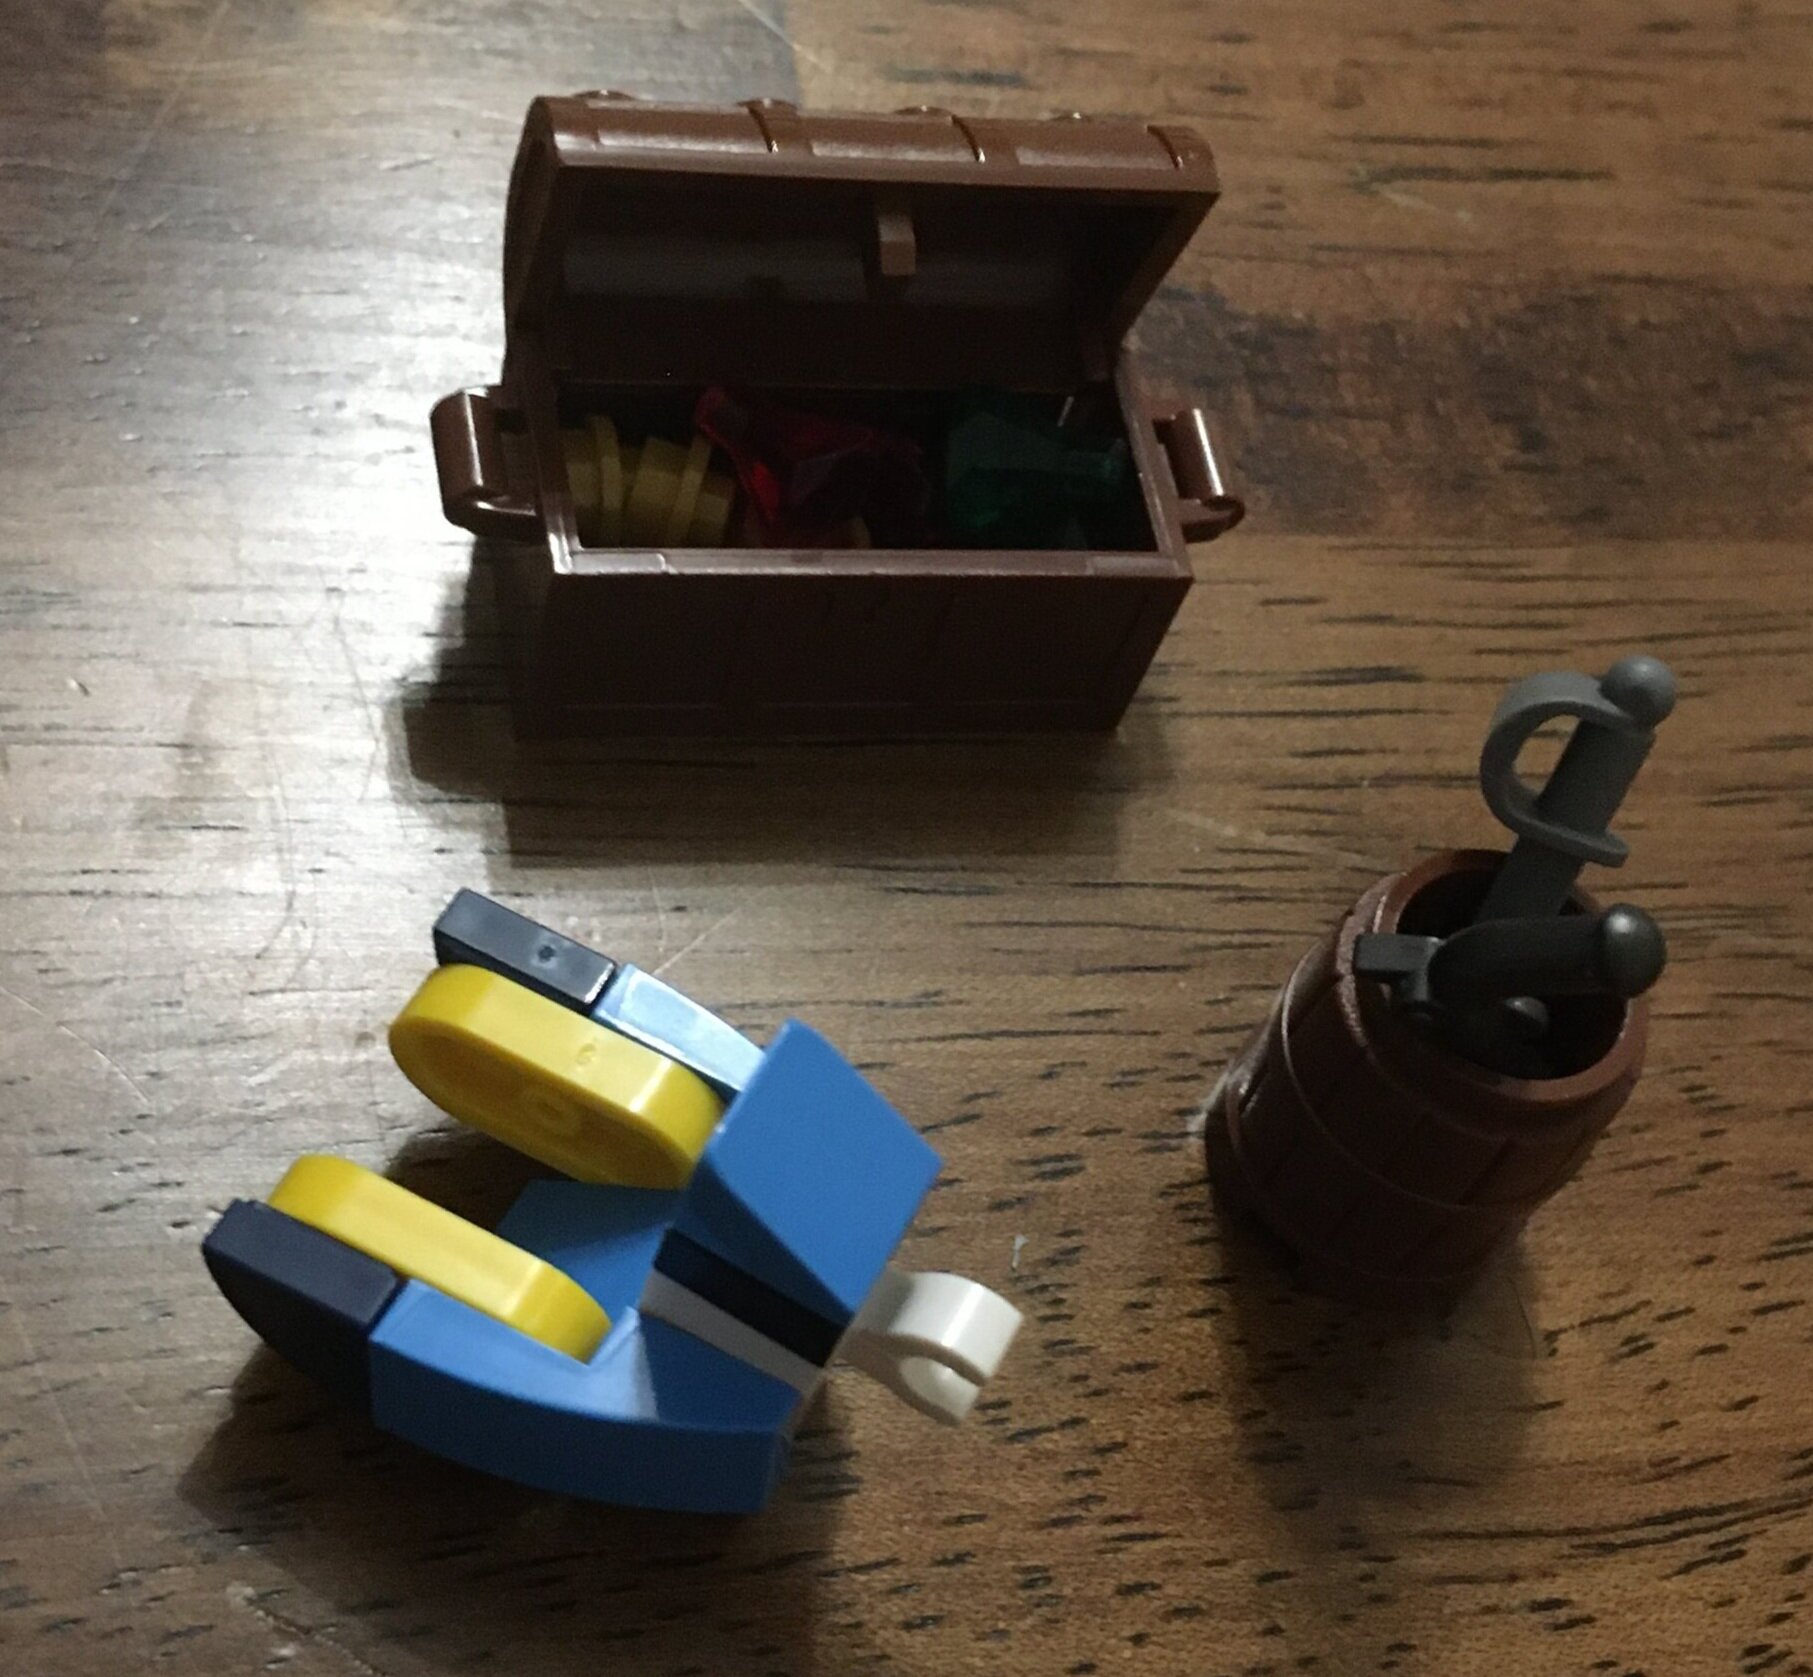
There’s a barrel to store some weapons, a treasure chest with some gems (I miss the old gold coins), and then a brick build bird.

31109_build1a.jpg
31109_build1b.jpg

The set contains four minifigures. There’s a pirate captain with two pirates and then a skeleton. It’s a pretty decent spread and they are all in line with the theme.

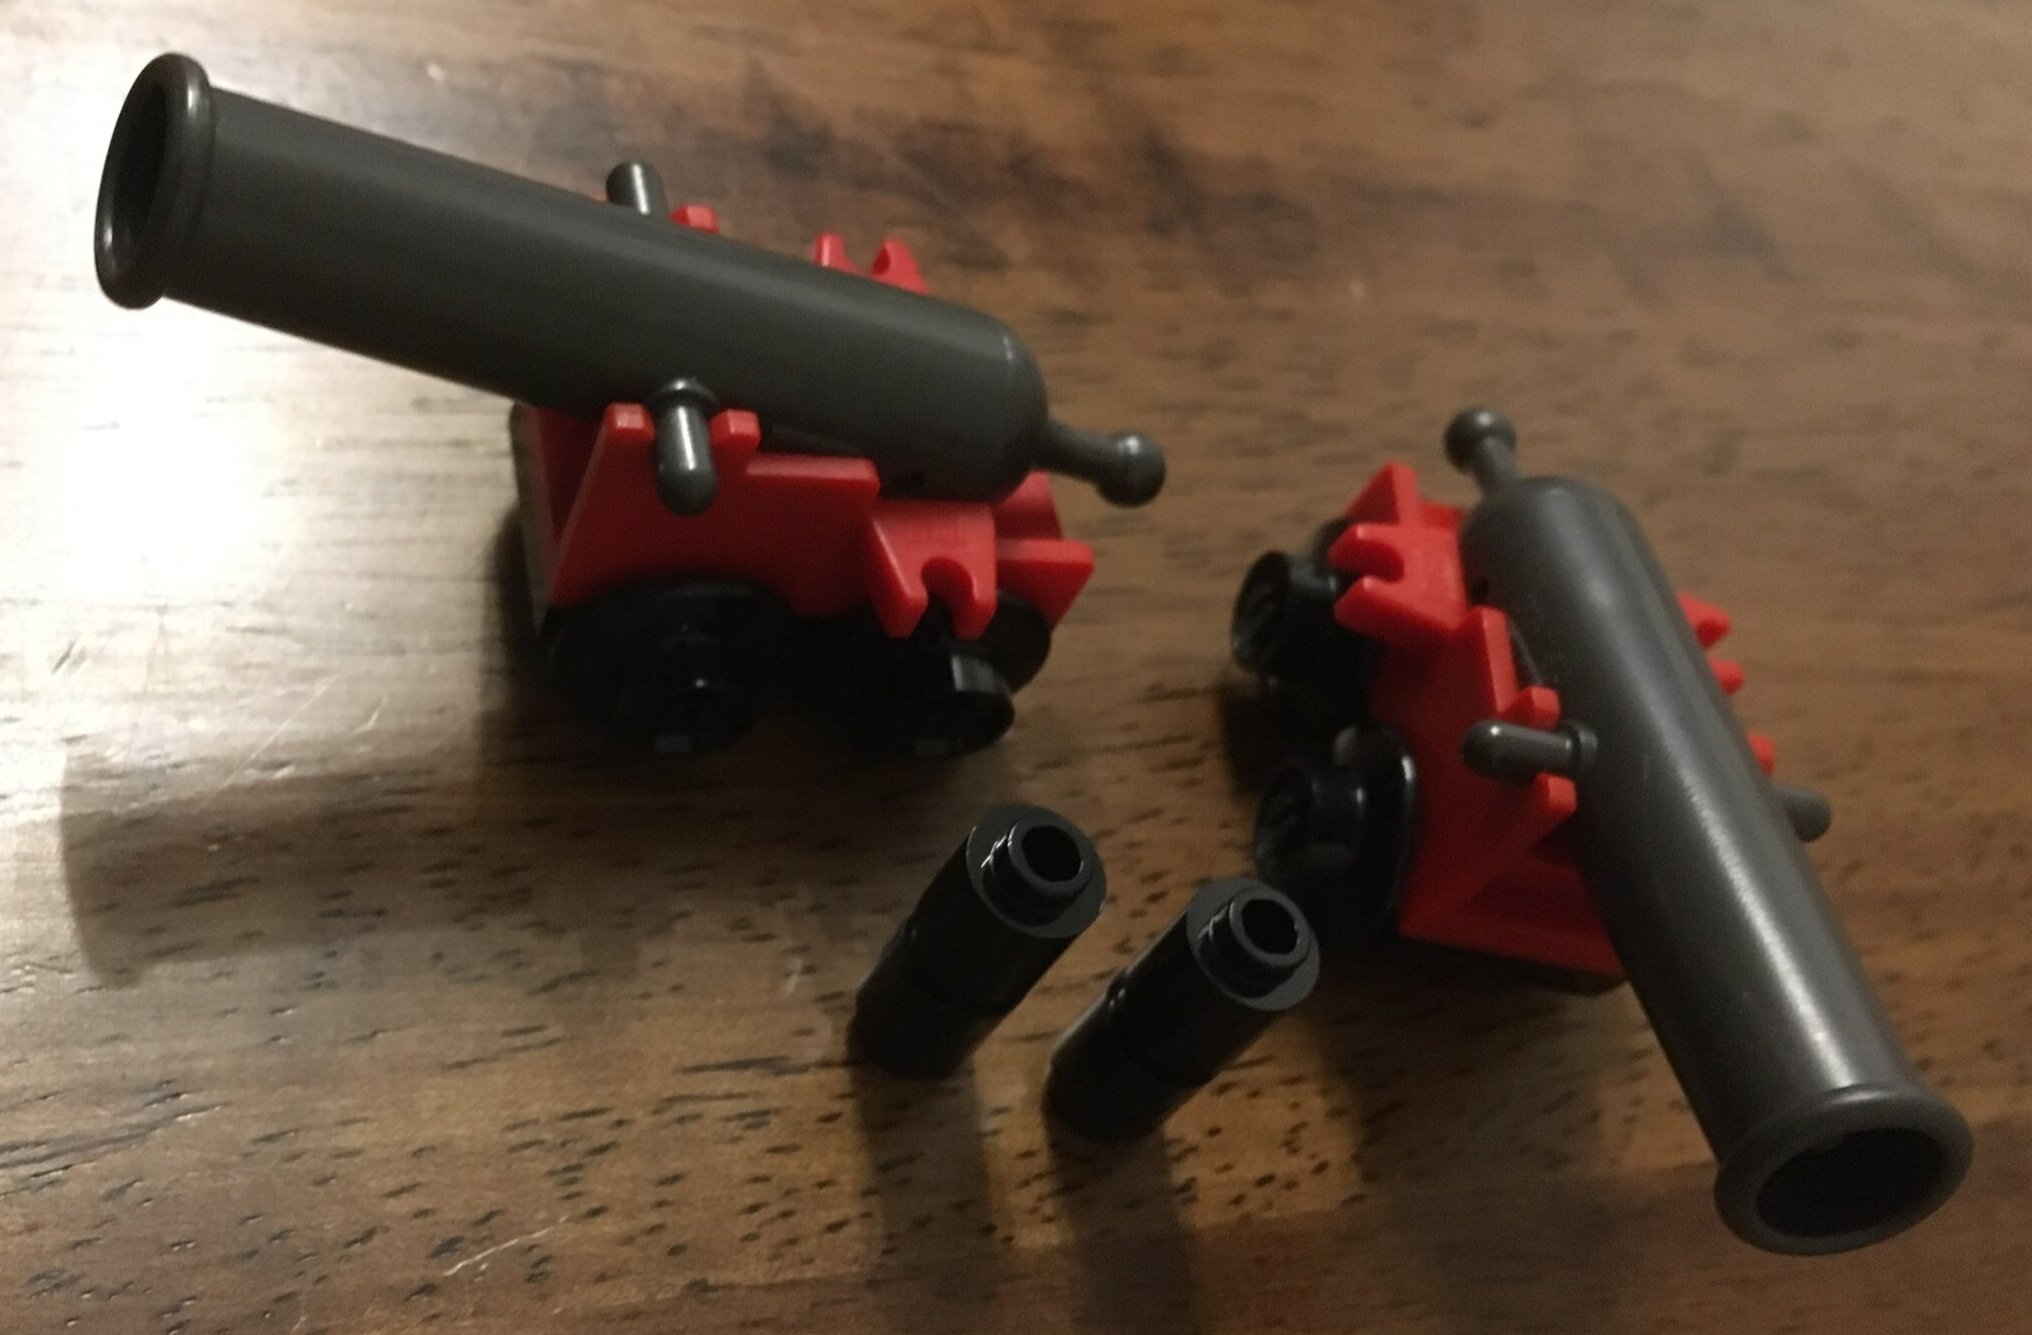
There are 2 cannons in the set along with some 1x1 round bricks to use as ammo.

31109_build1c.jpg
31109_build1d.jpg

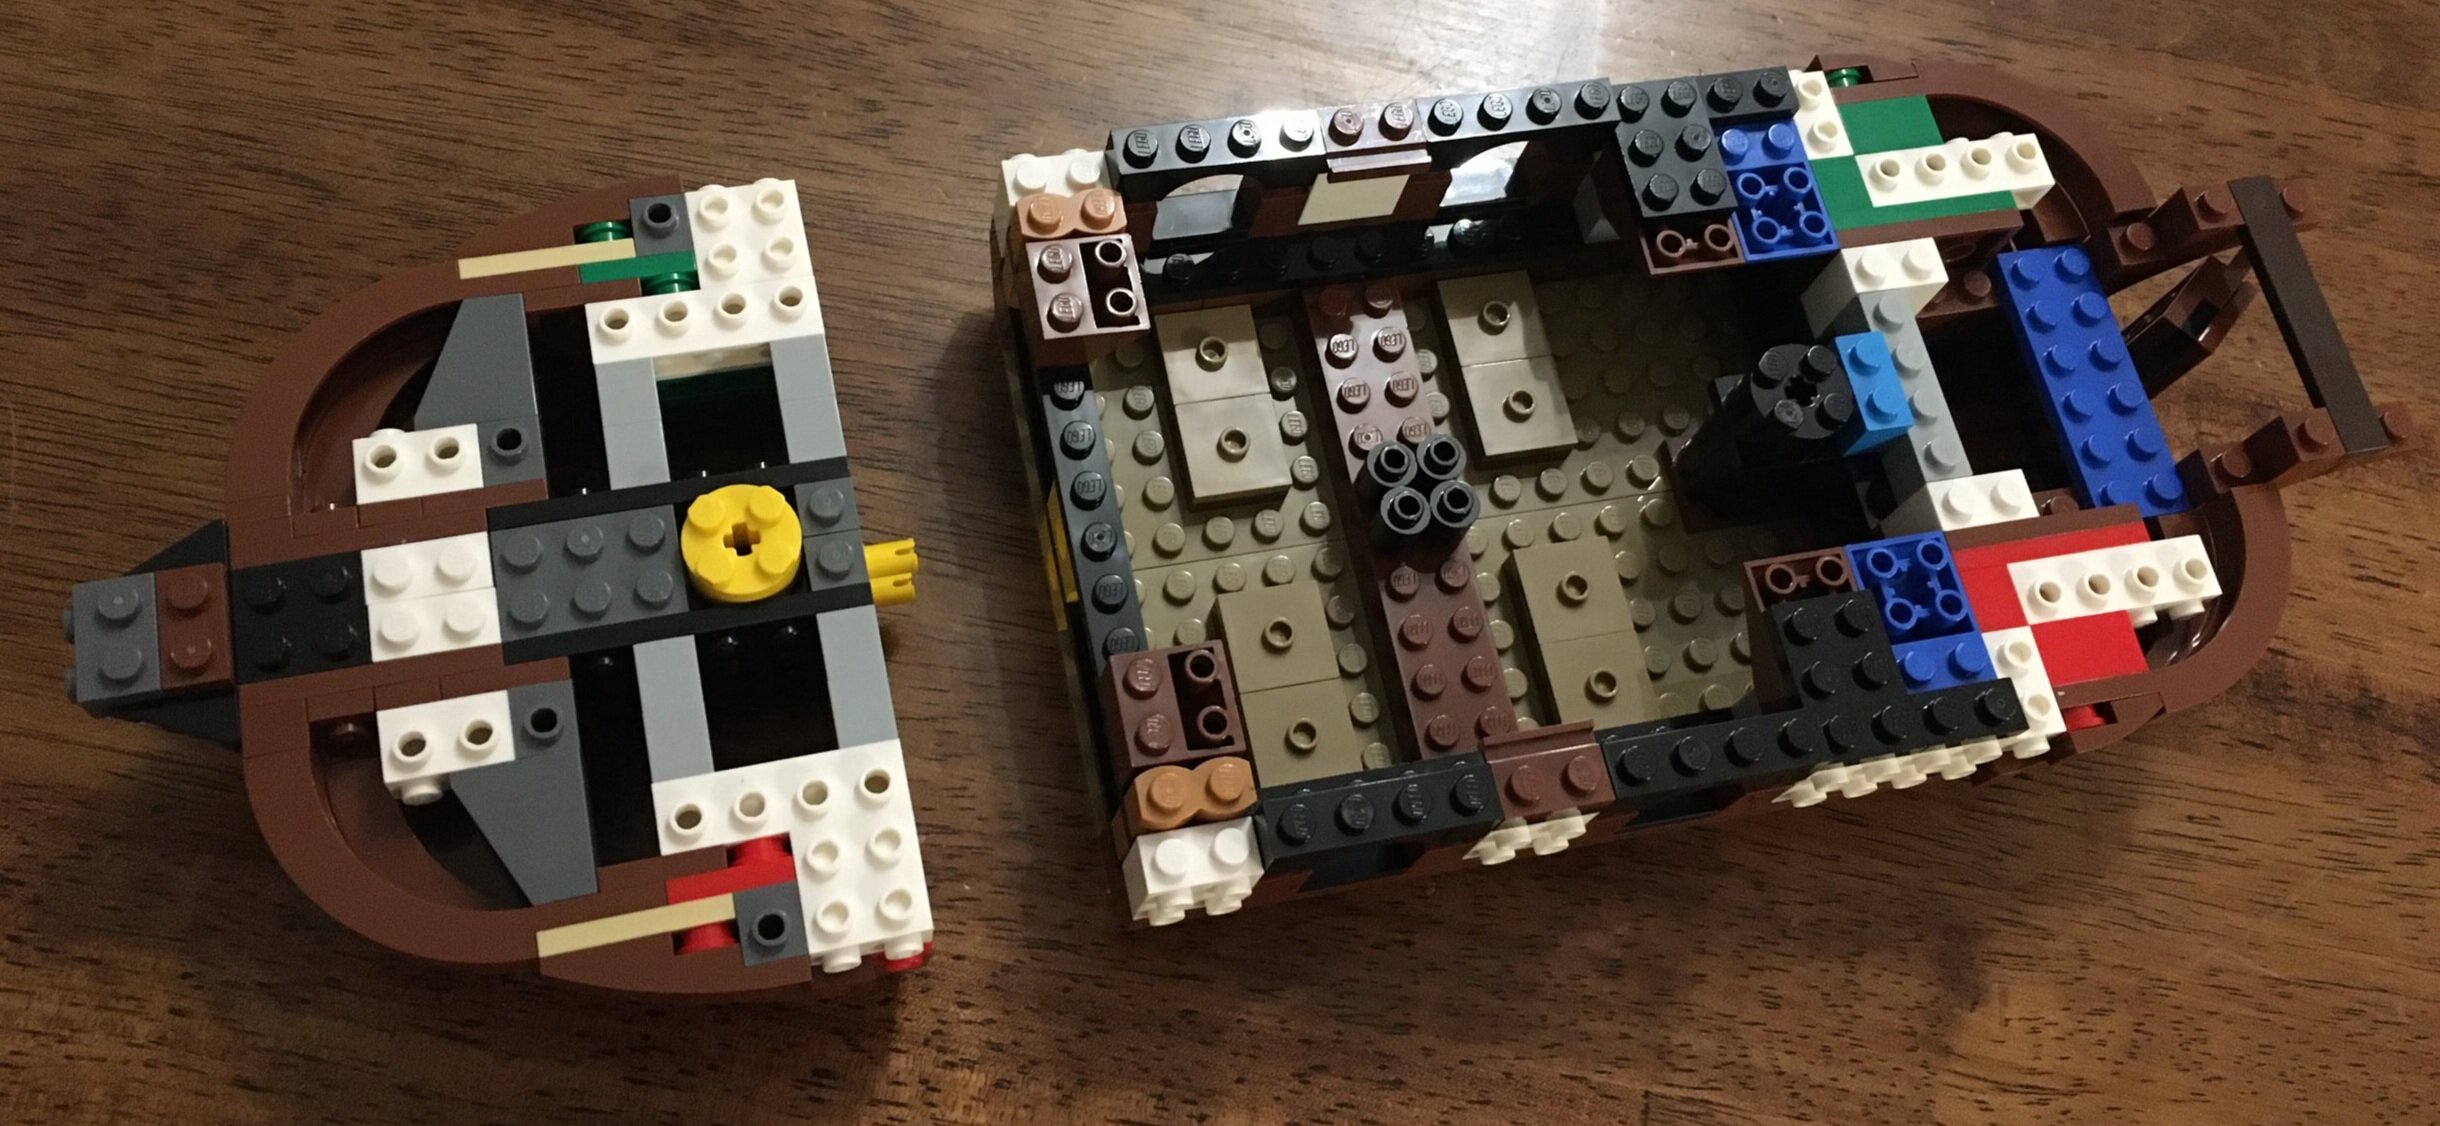
The second bag starts to build the hull of the ship. Unlike the Pirates of Barracuda Bay, this is a brick built hull versus a large BURP type piece as the base. I like the brick built version better I think. It doesn’t look as realistic, but it uses existing pieces versus the giant piece. It’s structurally sound too although not as big as the Pirates of Barracuda Bay ship.

31109_build2.jpg

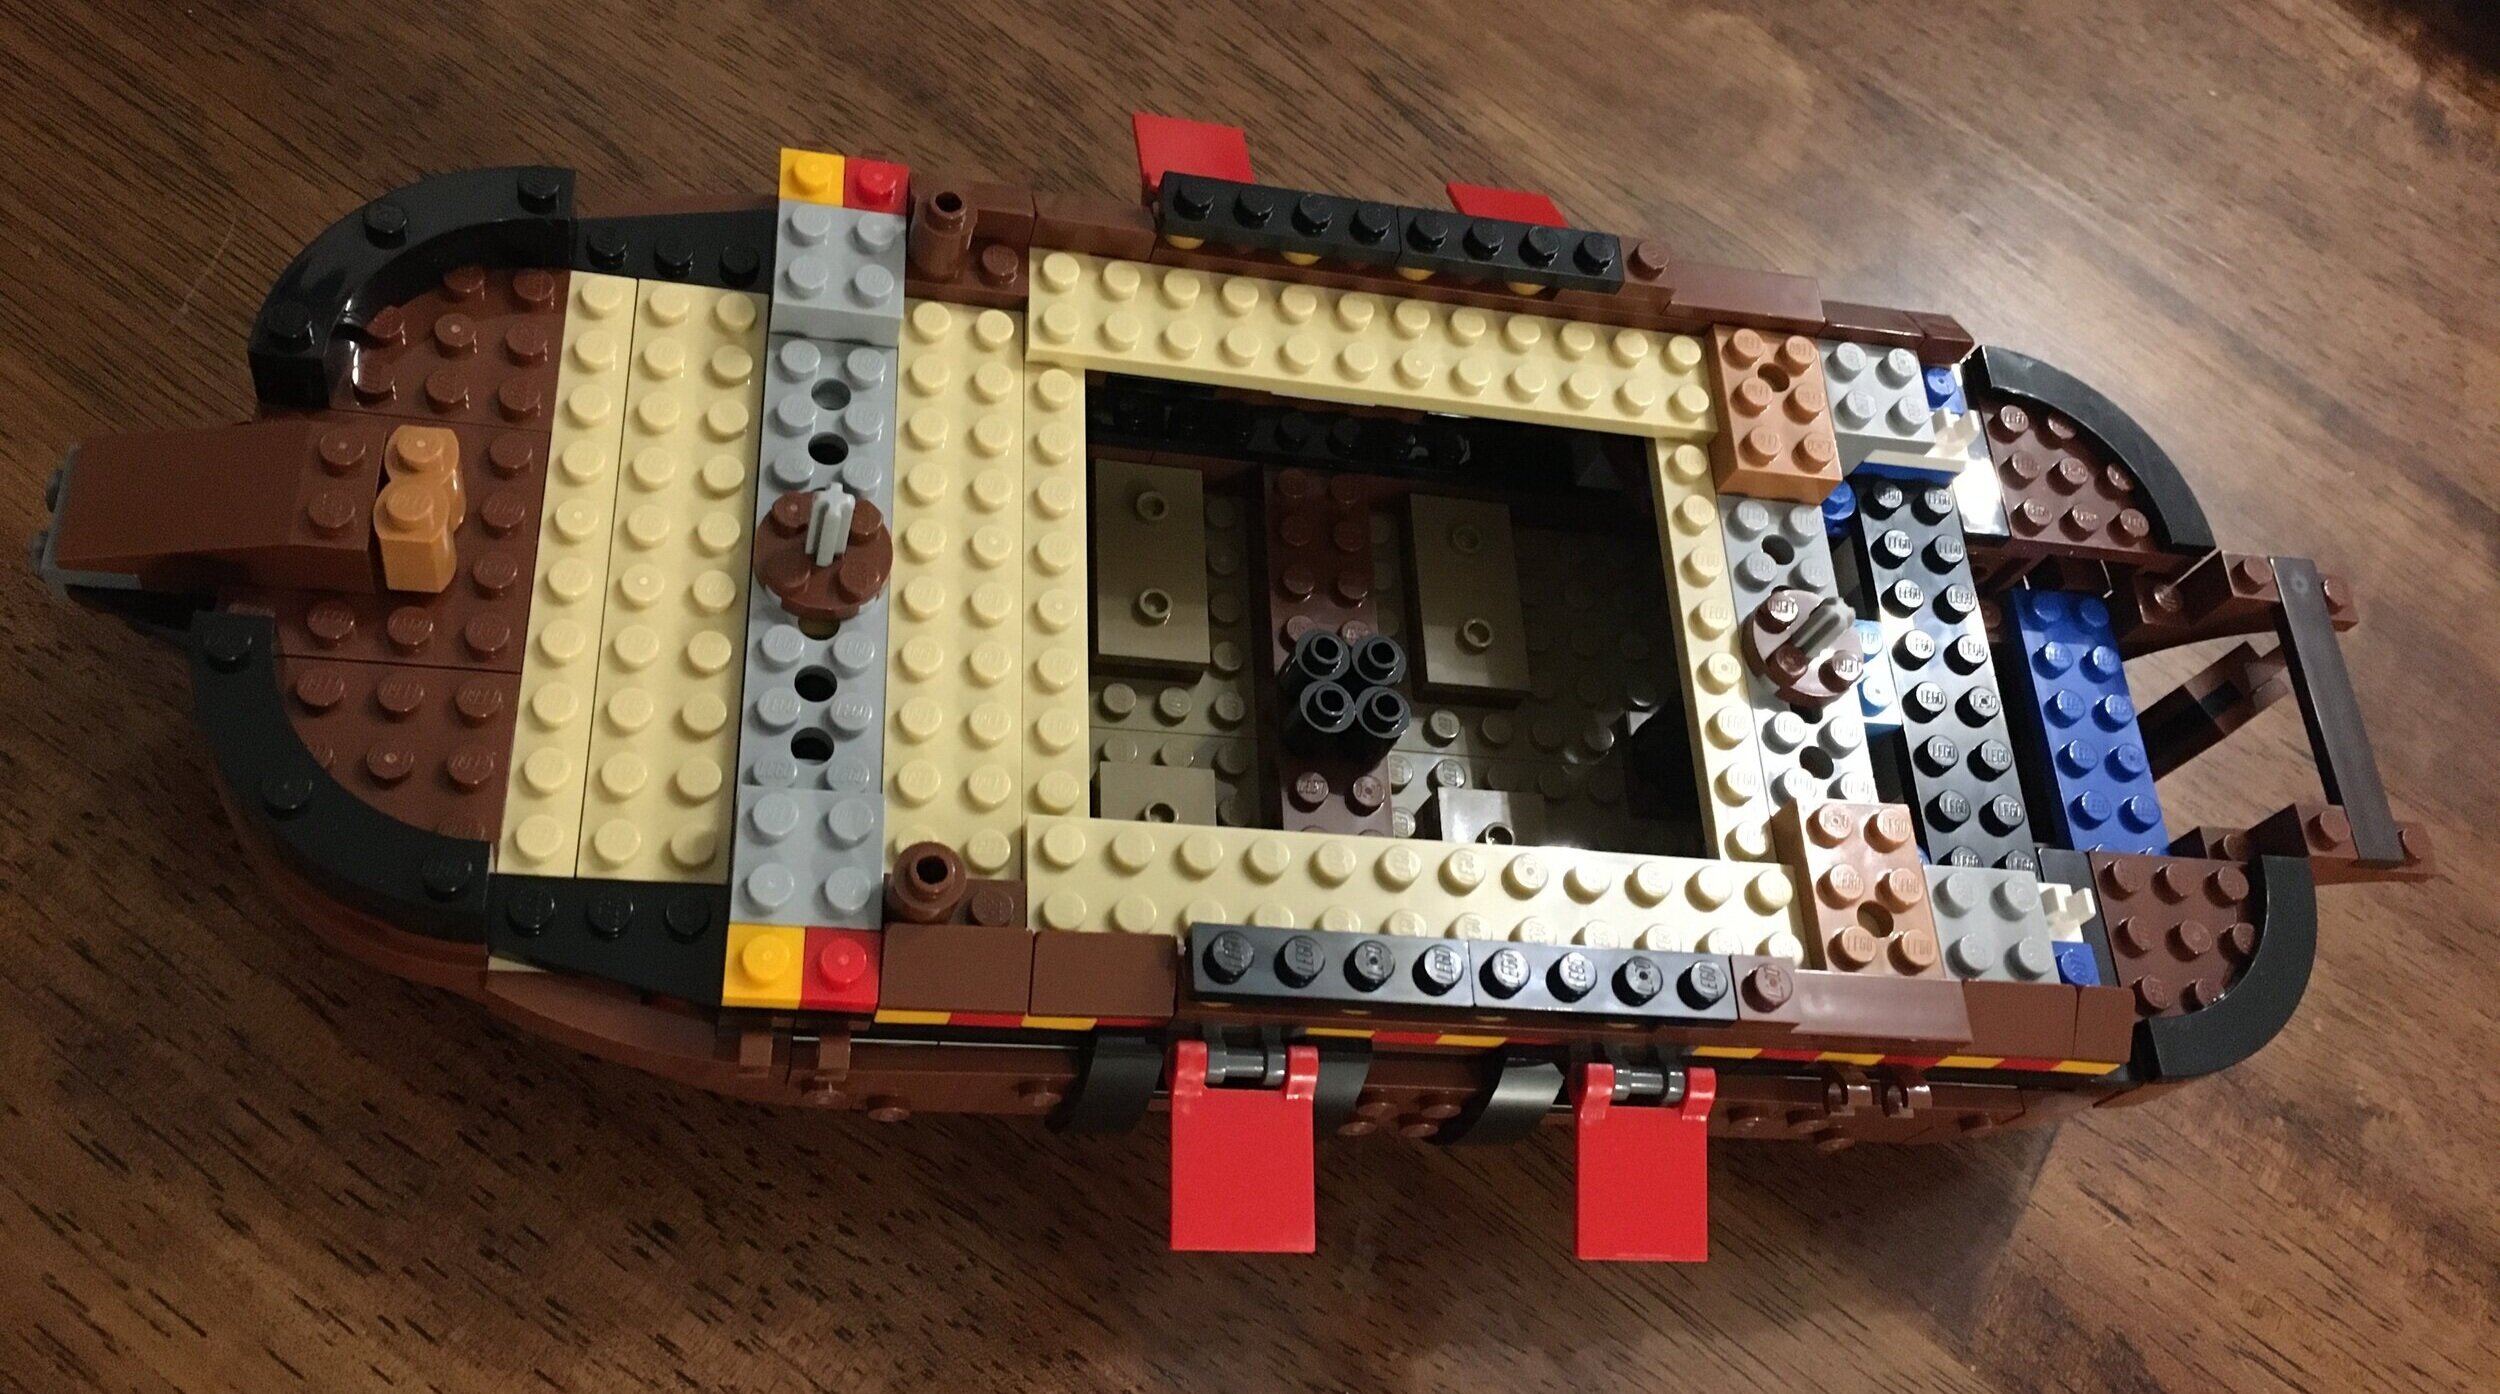
Bag three is the stern (back) of the ship. Each half of the build is identical except for one half uses red while the other uses green. I think this was done just to help make the build process easier.

31109_build3.jpg

The bow (front) is included in bag four. it attaches on as you can see in the picture. Like the stern, it has a similar build process for each half, but one is green and the other is red.

31109_build4.jpg

The fifth bag starts to add details to the ship as a whole. There are covers to the four cannon windows and some structure for the masts.

31109_build5.jpg

The sixth bag builds the cabin at the stern of the ship for the captain. It is not as ornate as the Pirates of Barracuda Bay ship, but still has a bunch of detail in it. I like how the designers created angles in the build instead of making it square. The red, black, and gold are a great color scheme.

31109_build6.jpg

Bag seven finishes up the stern of the ship and the compartment for the Captain.

31109_build7.jpg

The eighth bag puts more on the top to include the steering wheel at the stern and more detail on the front.

31109_build8.jpg

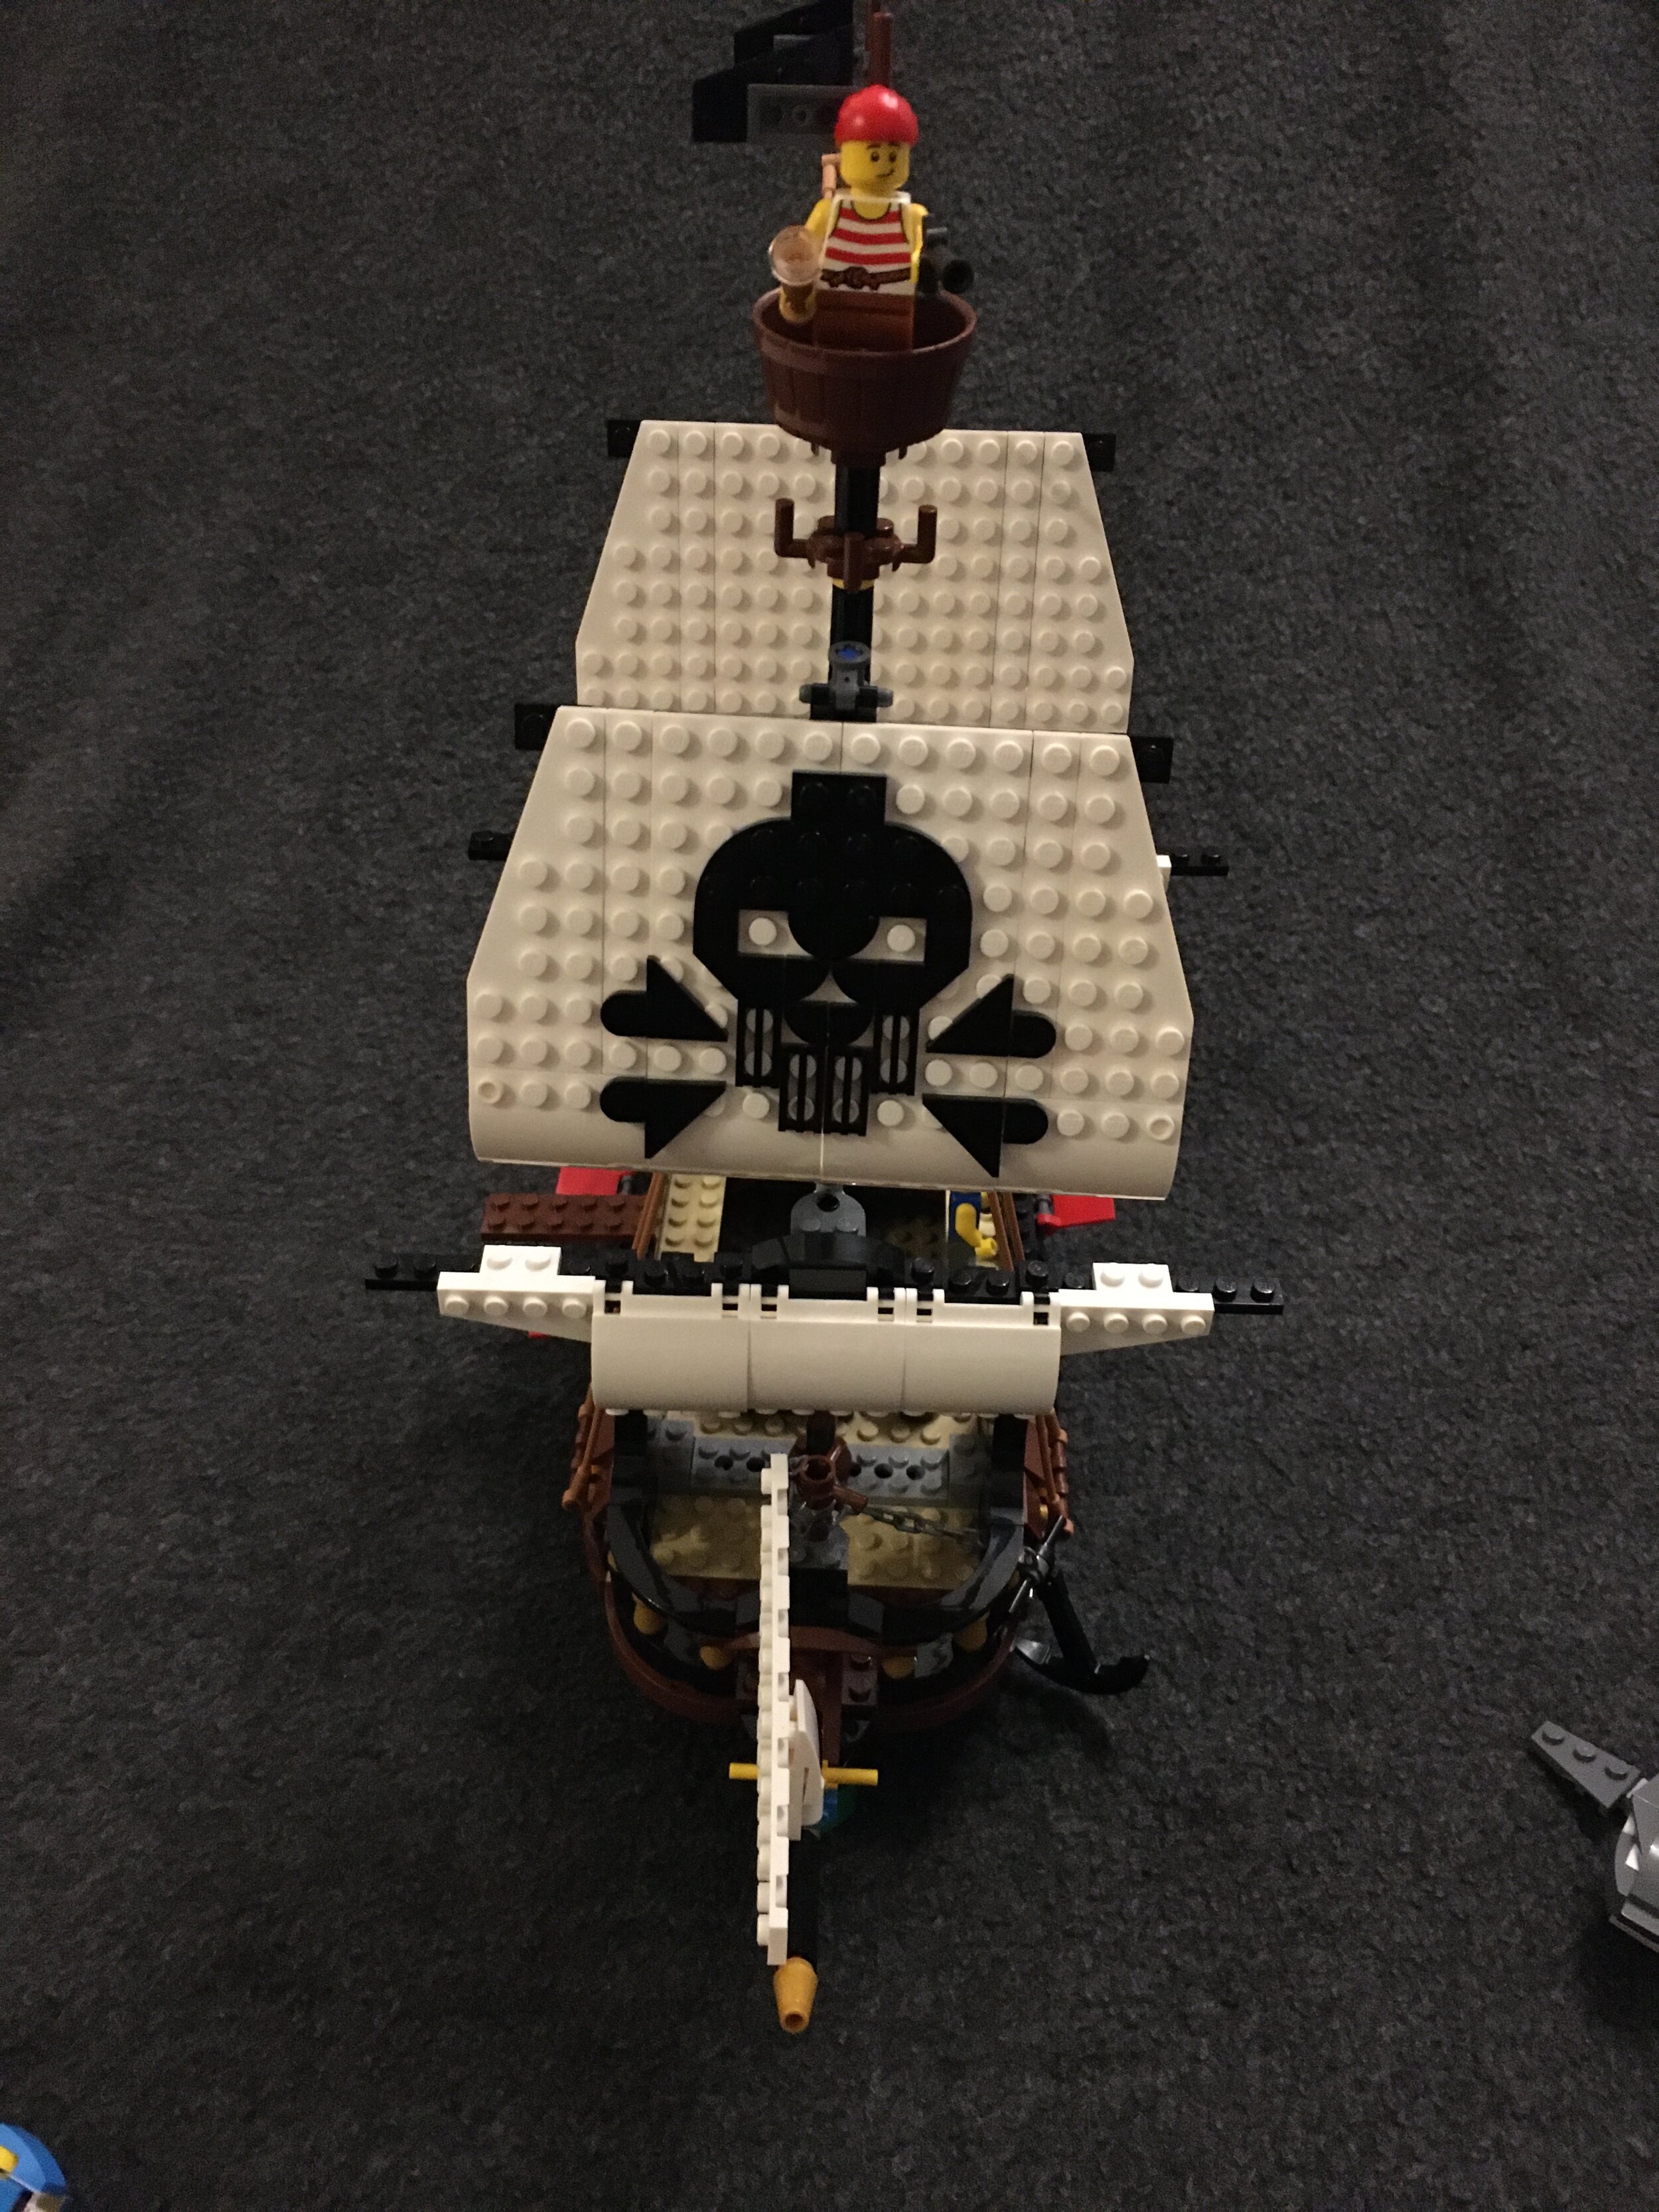
To wrap things up, you add the masts and rigging. The masts are all brick built. They look okay, but I think I prefer the cloth ones. I do like the brick built skull and crossbones though. That’s a nice touch. The rigging is all rubberized pieces versus strings. It looks a little thick, but it works.

The front of the ship has a brick built figure. I think I like the minifigure body for the front better, but I get the idea of what they built.

31109_build9.jpg

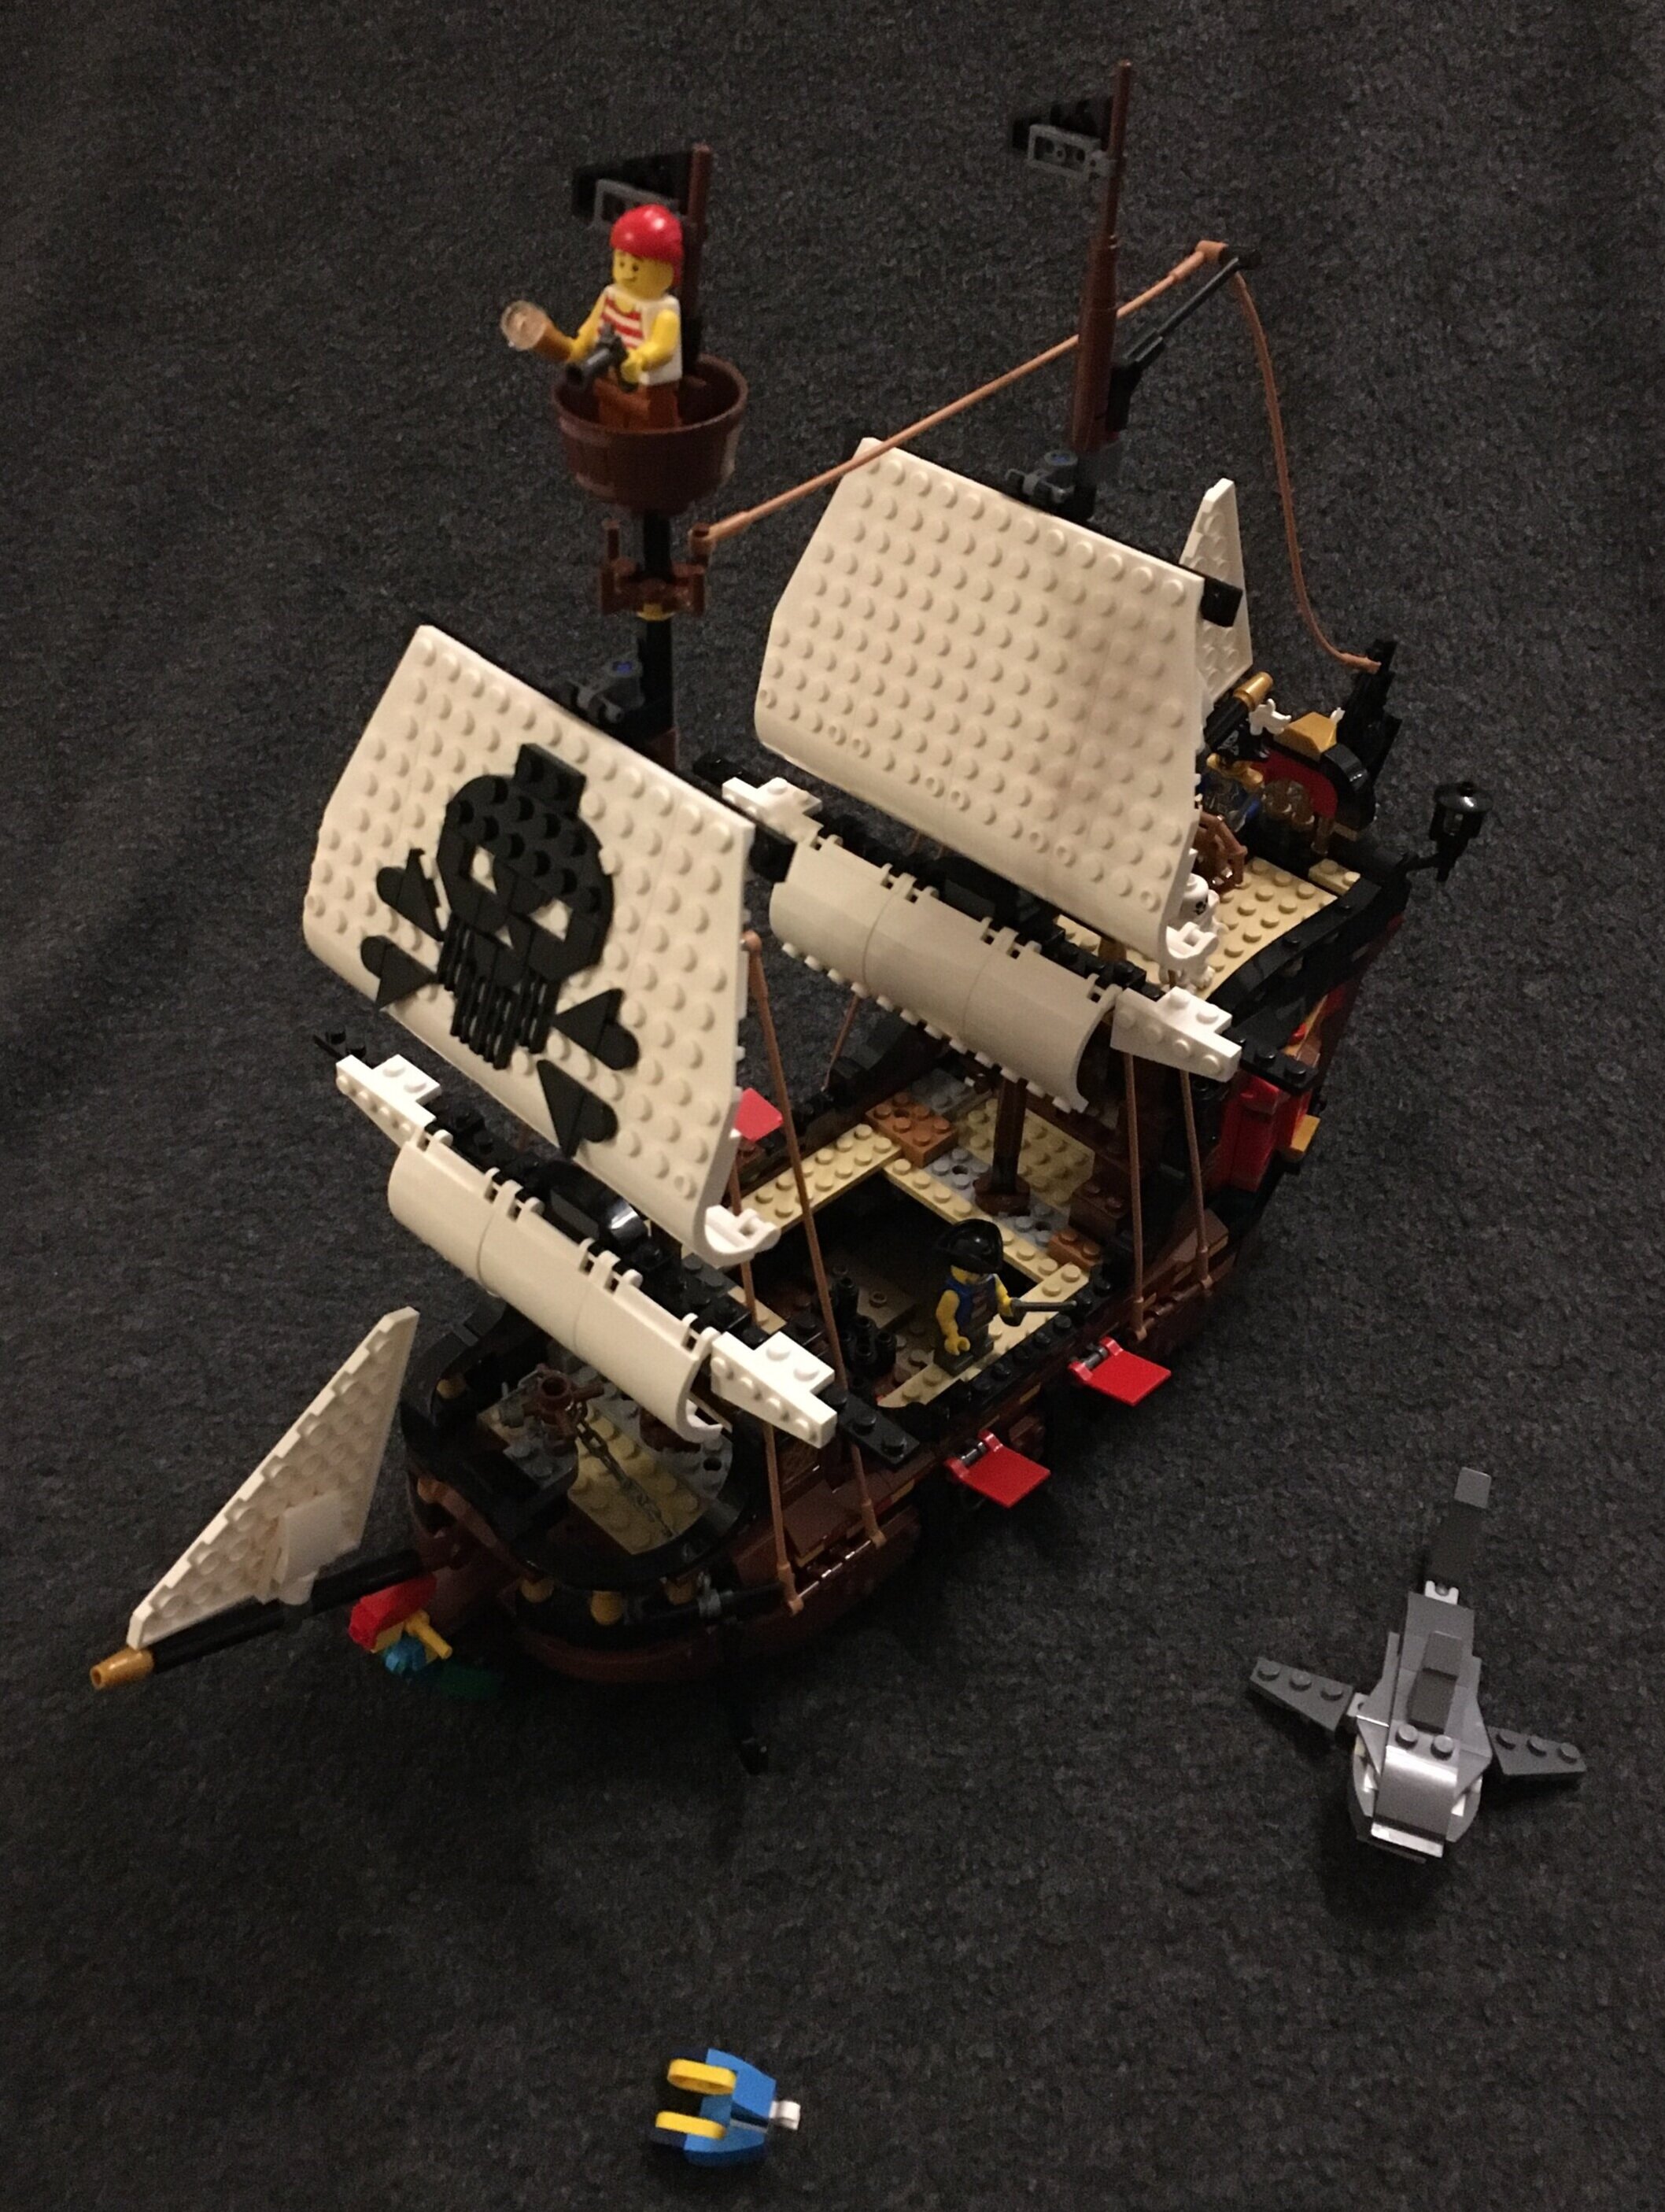
A few more shots of the completed set. The front view shows the brick built skull and cross bones well. The other shot is a little closer on the front. There are four ports for cannons, but it only comes with two. There is no covering so you have easy access to get to that part of the ship.

31109_build 9b.jpg
31109_build9c.jpg

And for fun, here’s the ship next to the Pirates of Barracuda Bay ship. Definitely much smaller, but pretty similar in terms of rigging and masts. The brick skull and crossbones helps it to stand out, but it is missing the skull and crossbones flags.

Overall, it’s a great set. A fun build with a lot of potential for parts in future builds/MOCs. The price is decent considering the price per piece and I found it at a discount so even better. Definitely get this set if you’re looking to expand your brick pirates.

I’ll show the alternate builds in another post.

Happy building!

31109_comparison1.jpg
31109_comparison2.jpg

Set Review - #40337-1: Mini Gingerbread House - Creator - Limited Edition

I’m a little late on this one, but I wanted to catch this set before it was too late. #40337-1: Mini Gingerbread House was a gift with qualifying purchase from LEGO in December 2019. It contains 499 pieces and is a mini build of #10267-1: Gingerbread House from the Creator Expert line.

The front of the box shows the set in front of a winter scene. It also has a red ribbon with a “Limited Edition” marking on it. The back of the box shows set #10267-1. I guess it’s so you can compare the two. Or maybe they needed some advertising space?

40337_box_front.jpg
40337_box_back.jpg

The contents are six parts bags, 2 instruction booklets, and a sticker sheet with one sticker on it. The parts bags are labeled one through three with three number ones, one number two, and two number threes.

40337_contents.jpg

As expected with any mini build, the pieces are rather small. As you can see, most are tiles or plates and most are 1x1 or 1x2. There are very few bricks as compared to plates and tiles. The 2019 sticker goes well on the set and helps to make it a true limited edition for the year. I’m actually a fan of this one. Probably because it is larger and there is only one sticker.

40337_build1.jpg

The bag labeled number two completes the first floor and you can see most of the details from #10267-1 miniaturized in this set. I think the designers did a great job at capturing the main details while still making it somewhat realistic. As you can expect, they didn’t build the internals of the house since there is not a lot of room. The back is instead just closed off as a wall with no details. I’m okay with this choice versus adding in extra details as you will probably just display the front of this set anyways.

40337_build2.jpg

The third set of bags finishes off the set. Overall it’s a fun build. I actually built it with my 5-year old and she did a pretty good job at getting it right. I had to guide in a bunch of spots, but she managed to get the hang of the SNOT techniques used on the roof pieces.

Overall, I think LEGO did a nice job with this set. Sadly, you’ll have to look on the secondary market for this one now. Usually these sets go for $25 to $30. Do they go higher? On some occasions in the past, LEGO has done a Christmas in July promotion where they have brought back Christmas sets the following July as a gift with purchase. No telling whether that will happen in 2020, but if you missed out, pay attention to in the summertime to see if that deal returns.

What do you think of this set? Did you get it with a purchase and was it worth it?

In the meantime, happy building!

40337_final.jpg

Set Review - #10264-1: Corner Garage - Creator Expert - Modular Building

The modular building line for Creator Expert started in 2007 and is back this year with #10264-1: Corner Garage. It was released on 2 January 2019. This one cost $199.99 and with 2,569 pieces, it works out to be $0.078 per piece.

You can see the previous Modular Building reviews at the following links:
#10246-1: Detective’s Office (2015)
#10251-1: Brick Bank (2016)
#10255-1: Assembly Square (2017)
#10260-1: Downtown Diner (2018)

A lot of the reviews I’ve read or watched have been negative towards this modular set. They’ve said it’s rather plain and doesn’t have a lot of the detail others have had. So we’ll see…

Like others, the front shows the full build with the different floors on the right side. The back shows some of the inner details and then how it looks next to some of the previous modulars. The box shows it next to the Assembly Square and Downtown Diner. I think it looks pretty good there.

10264_box_front.jpg
10264_box_back.jpg

The contents are six sets of bags, an instruction booklet (that comes wrapped), a 32x32 stud tan base plate, and two 8x16 light gray plates. I’m not sure why the 2 light gray 8x16 plates are separated as there are also some in bags too. Oh, and no stickers! Whoo-hoo!

10264_contents.jpg

The first set of bags starts the first/ground floor. It includes quite a few 2x2 light gray tiles for the floor and road portion. You can see the start of the garage as well as the lift. There is a tool box in the garage for the mechanic to use and a broom and dolly outside. This set of bags come with a dog and a male mechanic minifigure (I’ll hit on the minifigures later).

10264_bag1.jpg

One thing out of the ordinary for this portion of the build is the lift. There is a simple function that allows you to have the lift go up and then down. As you can see in the 2 pictures, you slide the piece out and it goes down and then you push it in and the lift goes up. Nothing to challenging, but it is cleverly integrated in the build without taking away from the aesthetics too much. So far I have only tried it with the vehicle that comes with this set and it works with that one, but that one is slightly heavy. I have yet to try it with a lighter vehicle.

10264_lift_down.jpg
10264_lift_up.jpg

The second set of bags mostly finishes the ground floor. Internally, there are some items for sale to include tires and maybe motor oil. There is also a cash register and counter. Then there’s a door entrance opposite the garage to go up to the higher floors. On top of the garage door is a small sign for the shop with a wrench on it.

This set of bags include a small Vespa type motor bike and a male minifigure who is the rider.

10264_bag2a.jpg
10264_bag2b.jpg

The garage has a door that can be opened and closed. It is the standard door used in some of the CITY sets, but it does not have the same attachment. There is a wheel on the outer wall that you spin to open or close the door. When you open it, the door parts roll up. When it closes the door goes down in a track along the walls. Some of the CITY fire stations just have the garage doors stay on the track the whole time. When the door goes up, it just slides up above the vehicle stall versus rolling up like it does in this set. I had a bit of trouble putting this together correctly, but eventually figured it out so it works fine.

10264_bag2_door.jpg
10264_garage.jpg

The third set of bags builds the gas pump, the covering over the pump, and the tow truck. The gas pump is an old fashioned pump with a cool Octan logo on it. The covering over the pump has a sign that reads “Jo’s Garage” with the catchy and clever saying of “By Accident We Meet.” A blue tow truck is included too. It’s in the older style… maybe 1930s or 1940s… and has a simple mechanism to raise and lower the hook. This parts bag also has a female minifigure who is a mechanic.

Also included in this parts bag is a small tree that uses one of the newer leaf pieces to make the branches.

10264_bag3a.jpg
10264_tree.jpg
10264_bag3b.jpg

The fourth set of bags builds the second floor which is a Veterinarian’s Office. The front window says “Dr. Jones Animal Care - No Snakes.” Yet another clever graphic by the designers.

10264_bag4a.jpg
10264_bag4b.jpg

The waiting room has a small waiting area to wait for your animal to be taken care of. There is a girl minifigure who can’t actually sit on the couch or chair and a parrot who hangs out there. The waiting room also has a small table with a coffee mug, some flowers, and a fish tank with a fish in it that is build into the wall that divides the office with the waiting room.

The Office has an examining table, a work desk for the vet, a lab station, and a table with some equipment for the vet to use. The instructions have the vet examining a rabbit on the table.

Despite the size of the floor, the designers were able to squeeze a decent amount of detail in. I’m impressed.

10264_bag4c.jpg
10264_bag4d.jpg

The fifth set of bags completes the third floor. This floor is a studio apartment with one male minifigure that lives there. The apartment has a small kitchenette, a bathroom, a bed, a TV, a couch, and some decorations on the wall (a truck and a record). The front of the building continues with the brownish color (I’m not sure of the official term used by LEGO) with the blue-gray colored window frames. The third floor has some flowers growing on the window sill. You can also see some of the design done by the 1x1 pizza slice tiles (my name, not the official name) on the second floor.

10264_bag5a.jpg
10264_bag5b.jpg

I wanted to make sure the windows get captured because I like the way they were designed. The ones on the second and third floor above the garage door are made using SNOT techniques with one of the clear pieces used for truck windshields. I like that the windshield pieces are still framed by the same blue-gray color as the other window frames. The side above the front door has a balcony on the second floor and a window on the third floor. I’m not sure why the vet’s office needs a balcony versus the studio apartment, but you can always swap them if you want.

10264_bag5c.jpg
10264_bag5d.jpg

The sixth set of bags finishes up the build and completes the roof. The roof has some flowers growing, a lounge chair to relax on with umbrella overhead, and the doorway to get up there from the stairwell. This floor also completes the facade on the front. The facade design is pretty simple, but I still think it makes it look a bit more elegant and fancy versus just a plain corner on the top.

10264_bag6a.jpg
10264_bag6b.jpg

I added pictures of both sides so you can see the designs above each of the side windows. I like the use of the new-ish 1x1… um… it looks like more of an equilateral triangle or isosceles triangle versus a cheese slope… piece.

10264_bag6c.jpg
10264_bag6d.jpg

This set comes with six minifigures. On the top there’s the vet (Dr. Jones we assume) and 2 mechanics (a female and male). On the bottom are the “cool guy” who has a helmet to ride the motor bike, the girl who brings her pet to the Vet, and the man in a sweater who lives in the studio apartment. In my opinion, it’s a good mix of minifigures and I think having facial expressions adds to the set versus the original smiley face they used to have in the original modular building sets.

10264_minifigs.jpg

A closer shot of the vehicles… The tow truck has 2 tones of blue which gives it a nice look and then the motor bike.

10264_truck.jpg

Overall, this is not my favorite modular building, but I don’t have as many complaints as I saw in other reviews. I like how the angled wall in the front was done to create a corner building. There are a lot of pieces in great colors you can use in MOCs if you decide to tear your building down. The signage is clever with some of the humorous clips and the old fashioned Octan logo should become pretty popular on the secondary market. I’m a fan and I can’t wait to add it to my other modular buildings some day.

As for downsides, I think the garage portion could use a bit more detail. Maybe some more equipment for fixing cars or more things to sell. Also, the color transition from the white and green to the tan-ish and blue-gray on the second and third floors doesn’t go well with my untrained eye. I’m not sure what to recommend, but it seems to clash slightly with me. To be fair, if I’m going to complain, why don’t I just redesign it myself, right?

What are your thoughts? Is this modular building really awful? Or maybe just not as good as some of the ones in the past? Or maybe it’s just different from some of the ones we’ve had in the past like the Parisian Cafe or Grand Emporium. Let me know what you think.

Happy building!

10264_final1.jpg
10264_final2.jpg

Set Review - #10255 - Creator Expert - Assembly Square (Modular Building) - Part 1

As an AFOL this is one of my favorite times of year, the arrival of the new modular building set.  Released on 2 January 2017, #10255 is the tenth year anniversary set for the modular building series.  The cost is $279.99 in the US for 4,002 pieces.  That works out to be $0.07 per piece.  This is typical for most of these sets in terms of price per piece, but 4,002 pieces is quite a bit more than usual.  There are 13 sets in all over the past 10 years and I am lucky enough to have 11 of them.  I'm missing The Green Grocer and Market Street.  

10255_Assembly_Square_front.jpg
10255_assembly_square_back.jpg

This will be a multi-part review as it will take me a while to build this.  For now, I have taken pictures of the box (for some real excitement).  So let the building begin!!!!!!!!

In case you missed it, here is the LEGO designer video.

See part 2 of the review here.

See part 3 of the review here


Set Review - Creator - Vacation Getaways - #31052

I got this set a while ago and for some reason I forgot to post the review.  Sorry.  Set 31052 is part of the Creator line and is titled "Vacation Getaways."  It was released on 22 May 2016 and has a retail price in the US of $69.99.  That's $0.088 per piece for 792 pieces.  Here is my review...

box front.jpg
box back.jpg

Here is the box.  The front shows the camper with boat, picnic area, trees, and wildlife design.  The back shows the larger boat and the small house options as well.

contents.jpg


First part of the build at step 17 is the start to the base, 2 minifigures (a female and male child), a chicken leg and a camera).


31052build2.jpg


Next up you can see how the back opens up.  You can also see the start of a table area for eating meals.


31052build4.jpg


We now have 2 seats in the front, a door on the side, and the living area built.


31052build7.jpg


The designers used SNOT to put the front windshield in.  You can also see what the pull out looks like.  Pull out?  Is that what you call it?  Or is it an extension?


31052build9.jpg


Here is the final build to include a small motor boat, some wildlife, and 2 trees.


31052final2.jpg


Here is a look with the top removed with a better look at the eating area, kitchenette, bed, toilet, and driving area..  It also shows how the top comes off for access.


Set contents are 9 bags and the instruction booklet that is protected in a bag (Thanks LEGO!).


31052build1.jpg


Step 31 of the build is still more of the base


31052build3.jpg


Step 65 and it's starting to look more like a camper now.  The back is mostly done and we're starting to build up the front as sides as well.


31052build5.jpg


Here is a close up during the build of the kitchen area, the bathroom area, and the bed area that pulls out.


31052build8.jpg


The actual camper vehicle is done here.  We just need to add all of the extra parts on the top where the storage area is.


31052final1.jpg


Here is the build with the grill, table, chairs, and skateboard set up along with the awning out for some extra shade


31052final3.jpg

Final thoughts...
     -I'm a big fan of the Creator line.  It focuses on the building and not the licensed themes that are very popular.  I only built one of the 3 instructions included, but I thought it was a great build.
     -Lots of great pieces.  If you don't want to use this for your City scene or elsewhere, you can break it a part for pieces to use in your MOCs.
     -The cost is good and as of the date of this write up (10 Oct 16), Amazon has the set 20% off so if you're reading it around that date and were looking to get this set, now's the time!
     -If you're a fan of sets with lots of details, then this set is probably not for you.  Go for the VW Van.  This set is for building multiple sets with a single set of pieces.

What are your thoughts of this set?  Post them below!


Set Review - Creator Expert - Brick Bank - #10251 - Part 2

In case you missed part 1 of the review, it's here.

With 2380 pieces and 20 bags of LEGOs, this set takes a while to build.  After a few days, I was finally able to put it together.  Here goes...

contents.jpg

There are the contents.  A pretty thick instruction booklet that comes in a wrapped package for protection, a tan base plate, and 4 sets of bags (20 total).  This set also comes with a brick separator which comes in handy given the number of pieces.

The first set of bags is the tiles for the sidewalk and floors along with the start to the first floor.

build1.jpg

The designs for the floors inside the cleaner and bank are awesome.  Some new pieces were used to make the design inside of the bank part.  You can also see the start to the vault to include a vault that opens and closes with a dial.  The vault has a stack of cash... all $100s of course.  The first set of bags comes with one minifigure who is shown working as a bank teller.

build 2a.jpg

The Brick Bank is a corner building.  The bank side is shown here with the second set of bags complete.  It comes with 2 minifigures, a girl and a woman.  The box shows the woman taking a picture of the girl receiving a check for 500 studs.  You can also see some of the great design features used to make this set stand out.  You'll also notice that there is a decal on the windows.  If you were paying attention, I didn't mention a sticker sheet.  YES!!!  No stickers in this set, everything is already printed on.

build2b.jpg

Here is the other side of the bank and "Soap 'n' Suds" the laundromat.  The advertising on the laundromat is fun with a pair of pants and a washing machine.

build2c.jpg

Here is a top view of the set with the second set of bags completed.  The vault is complete although you'll notice there is a way for a potential thief to sneak into the vault through a shaft above.  Also, the laundromat has 4 machines to include one for "laundering" your money.  

build3a.jpg

The third set of bags complete here with the second floor done.  The second floor has 2 office spaces to include a private office.  The chimney continues to allow a thief down to the vault.  2 more minifigures come with this set of bags.  They are both male figures.  One is shown in the office stamping and another is shown just outside the office at another desk.

build3b.jpg

Here is the other side of the building.  You can see the clock attached to the building and the design of the front of the building to include the textured pillars and the window designs.

final1.jpg

Here is the final set .  The top has a large sky light.  Also the picture doesn't show it, but there is a cool looking chandelier that lights the building.  You can also see included is a ladder, broom, and bucket so someone can clean the windows.  

finalcorner.jpg

Here is the front of the building from a corner view.  You can see the tree, bench, and lamp post outside.  Also, there is a pulley that the box shows as a way for them to install the laundry machine on the signage.  It could also be used for a thief trying to climb up.  I don't have it shown, but the set include a LEGO string, black hat, and scarf for one of the characters to put on and sneak into the vault through the chimney.

2modulars.jpg

I have other modulars, but many are boxed up as I don't have space to have them displayed all the time.  Here is the Detective's Office from last year attached to the Brick Bank.  Both fantastic sets with some creative building techniques.  The Brick Bank does not disappoint.  While you have to shell out some extra cash to get it, it's well worth it.  It's a challenging build with some interesting building techniques.  For those people that like to build MOCs, there are some great pieces in here for building future designs.  

Well done LEGO on another great modular building!


Set Review - Creator Expert - Brick Bank - #10251 - Part 1

(CLICK HERE FOR PART 2 OF THE REVIEW.)

The LEGO modular building line was started in 2007 and I am a huge fan!  Each set typically has more than 1,000 pieces and many have over 2,000 pieces.  As they have continued to be released, the details have become even more impressive. You don't buy these sets for the minifigures (they exist, but have the standard yellow face), you buy them for the build.  

This year's set is the Brick Bank.  It contains 2,380 pieces and costs $169.99 in the US. This works out to $0.07 per piece (it's actually .07142 and so on, but I figured you all weren't too concerned about that).  Not a bad price at all in terms of price per piece.  It was released on 2 January 2016 and LEGO keeps them out for a few years (some have been on sale for 4 years, others less).  Often times it's best to wait for Double VIP point promotions or other details, but in this case I was given some LEGO gift cards as Christmas gifts so I decided to order it sooner rather than wait for Double VIP points.  

I haven't had a chance to open it yet.  I'll release details on set contents and the build in a future post.  For now, here is the box.

brickbank10251front.jpg

As you can see from the front, it contains 5 minifigures and the build is split into 2 floors and a roof.  The front of the building is the bank and then along the back, it's a laundromat.  It's a corner building similar to the Cafe Corner, Grand Emporium, and Palace Cinema.  If you're not familiar with the modular buildings, along the bottom of the building are Technic pins that can be attached to other modular buildings (or you can build your own).  

brickbank10251back.jpg

The back of the box shows some details of the set, the different floors, and what the set looks like next to previous years modular buildings.  This box shows the Detective's Office (and here) as well as the Parisian Restaurant.  I'll go into some of the fun details of the build once I build it.

Has anyone else purchased or built it yet?  Let me know in the comments.

CLICK HERE FOR PART 2 OF THE REVIEW.

Set Review - Blue Power Jet - #31039

The Blue Power Jet was released in the US on 15 May 2015.  It is a part of the Creator line and contains 608 pieces total.  It costs $69.99 in the US which works out to be 11.5 cents per piece.  In my opinion, this is a bit high.  I found it on sale at Amazon.com for $59.99, which works out to be 9.8 cents per piece.  Right under the average of 10 cents per piece so about average.  If you're interested in this set, I would definitely look for a sale if you can find one.  

boxfront.jpg
boxback.jpg

As you can see on the box, it comes with 3 separate designs.  There is the jet, a helicopter, and a speed boat.

contents.jpg

The set comes with 5 parts bags and a 217 page instruction booklet.  It also comes with a part separator which is $2.49 from LEGO if you buy it separately so you can't complain there.  The bags are not numbered since there are 3 different builds so it takes a bit to find the pieces you need.  It also makes it more fun.  On page 2 of the instruction booklet, it says there are 3 different builds.  There is a "quick build" which is the speed boat, a "medium build" which is the helicopter, and an "advanced build" which is the jet.  For this review, I show the jet version only.  Interestingly enough, the Blue Power Jet looks a lot like the US military's F-35 Lightning II.  

F-35A - Courtesy of www.af.mil.

F-35A - Courtesy of www.af.mil.

You'll notice some of the differences pretty quickly.  Besides some of the differences in shape (intakes, bottom of the aircraft, tail), there's the 2 seat cockpit versus the single seat cockpit, and the landing gear being visible.  I'm getting ahead of myself... let's get into the build.  

build1.jpg

The build is on the bottom of the picture with all of the pieces above it.  You can see how the front landing gear fits in and you see the use of the Technic pieces to hold it all together.

build2.jpg

As the build continues, you can see some of the engine taking place.  This variant looks similar to the F-35B variant that the US Marine Corps will use.  You can see some pictures on Lockheed Martin's Flickr stream here.  You'll notice a few pictures where panels open up so the aircraft can do vertical takeoffs and landings.   In later pictures, you'll see that the top of the LEGO model has panels that open so you can see the engine inside.  Not sure if it's for maintenance purposes or if it's vertical takeoff and landing parts.  

build3.jpg

In this photo, you can see the cockpit taking shape.  The front seat has a green 1x1 translucent tile that I assume acts as the Heads-Up-Display or HUD for the pilot.  

build4.jpg

In this photo you'll notice that the main part of the fuselage is covered.  There are 2 panels that open up (a picture of them open will be shown later).  Also, one of the wings is installed.  When I started the build, I was confused as to how it was going to work, but in the end it turned out very nice.  My only complaint is that the top is very detailed, the bottom is very plain (another picture seen later).  You'll notice the flaperon as well.  In my opinion, there's a lot of space between the wing and flaperon, but there isn't much you can do with a model this small.  By the way, if you don't know what a flaperon is, it's an aileron that can be used as a flap as well.  The aileron help you turn the plan, the flap gives you added lift at slow speeds.  Watch the wings the next time you fly commercial and you'll see the flaps open up before landing.

build5.jpg

Here is my final build in progress picture before the final one.  Both wings are on now.  We're just missing the tail (vertical and horizontal stabilizers) and the canopy.

finalbuild.jpg

Here is the final build.  I put he flaperons up, the horizontal stabilizers are pitched as well.  You can see the panels open on the fuselage to expose the engine parts.  Also, the canopy is open too.  The actual F-35 has a single canopy piece that opens at the front versus 2 pieces.

finished.jpg

Here is a picture with everything closed up.  

front.jpg

Here is a view from the front.  The nose is pretty flat and not a great aerodynamic shape.  Given the small space, I can't complain with what the designer did.  I'd rather have this then, LEGO building a specific piece that is a BURP (big ugly rock piece).

bottom.JPG

Here is the bottom of the aircraft.  Very plain if you ask me.  Landing gear is exposed, the wings do not have a shape on the bottom (camber is the official term for you nerds like me), and the color scheme from the top does not continue on the bottom.  To be fair, I'm sure LEGO didn't design this to be an official model.  They built it to give someone a building experience and if you want to make it better, go for it.  Get some additional pieces and knock yourself out, right?

Overall, it's an impressive model.  Lots of great detail and fun to build.  It's not an exact replica of a fighter jet, but given the size, I can't complain.  The price is a bit high so look for it on sale or take advantage of deals on LEGO.com (double VIP points or free give aways) to help out with the higher price.  I didn't build the other 2 models, but having the instructions for 2 others is great too.  Plus, it comes with a ton of great pieces.  The darker blue color is great to build with and I'm sure there are many other things you could build with these parts and maybe a few others.  The box says it is for ages 9 to 14.  I realize I'm older than that, but it's all good.  Younger kids may have trouble with the build or it may be a good time to sit down with a kid and spend some time together away from a screen.

I hope this post was useful.  Let me know in the comments if you'd like to see something different in set reviews.  Also, let me know if you have this set and what you think.  

Finally... I do not have this set available in my store.  Sorry.  I will look to catch it on sale so I can add it to the store or to one of my sales events. 

It's a Ferrari! - Set Review - Ferrari F40 - #10248

I finally got some time to build.  WOOHOO!  I had 4 sets waiting for me.  The list includes Wall-E, The Big Bang Theory, Simpsons Kiwk-E-Mart, and the F40 Ferrari.  My first choice of build was the Ferrari and I definitely think it was a great choice, but I'll get into that later.

The F40 Ferrari (#10248) was released in 2015 under the LEGO Creator Expert line.  The age range says 14+ on the container.  It contains 1,158 pieces (I'll trust he box, I didn't count) so quite a few.  The price in the US is $99.99 so that works out to be $0.086 per piece so not too bad when it comes to LEGO.  No minifigures are included, but that was fine for me.  It also includes a piece separator to help you take it apart or help fix mistakes you may make (yes I did make some).  

Here are pictures of what the container looks like.  It is a decent size, but there wasn't a lot of open space on the inside.

Here are the contents of the container.  Four bags labeled "1" and four bags labeled "2" with a large instruction book (over 100 pages) and a small sheet of stickers.

contents.jpg

The instructions were in a bag, but not with a cardboard piece to keep them from bending like in some of the larger sets.  The instructions weren't bent in my container so I can't complain.  The stickers were flat too.

Onto the bags labeled number 1.  I'll be the first to admit that I made some mistakes in this build.  I'm not sure if I was rushing or just that it was challenging.  It wasn't anything that I couldn't fix, but I definitely think the age range listed on the container is spot on.  Younger children can build this, but will most likely need an adult to help them out (which isn't a bad thing).  Here are a few pictures of the results from the first set of bags.  Lots of SNOT (Studs Not On Top) techniques, use of Technic style pieces, and some very creative building techniques.

The bags labeled #2 were next.  I was thankful that there weren't a ton of stickers.  Most of them were of the Ferrari logo, but a few of the pieces were printed on to save the hassle.  I am not a fan of stickers, because I never seem to put them on right.  The stickers I placed on look okay, but you can definitely see they are stickers versus printed on pieces.  More creative building techniques in #2 and some amazing building techniques I haven't used in the past.  The tires and rims were great too.  I'm not sure if they have been used in a previous set, but they definitely help make the model in my opinion.  Here are some pictures of the finished product.  Note that you can open the doors, the hood, and the trunk to see the engine.  I'll admit I've never been close enough to a Ferrari to inspect it to see how realistic the engine looks, but I think it's impressive.

Overall, this was a great build.  It was challenging with some great use of building techniques to create a final item.  The vehicle is very sleek.  I'm impressed at how the designers were able to create such a streamlined model using just LEGO pieces.  I will probably never own a real Ferrari... for one, too expensive for me and two, I have never learned how to drive stick shift and don't want to learn on a Ferrari.  However for $99.99, plus tax, I am okay with owning a model of one.  The build was enjoyable and it comes with a lot of great pieces if I don't want to keep the car together.  It's a great LEGO model for an adult, teen, or for a younger kid to tag team with an adult.  

If you want to buy it, I recommend going straight through LEGO through their website or a physical store.  You can find them online, but they are all marked up much higher over the retail price.  Amazon.com lists the cheapest one at $142 today.  Sign up for the VIP program and if you time it right, you can get a free item with it or whatever they are offering.  Also, the price will get you free shipping so that'll save you some too.

Let me know if you get it or if you have one.  I'm curious to see what you think.

Set Review - LEGO Creative Supplement - #10693

Thanks to some great friends, I received a LEGO set as a gift.  It was set number 10693, the LEGO Creative Supplement.  

creative_sup.jpg

It got a little damaged in shipping, but the contents inside are still good.  There are 303 pieces inside and they are displayed on the back of the container.

creative_sup_back.jpg

As you can see there are a wide variety of colors in this set as well as types of pieces.  It's not just bricks, but slopes, cylinders, some SNOT (studs not on top) parts, and a few other fun pieces.  There are even a few translucent parts in the mix.  The set includes a brick separator as well and a few 1 x 1 eye tiles.  Other than that, the set does not include any other tiles or plates.

creative_sup_inside.jpg

The inside contains 3 bags of bricks and a booklet of some various designs you can build.  

So why would you want a bunch of random bricks?  To build whatever you want with them, that's why!  You can use just the pieces in the set to build or you can add them to your other sets and designs to build whatever you want.  

The set is $19.99 for 303 pieces.  That's a little over $0.06 a piece.  In terms of price, it's a pretty good deal if you look at price per piece.

Is this a good set to buy?  It depends on who is buying it.  A LEGO fan who builds to the limits of the bricks he/she owns will love this set for the added parts.  A child who is used to sets with instructions and minifigures may not appreciate this set.  So it all depends.  If you're looking to get me a set, I like it!