Set Review - #71038 - Disney 100 - Collectible Minifigures

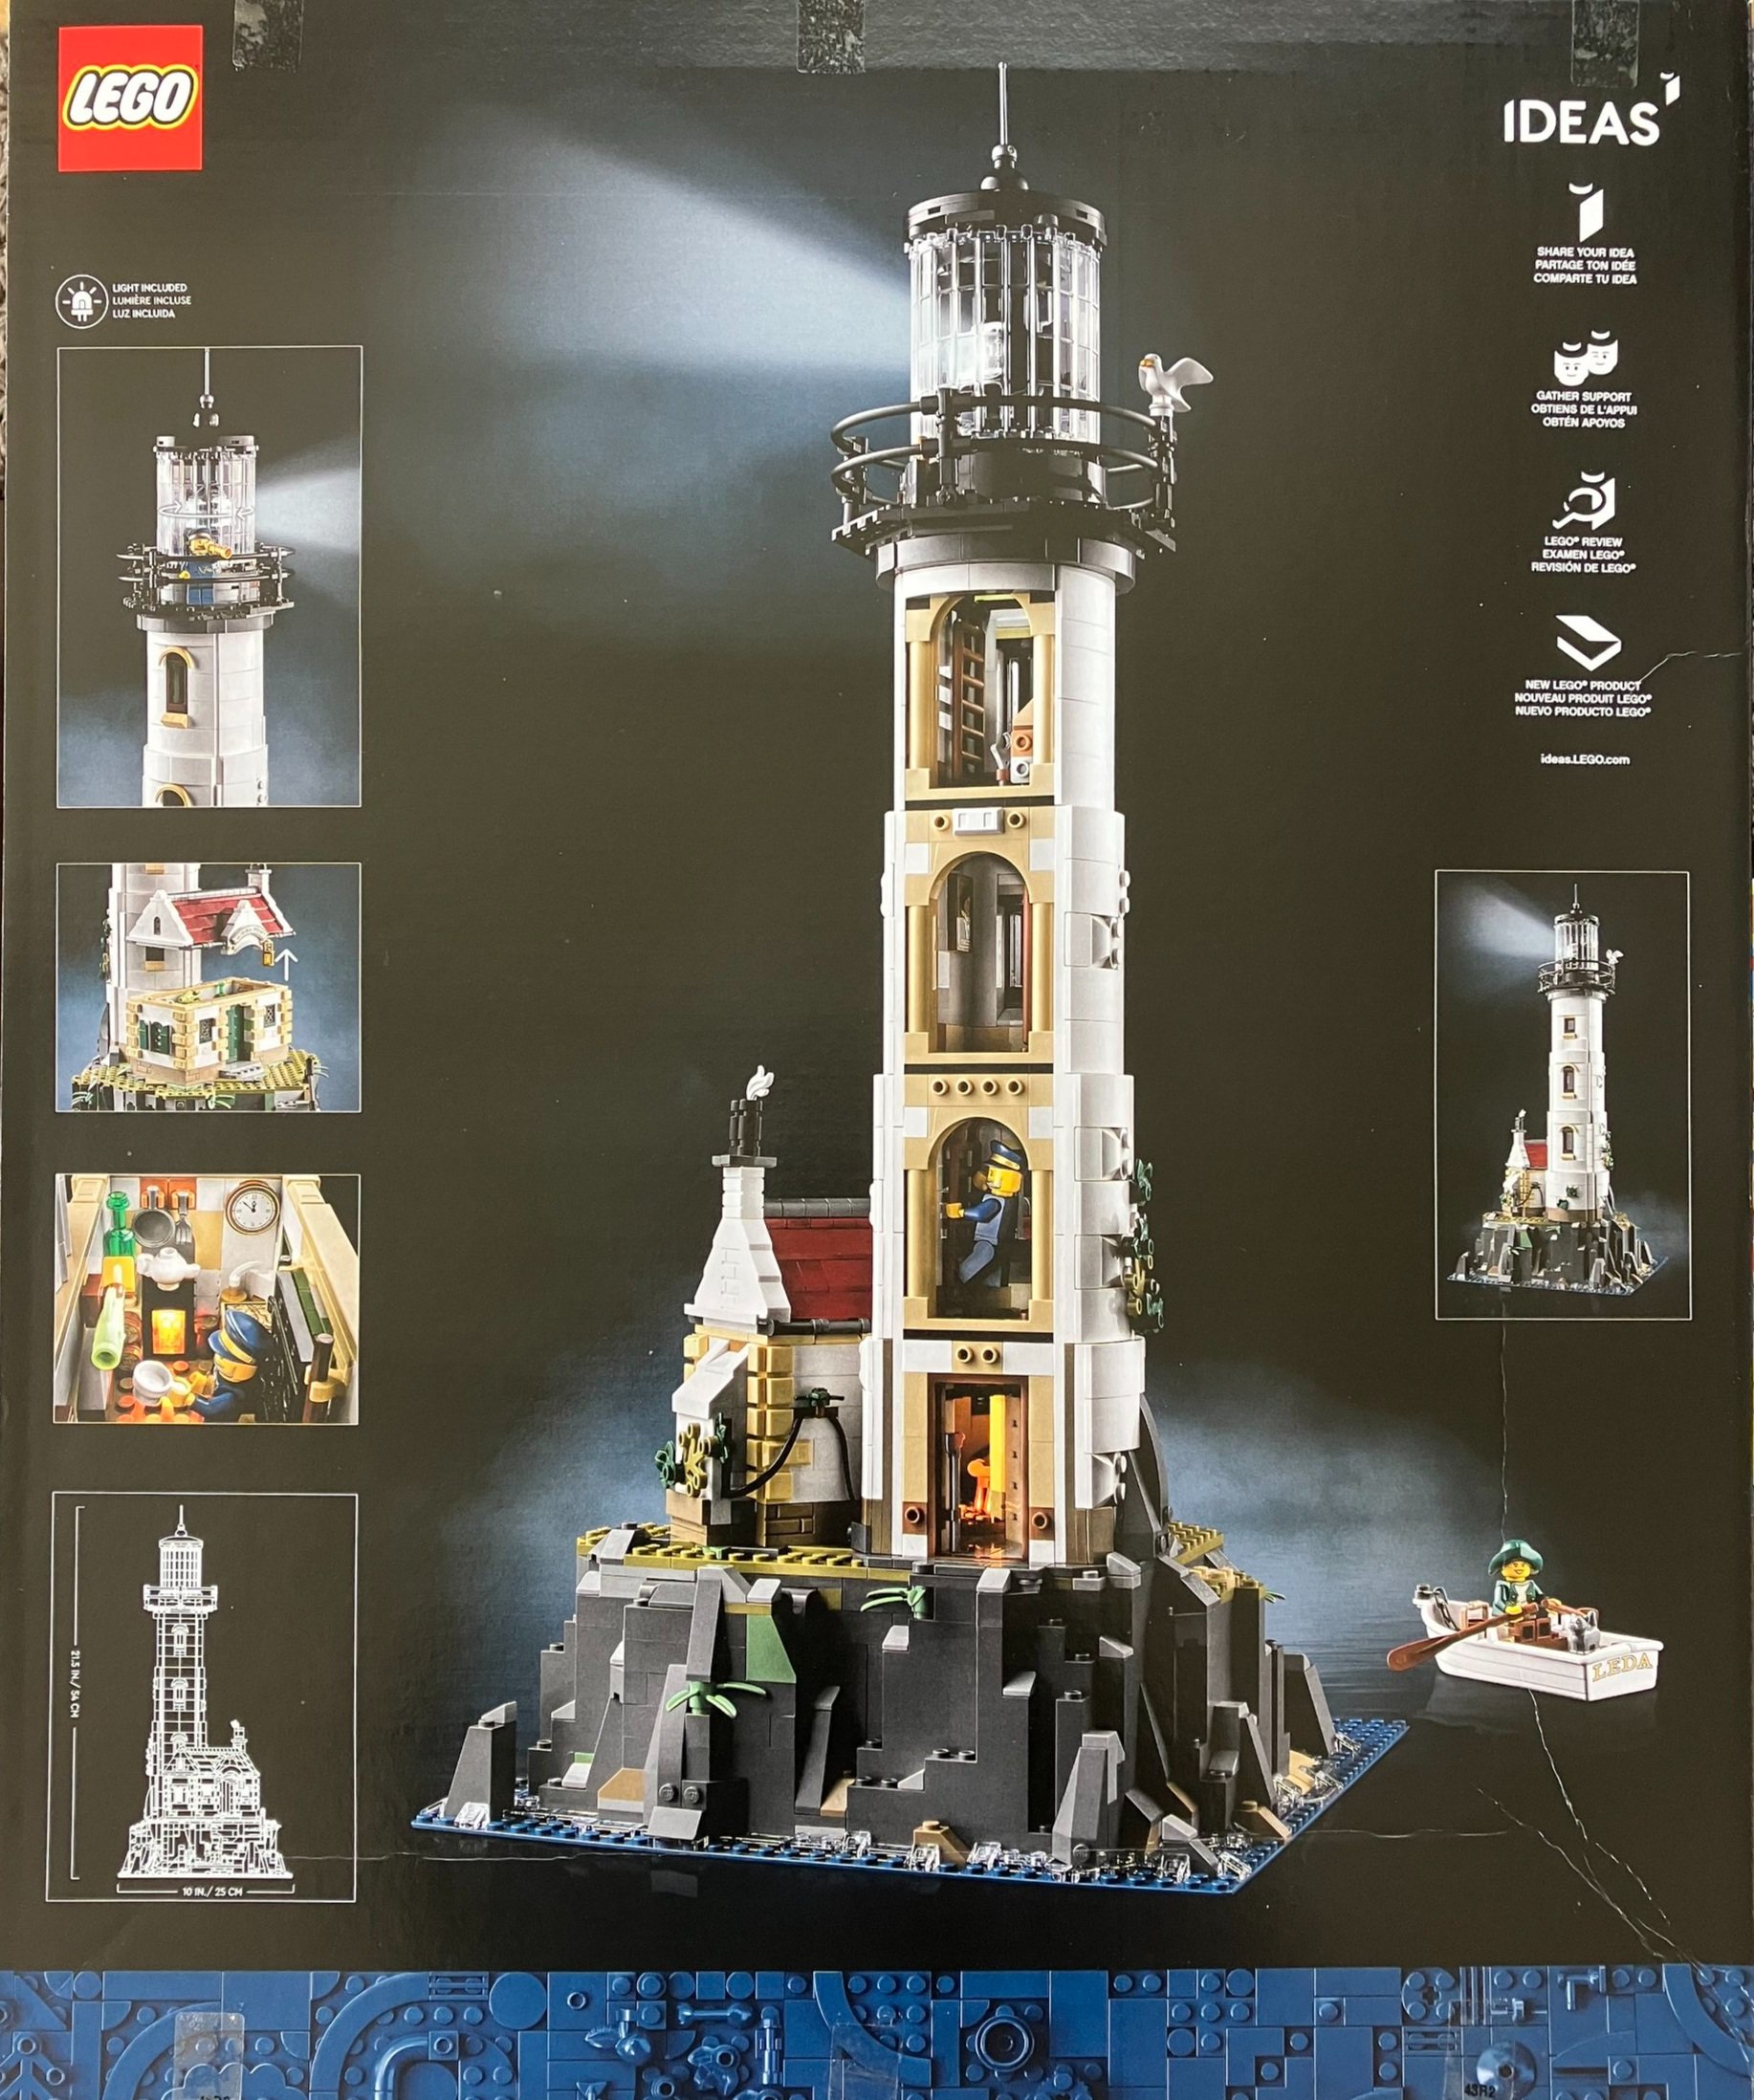
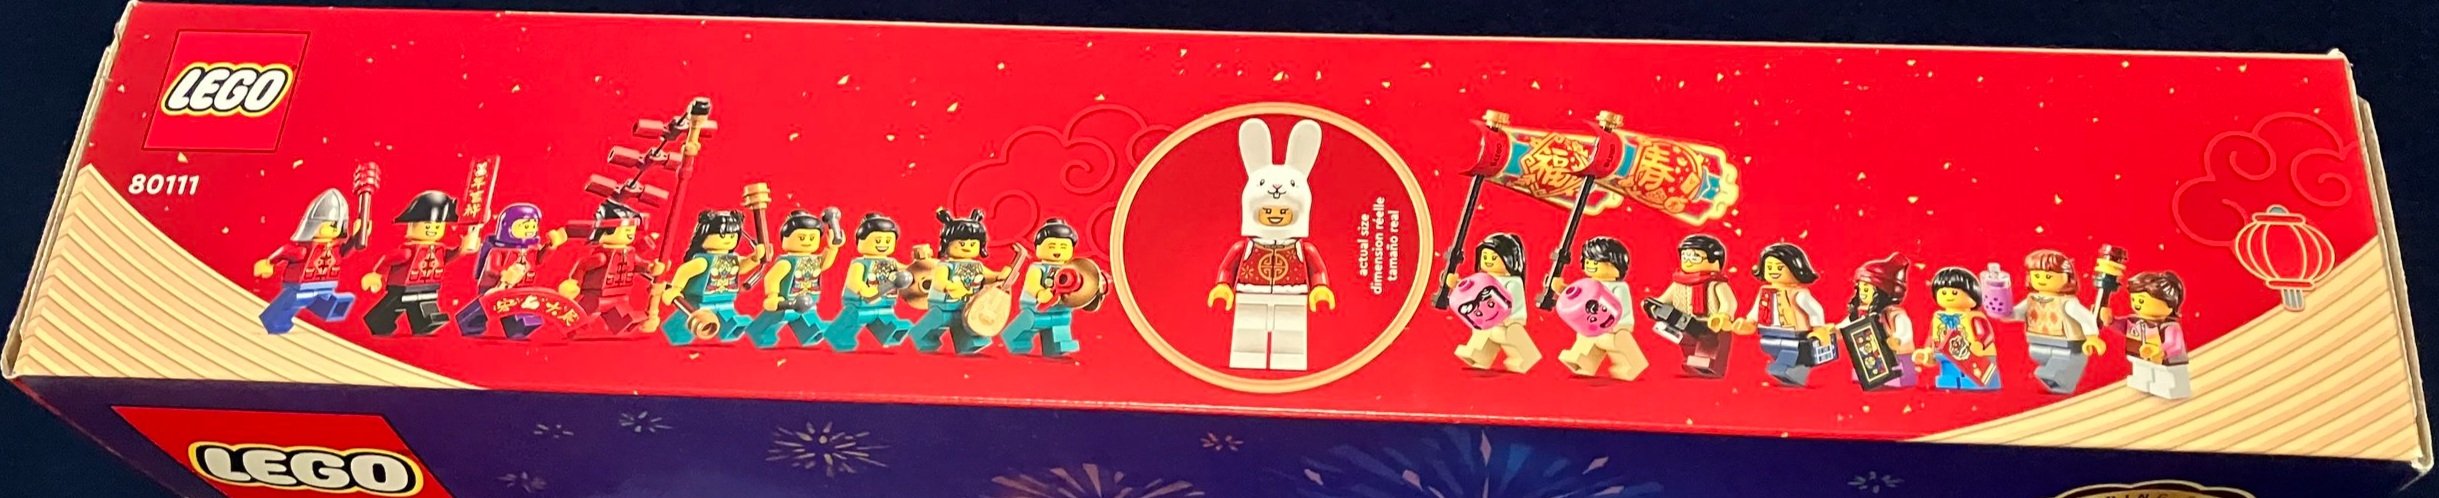
We just had two Collectible Minifigure Series of original minifigures and now we’re back to another licensed theme. The Disney 100 series was released on 1 May 2023. It contains 18 minifigures instead of 12 like the previous two series. The price is still $4.99 each per minifigure.

Overall, I’m not a big fan of this series, but I’m also not a big Disney fan so maybe I have a biased opinion. It definitely has a diverse grouping of minifigures from some movies I haven’t seen before. I thankfully didn’t have to buy a ton to get all 18. It took four boxes of six to get to the 18. I bought 6 boxes total so I have some extras, but that’s the good part of having a Bricklink store is I have a place to sell them when I have extras. You should get these if you’re a Disney fan or if you’re addicted to needing each Collectible Minifigure set (like I am). Otherwise, only get them if you really want a part or like one of the minifigures. With any luck, these will go on sale towards the end of their shelf time similar to how some of the previous series have done. Onto my comments on the minifigures…


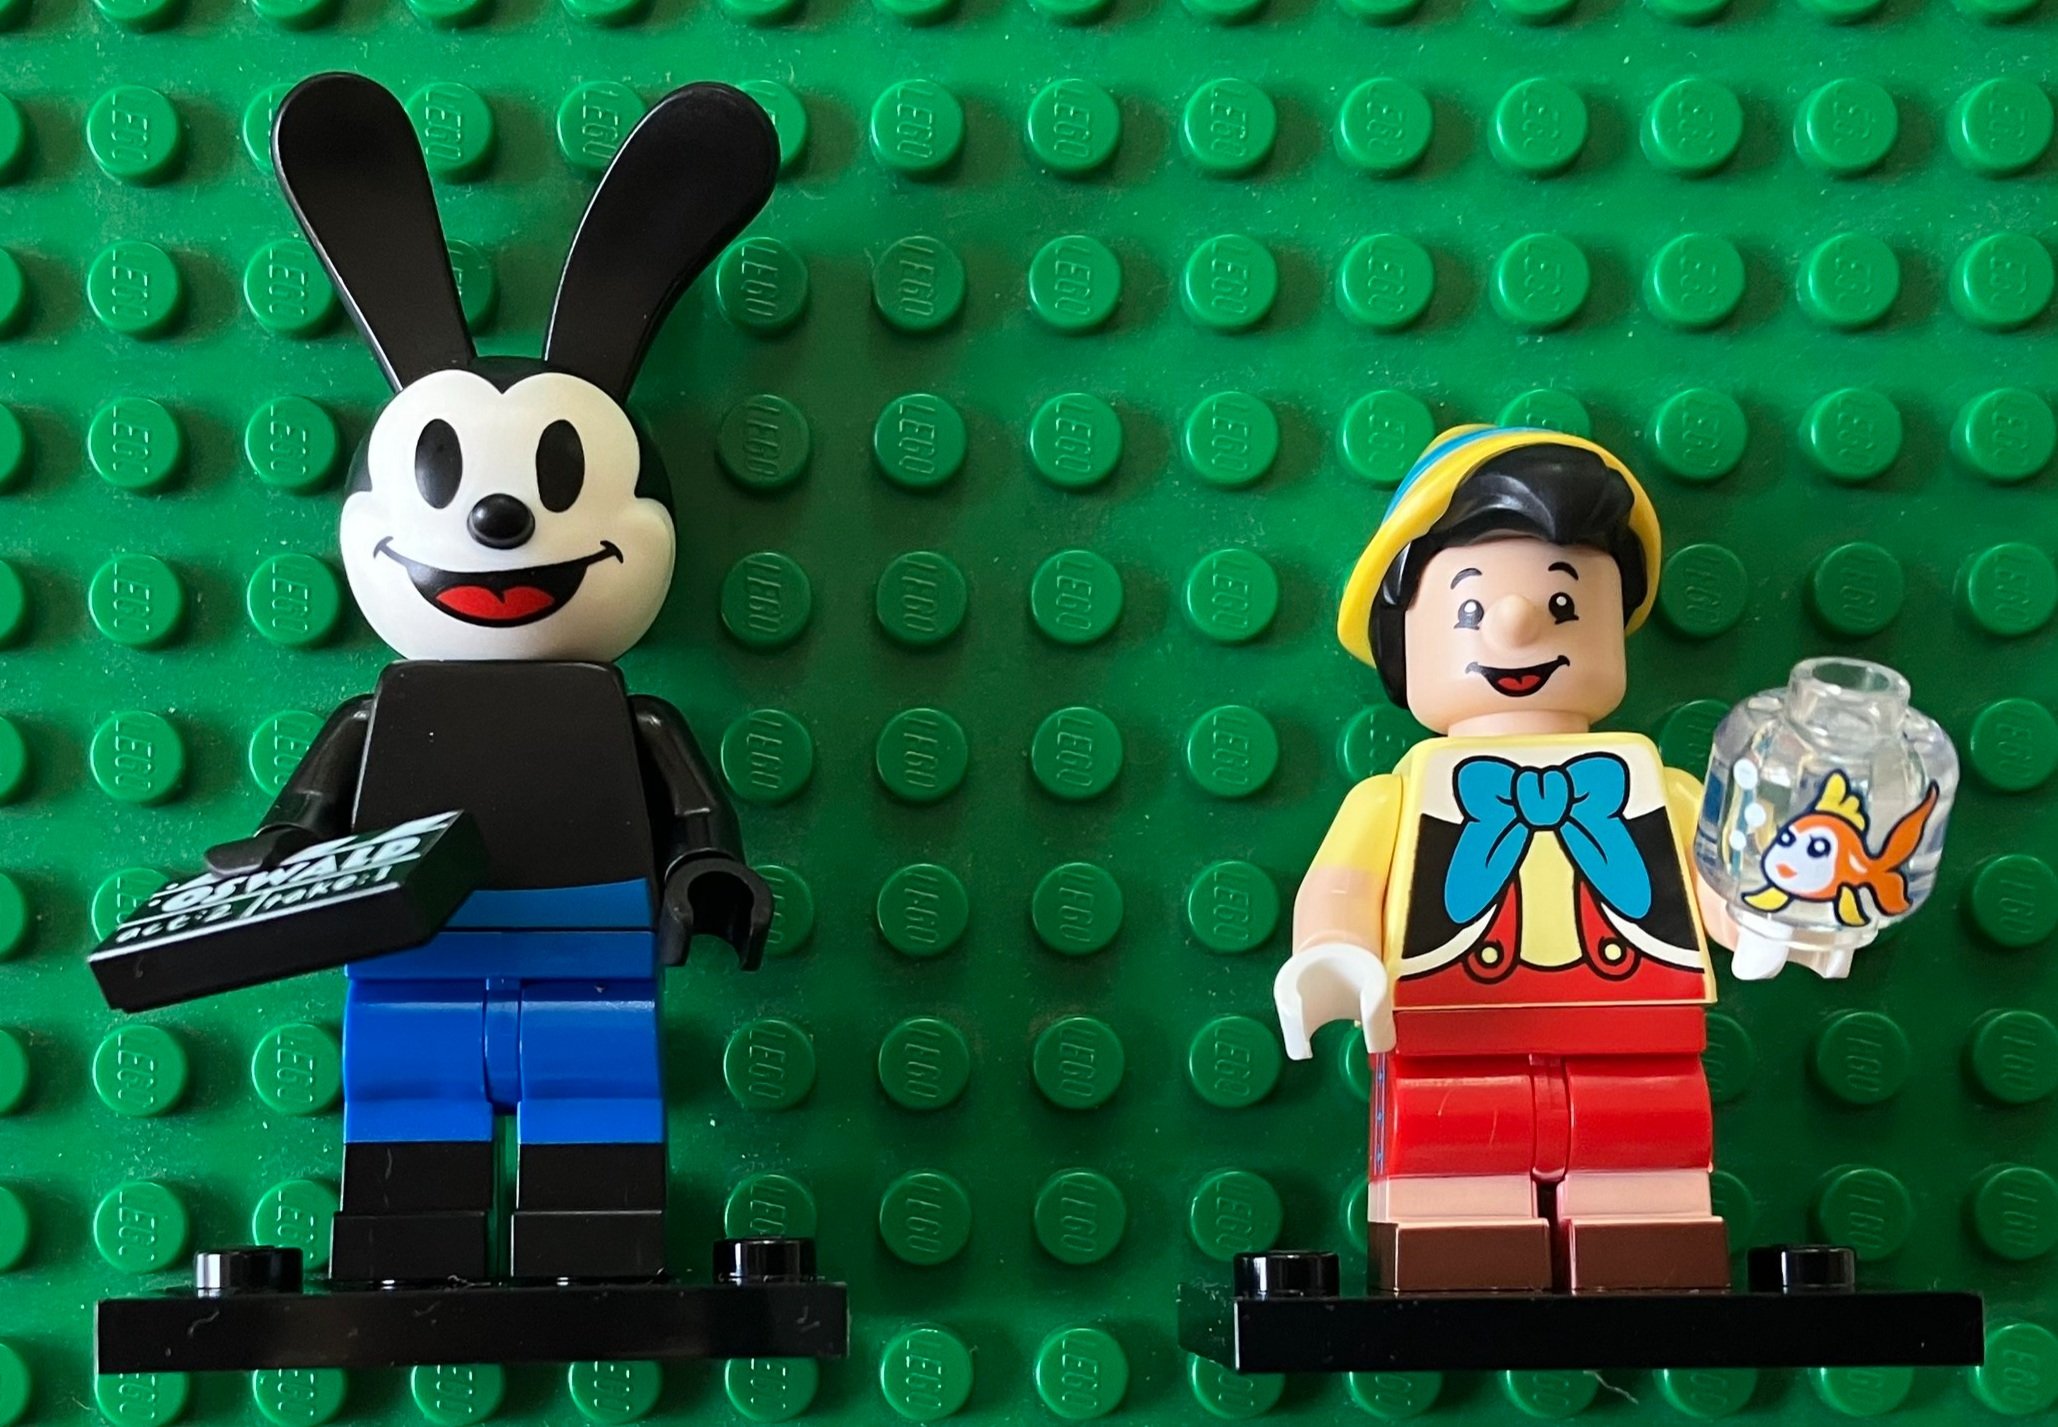
Oswald the Lucky Rabbit has a different shaped head with ears attached so that’s unique. He also comes with a printed 1x2 tile. I’m not sure what else I’d do with him besides a display of minifigures, but I’m sure someone will come up with something cool

Pinocchio has the normal minifigure head, but has a molded nose which is a first from what I know. He comes with a clear minifigure head with the fish printed on it as a fish bowl. His legs have different coloring which is a nice touch to give a shorter minifigure shorts.


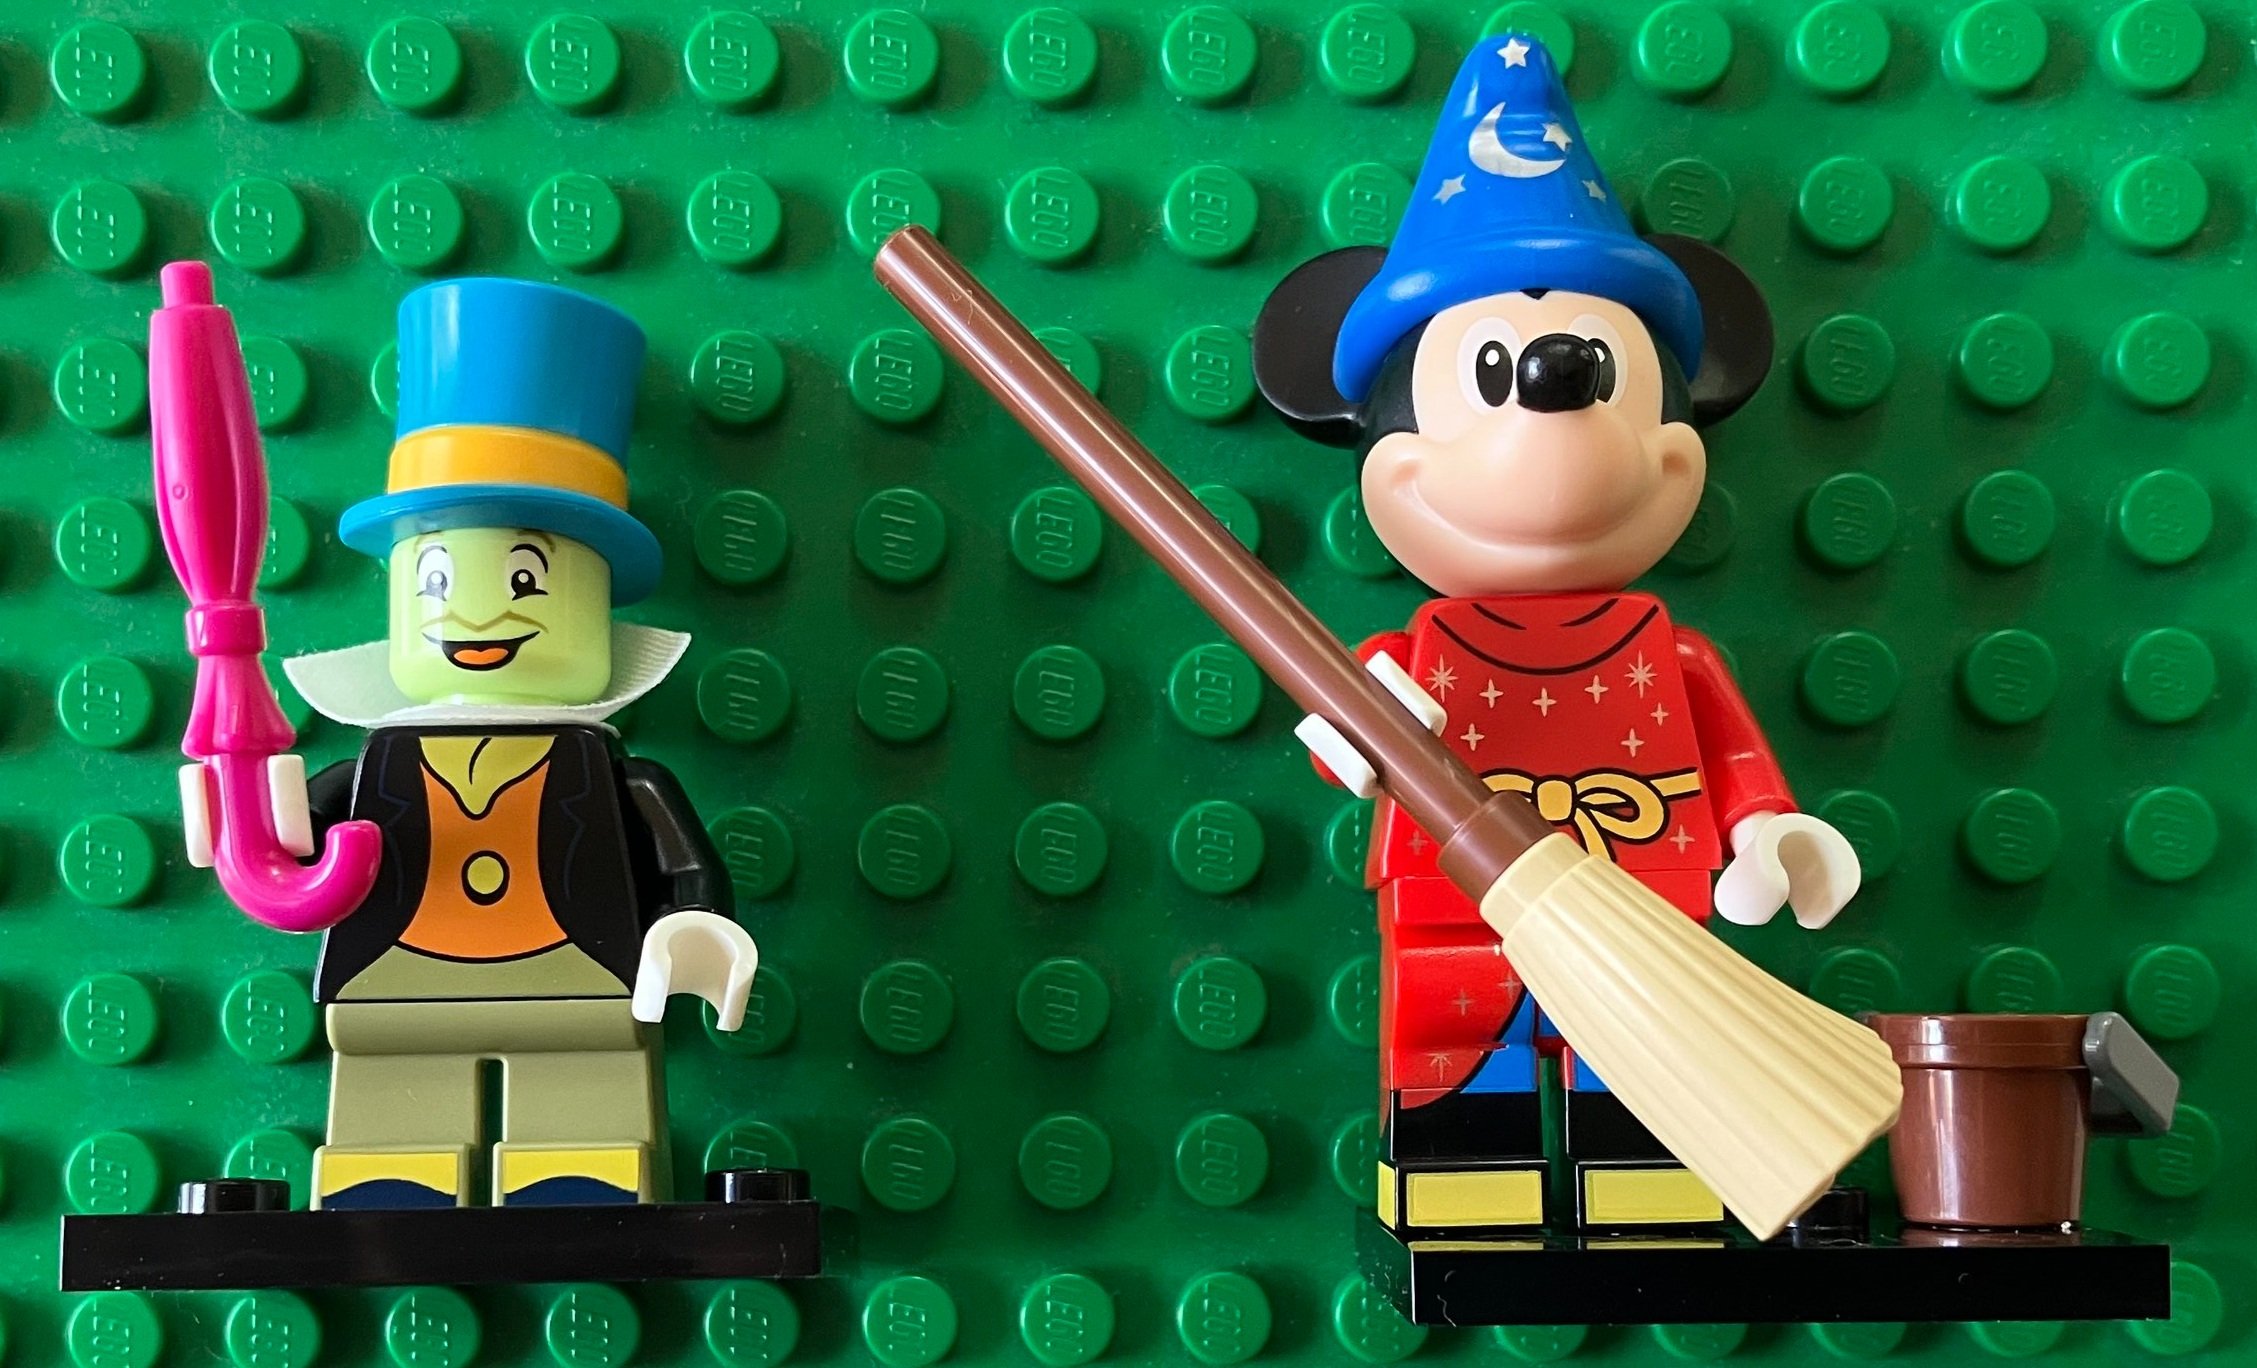
Jiminy Cricket looks a little odd as we’re used to seeing him with a shaped head instead of a minifigure head. For a LEGO minifigure it works I guess. He’s got an umbrella which isn’t new and a collar piece for his shirt. The hat is a nice touch with the yellow band around bottom.

Sorcerer Mickey looks similar to the other Micky figures only with the sorcerer get up. He comes with a pail and mop. Nothing else overly spectacular here.


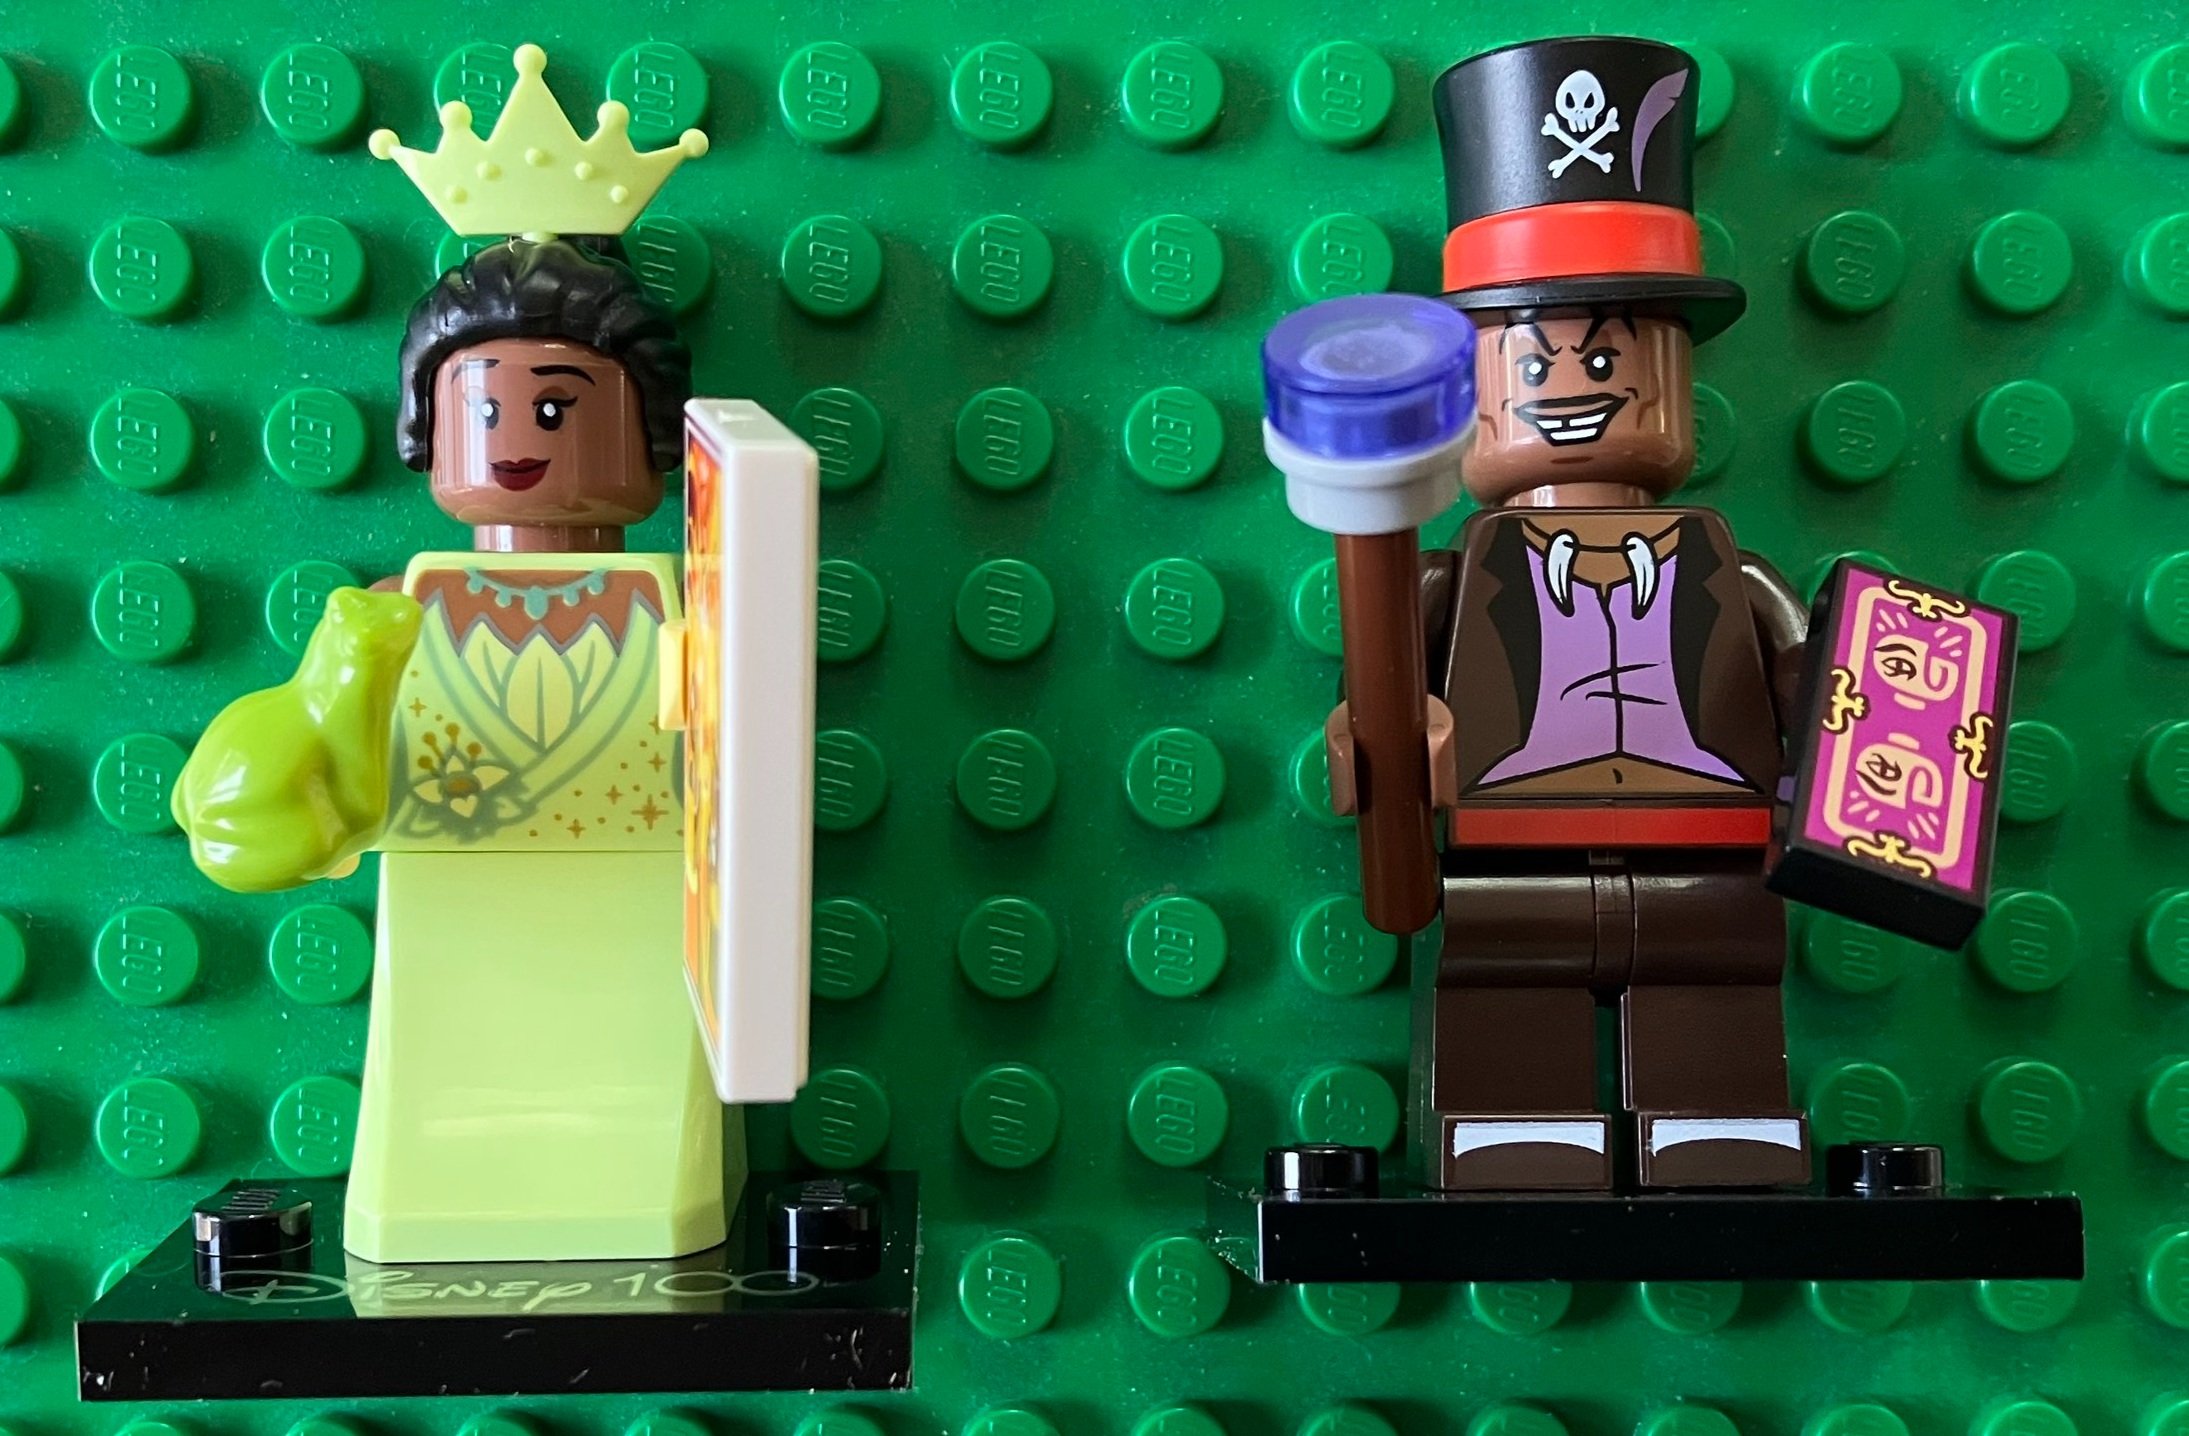
Tiana comes with a light greenish colored tiara and a frog. She has a 2x3 printed tile as well. The color of the dress is different so that’s good.

Dr. Facilier… um, I haven’t seen the movie so I guess he is okay. I don’t know…The top hat with the skull and cross bones could work as a pirate minifigure in a pirate themed MOC.


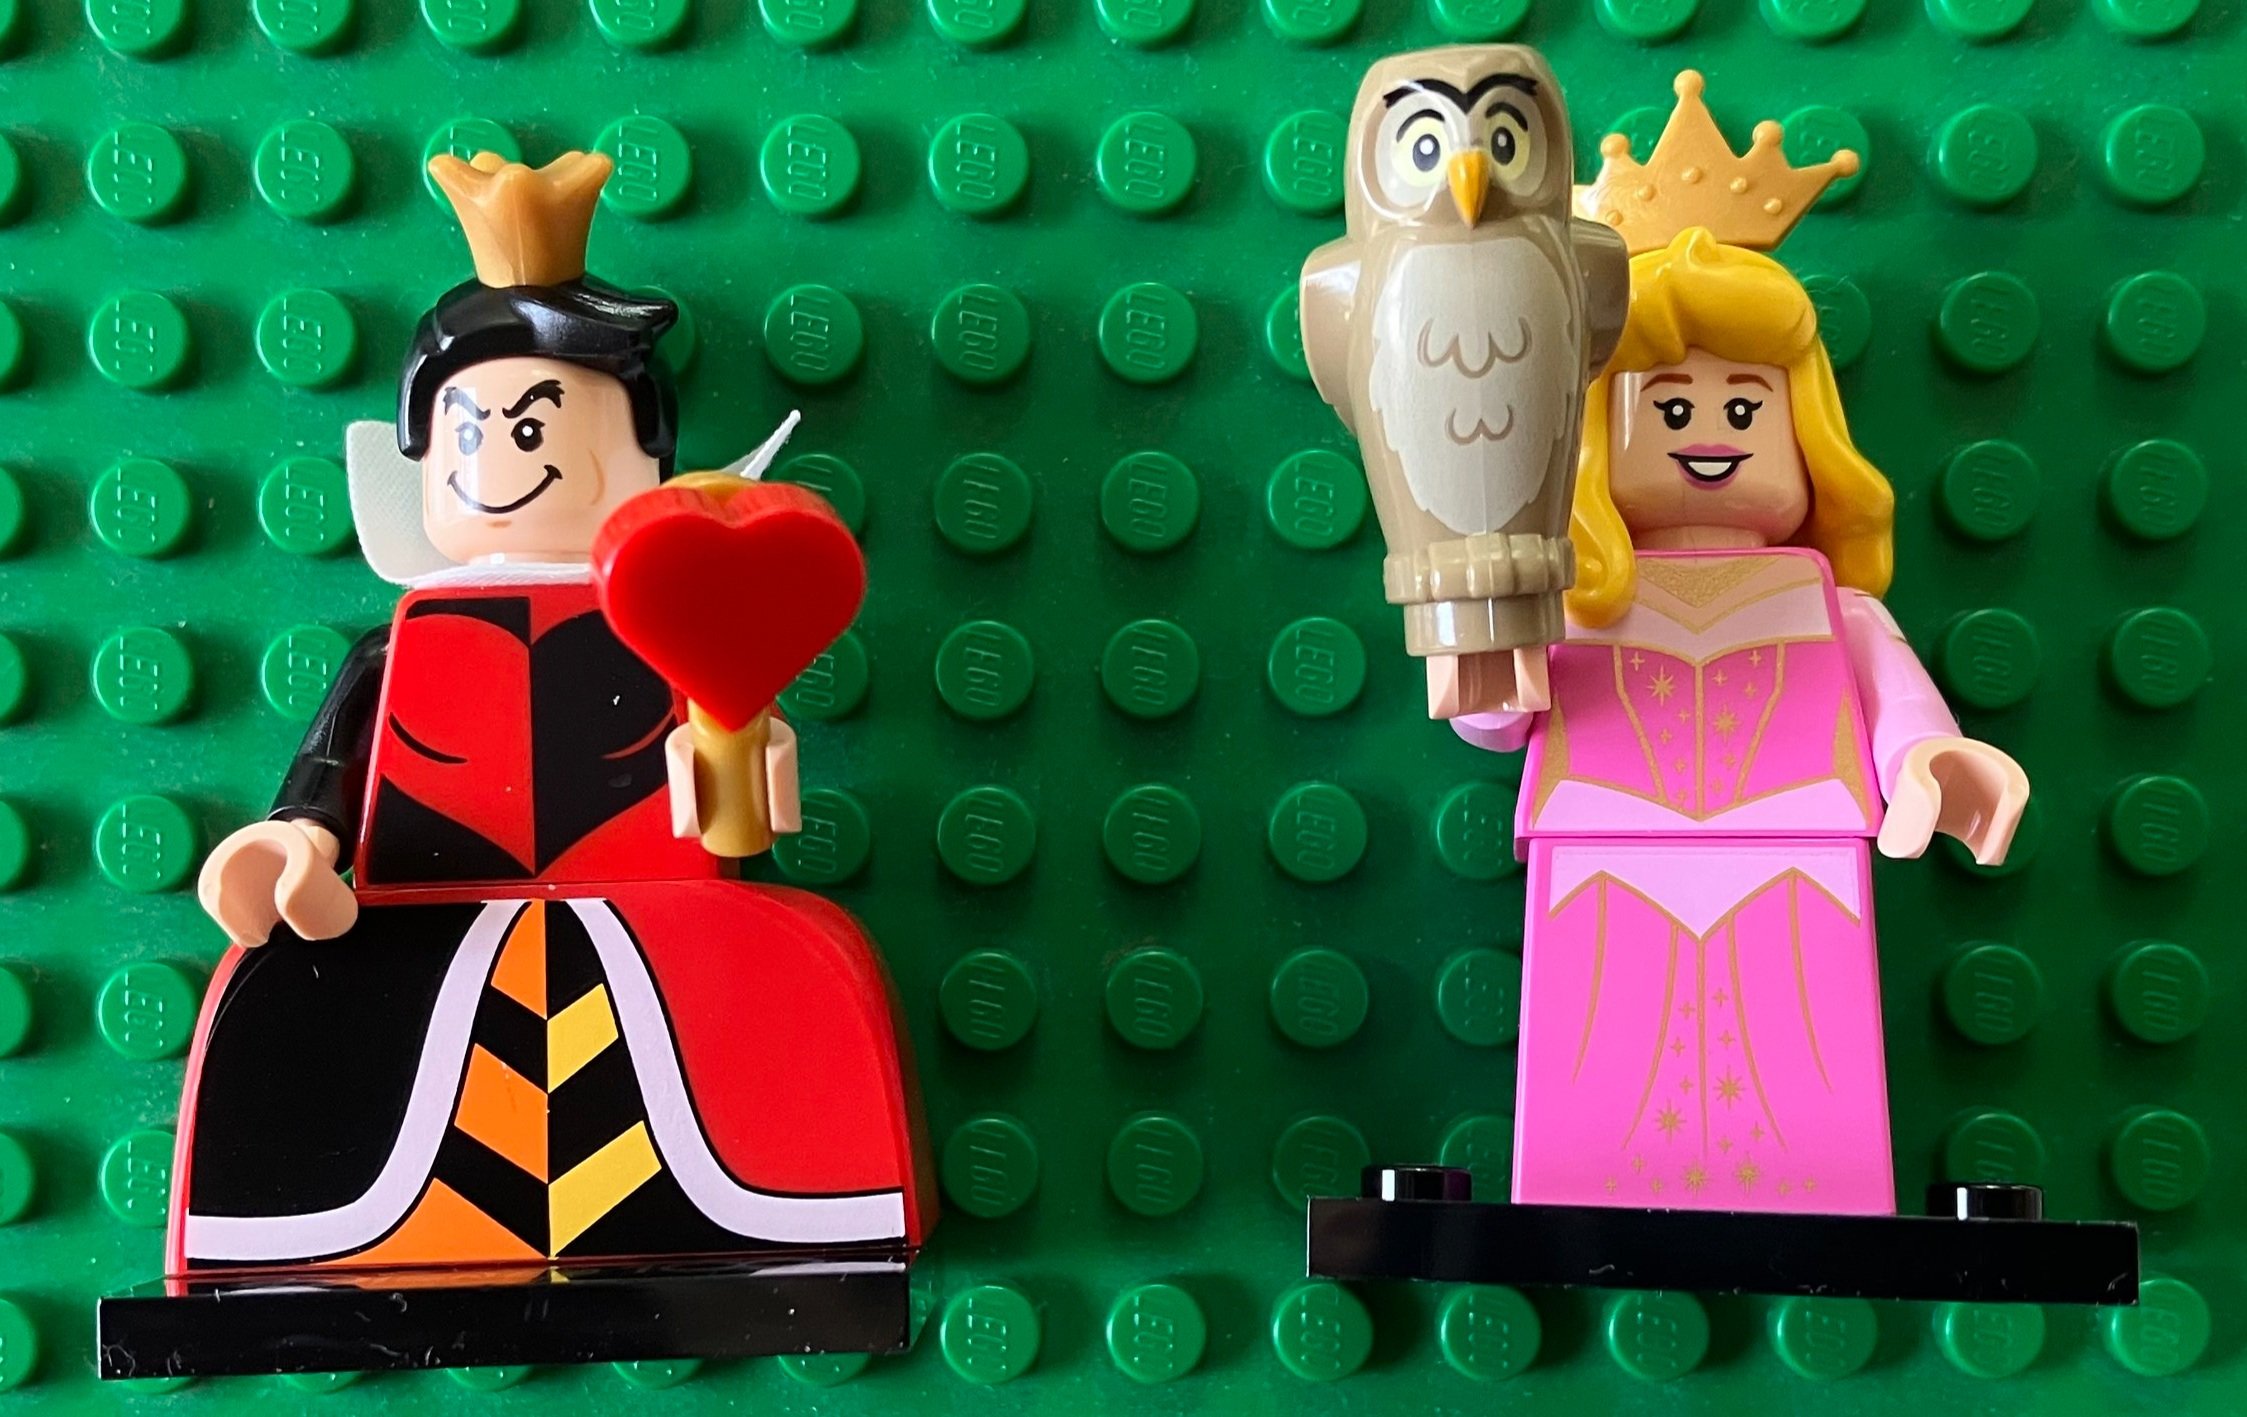
Queen of Hearts looks like I’d picture the Queen of Hearts and she even has a heart scepter. The face looks less like a minifigure face and more like a cartoon.

Aurora isn’t really all that special in my opinion, but you do get an owl that is different from all of the Harry Potter owls so a new animal is always a good thing.


Mulan looks pretty tough. I think it’s a good looking minifigure. Nice work here.

Ernesto de la Cruz… I haven’t seen this movie so I have no idea what to say here. The white guitar is fun and the sombrero as well.. Beyond that… I don’t know?


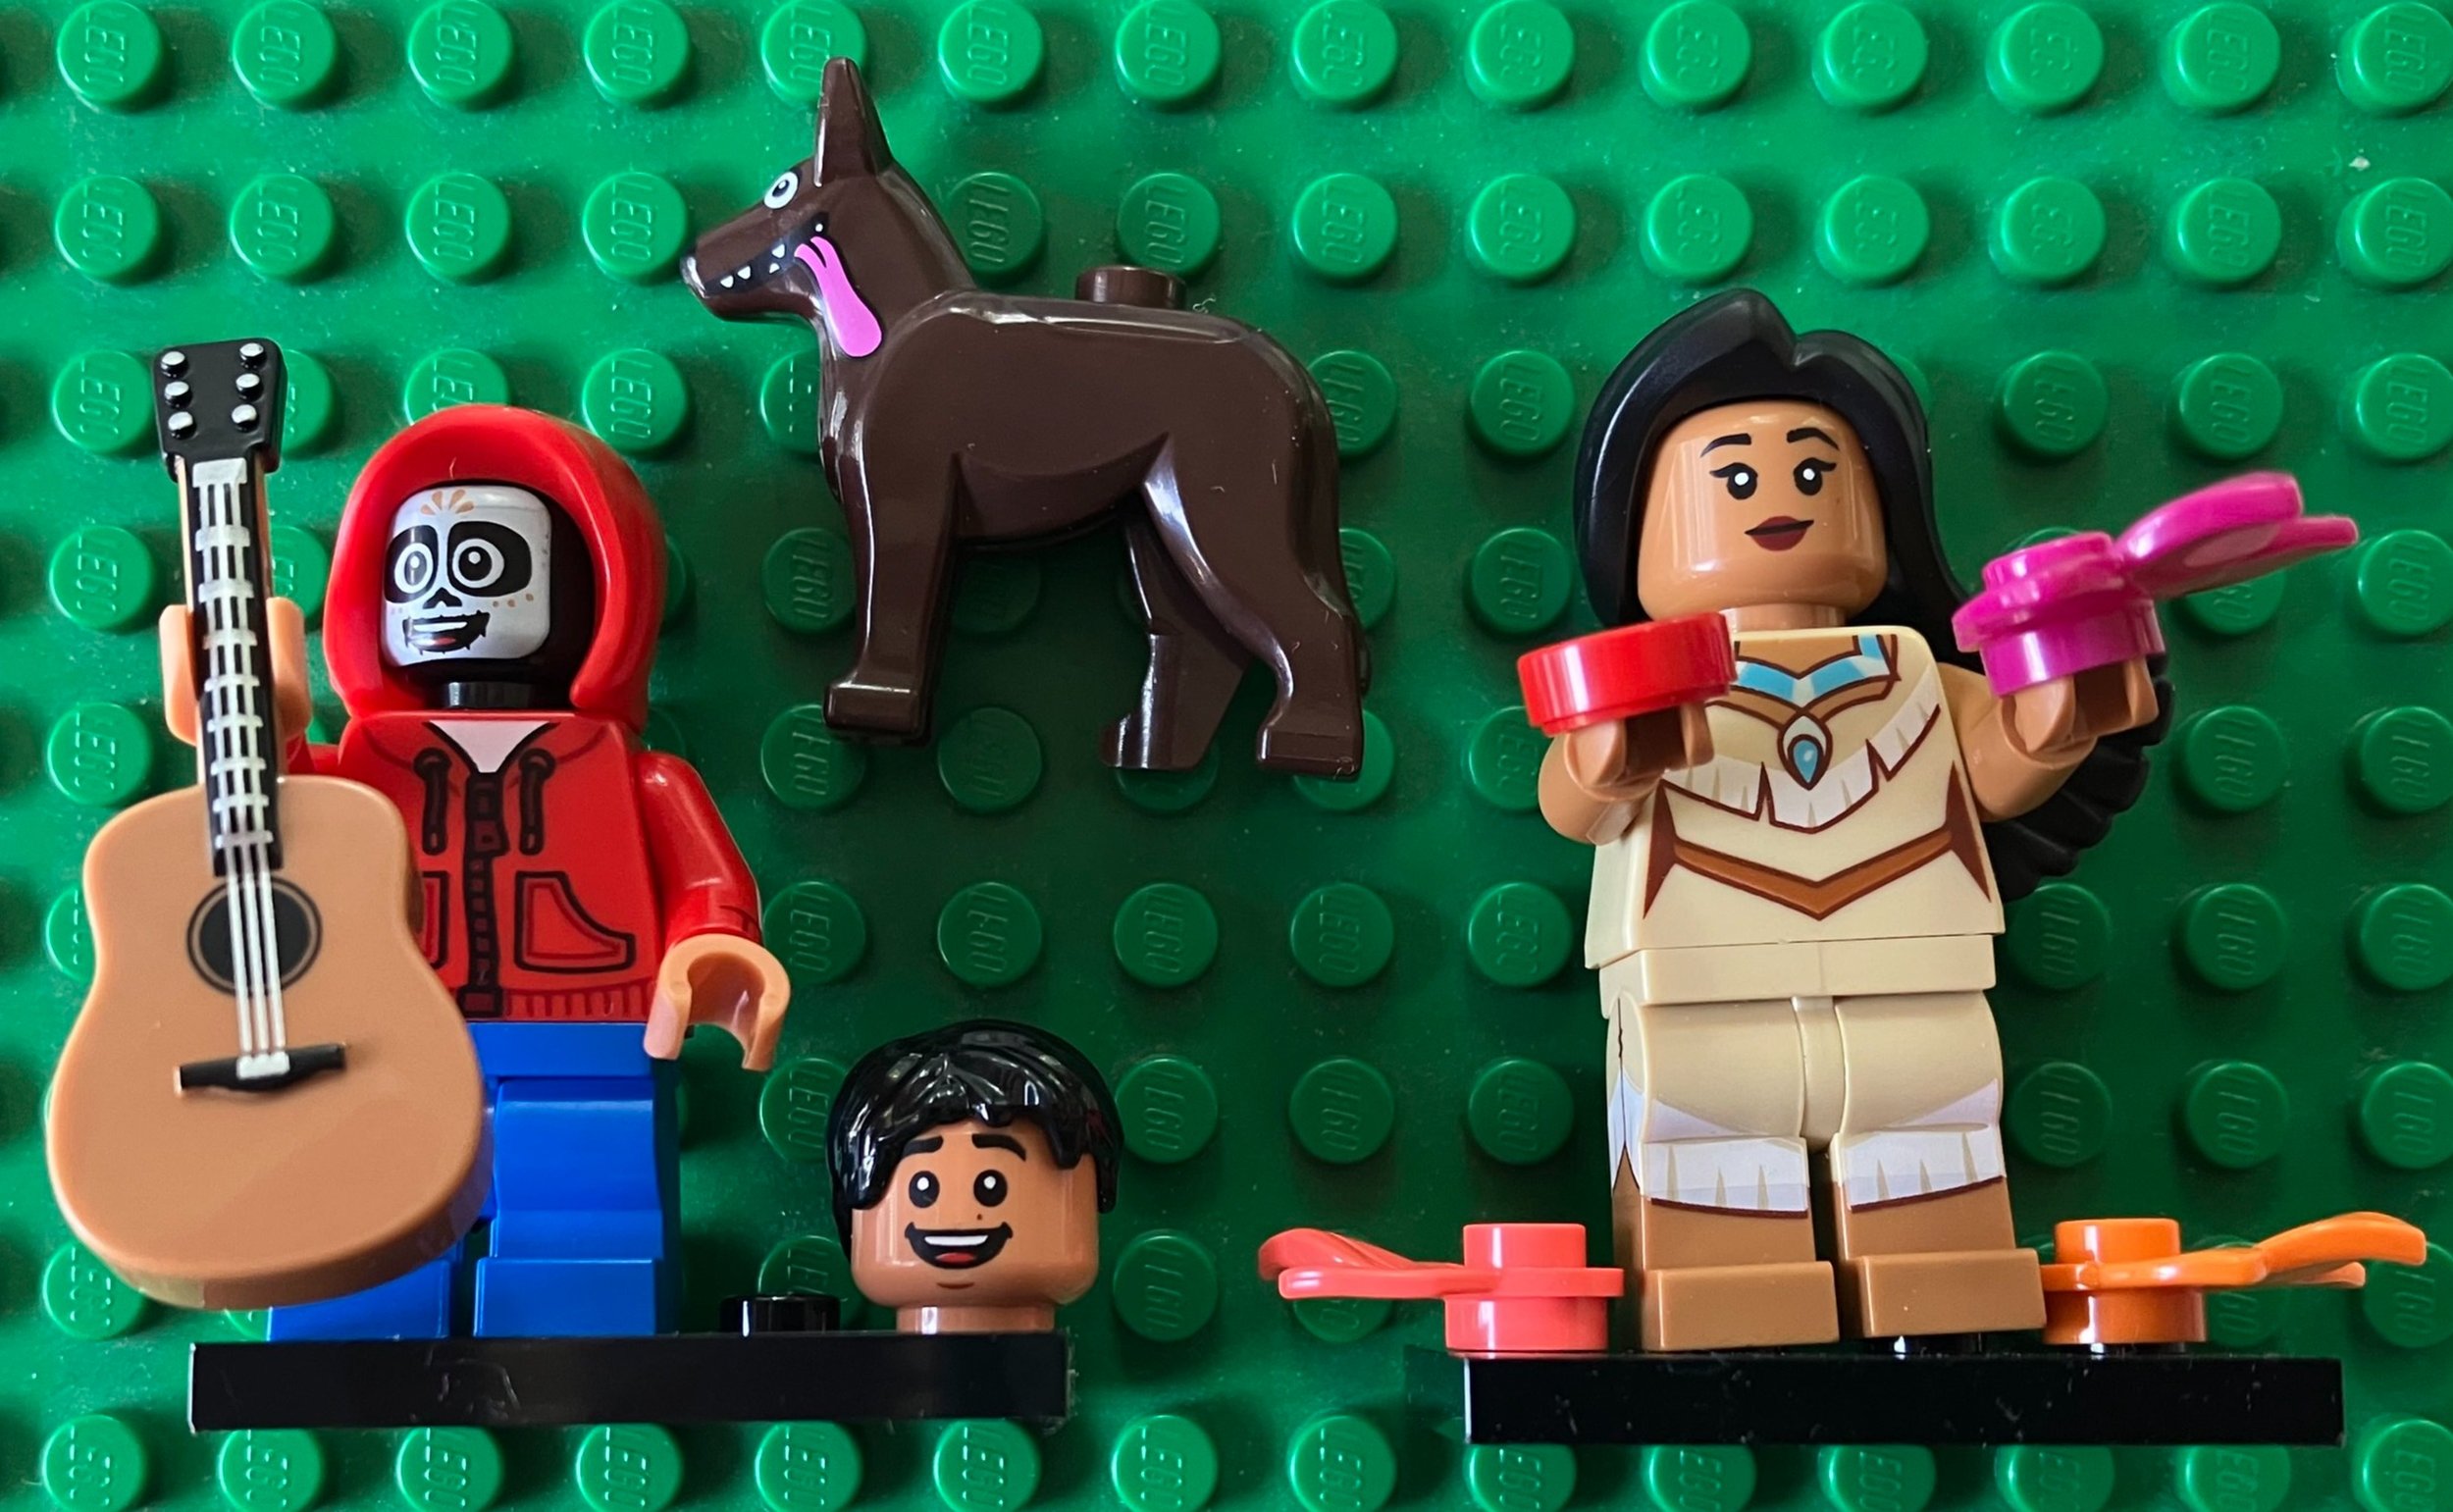
Miguel Rivera… um… looks good I guess. The dog with the tongue to the side must be from the movie so we’ll go with it. You can go with the hood and skeleton face or the printed face and hair. For fun, I have the hair on the minifigure stand which looks a little creepy.

Pocahontas seems to match the character well enough. And you get a few colored leaves which should help to brighten up any plant or garden MOC.


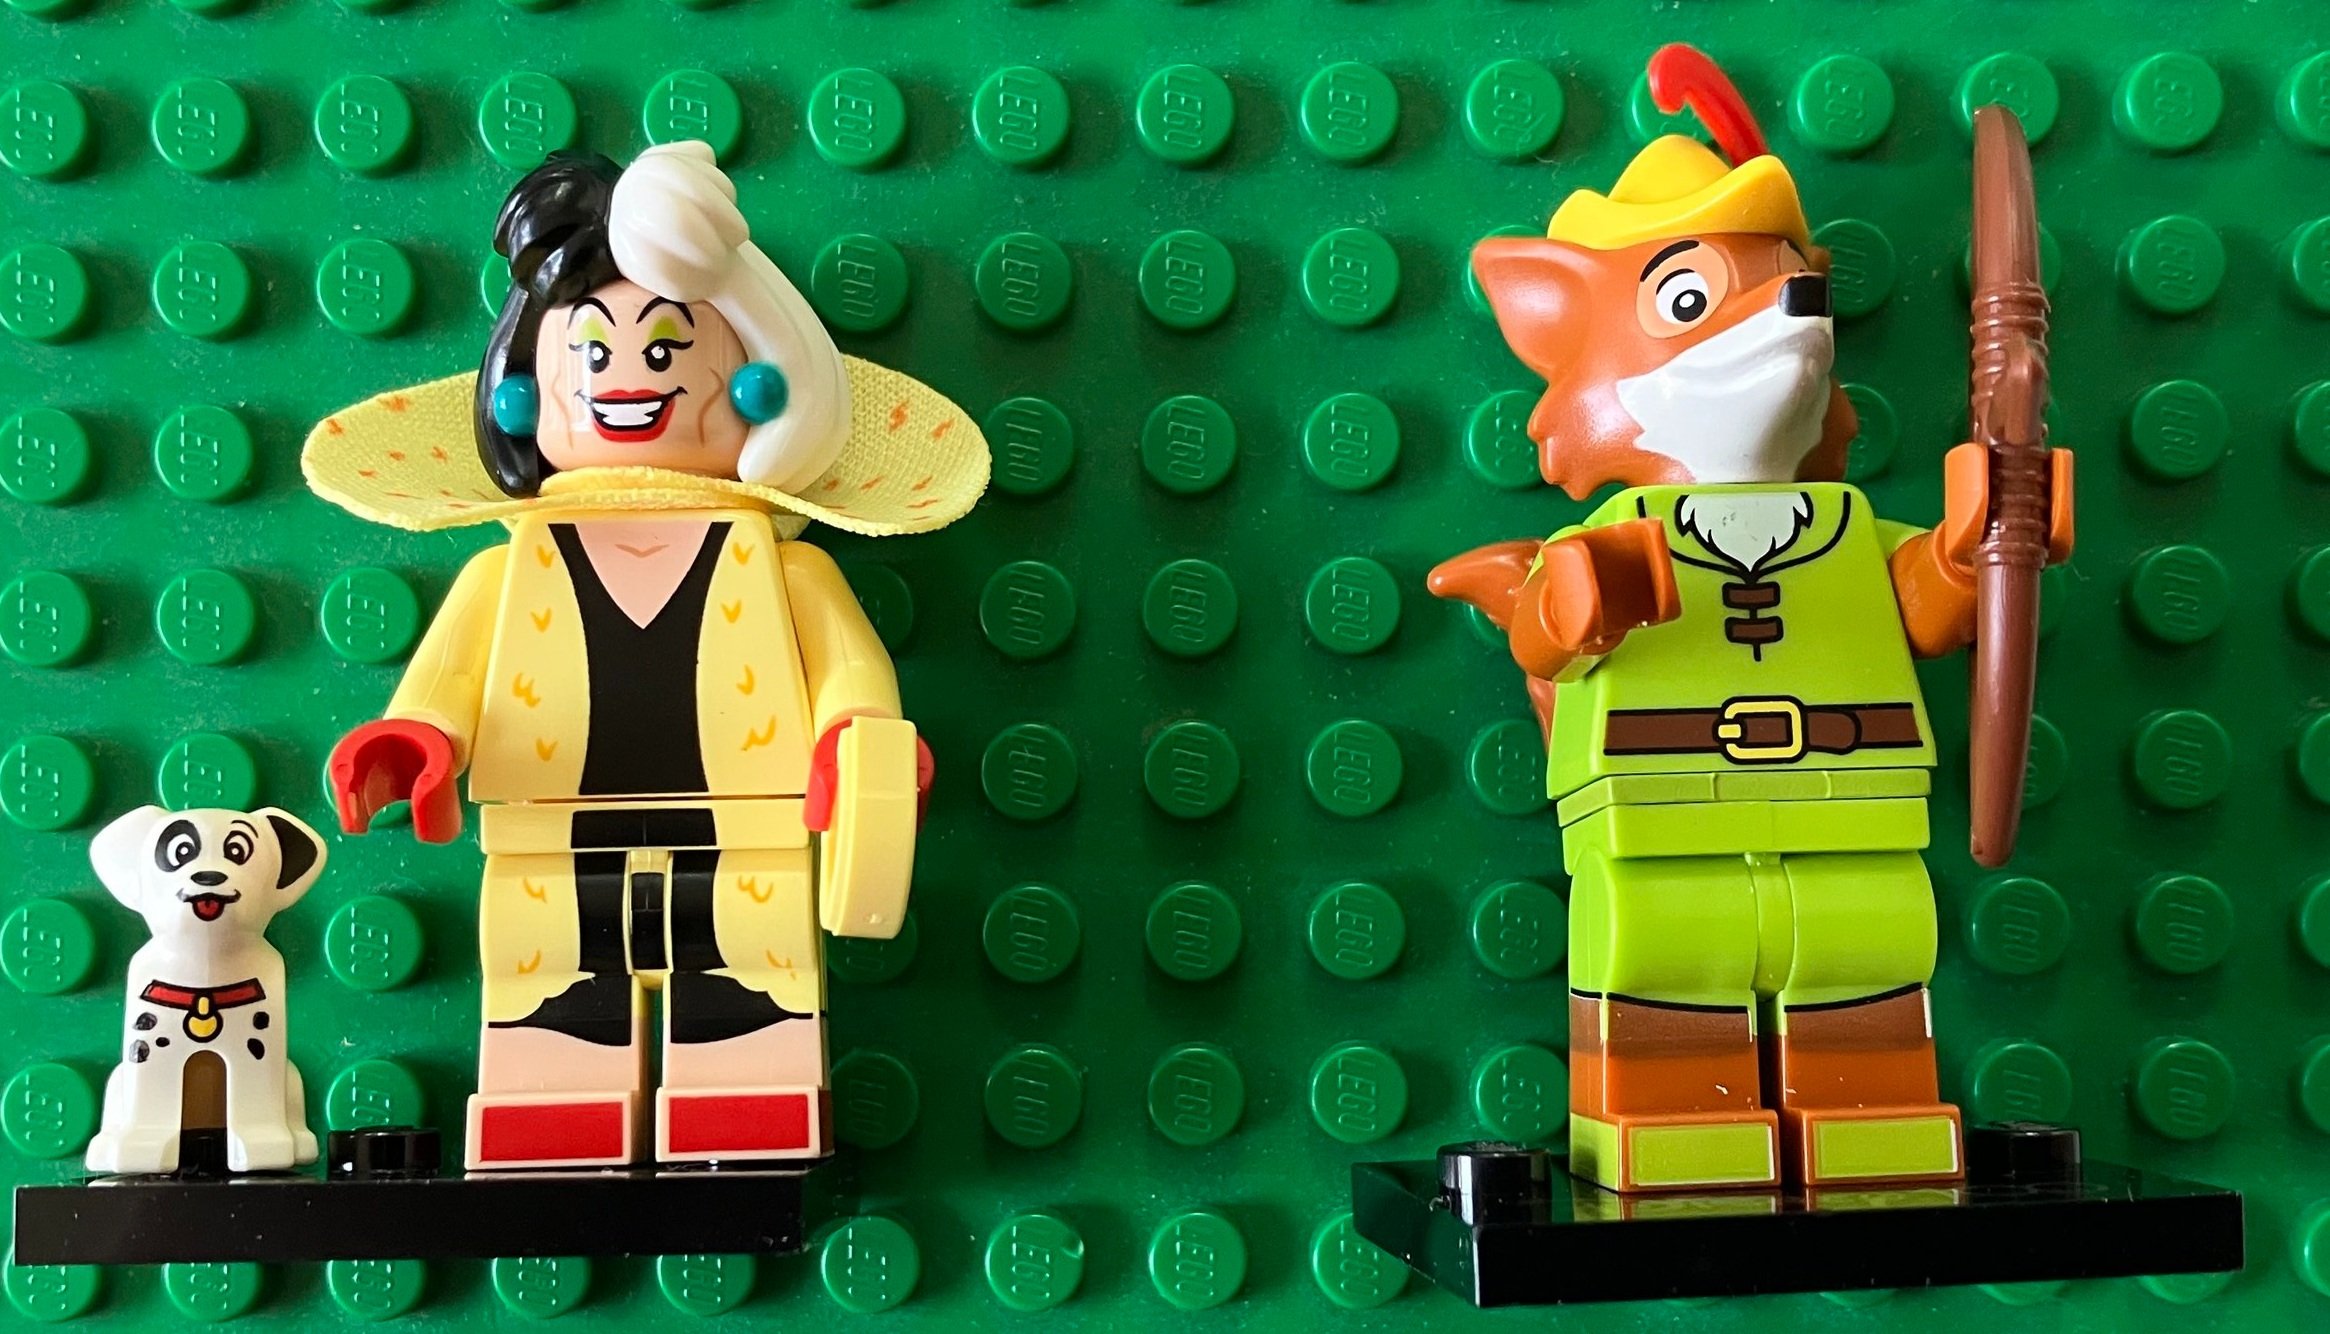
Cruella de Vil seems a little odd with a printed dress on, but not a dress piece. I’m not sure how they could have done this better. A slope piece for the dress would be too long and I think the cloth piece wouldn’t work as she has the long coat on over her dress. We’ll go with it. You get a little dalmatian too which is a nice addition.

Robin Hood seems a little tall for a fox. Maybe they should have done some shorter legs. The head mold looks pretty accurate along with the tail. He has a bow and arrow, but no quiver since it probably wouldn’t fit with the tail piece.


Prince John looks pretty accurate as compared to the movie. The sac he’s holding I assume is a sac of money.

Experiment 626 Stitch is awesome with the 4 arms. I like it!


Baymax… didn’t know who he was… we watched the movie and now I know. I think the minifigure is a little small as he was much larger than the people he was with in the movie. I’m not sure how the designers would have done that though. he comes with his charging pack.

Evil Queen works well for what you’d expect her to be. The mirror is great with the minifigure head printed on it.

I Went 1 for 5 in Picking the Series 1 Bricklink Designer Program Finalists

In case you missed it, Bricklink released the results of Series 1 of the Designer Program on 8 May 2023. You can see the results here. I made a post back in March 2023 with my top 5 picks. Well the results are in and only one of the five I voted for were selected.

Before we get into that, the program will open for crowd funding in February 2024. Bricklink users will be able to pre-order up to two sets of each available design. A design will go into production if it receives at least 3,000 pre-orders. LEGO will produce a maximum of 20,000 sets. Production/Shipping won’t occur until summer/fall 2024 so get ready to wait if you pre-order.

Onto the finalists selected…


Photo from bricklink.com

#1 - Mountain Fortress by user SleeplessNight. This set contains 3,986 pieces as currently designed. It’s a Black Falcon subtheme castle and it looks great! With the popularity of the castle theme, I’m not shocked to see a castle set in the top five. I have no doubt this one will get produced and it’ll probably go quickly. As for cost, I would guess over $400. We’ll see.


Photo from Bricklink.com

#2 - Parisian Street by user NicolasCarlier contains 3,465 parts. I voted for this one back in March 2023 and I’m stoked to see it made the list. This one looks awesome! I’m sure it’ll get made with the popularity of modular buildings. The initial design looks awesome! I can’t wait!


Photo from Bricklink.com

#3 - Old Train Engine Shed by user Mind_the_Brick. This one contains 2,298 pieces and to be honest, I didn’t think it would get voted in as train themed sets usually don’t see a lot of love. This one made it and it has some great details on the outside and then check the Bricklink site for pictures of the inside. The designer put a lot of details inside to capture what would be in an engine shed. Now we just need an engine to go with it.


Photo from Bricklink.com

#4 - The Snack Shack by user Skeletuhr. This set contains 548 pieces and is a fun little food trailer. It looks like it could be set at a beach for beach goers to grab some food. It’s a smaller set, but it still has some fun details. I like it and I think the price should be lower as compared to the others making it a bit more obtainable. Maybe $70?


Photo from Bricklink.com

#5 - General Store - Wild West by user llucky. This one contains 1,848 pieces. We’ve seen a number of Wild West type sets on the LEGO Ideas platform as well as in previous Bricklink Designer Program offerings. This is another opportunity to have something in the theme built. I think there’s a good opportunity here with this fun design. I like the inclusion of the stage coach and the blue coloring of the siding on the store is a nice choice. I hope to see this one as well as the other four out there in production.

Registration is Now Open for BrickCon 2023

Registration is now open for BrickCon 2023! The dates are 7 through 10 September 2023 for the AFOL convention and public days are 9 and 10 September. You can go register here. Tickets for the in-person AFOL convention are $85 until 24 August and then they go to $100. The virtual convention will be $25 regardless of when you purchase your ricket.

The convention will be at the Meydenbaur Center in Bellevue, WA this year which is a change from previous years, but it sounds like it should be a great event despite the new location. You can learn more about BrickCon here. There will be a public convention as well, but those tickets aren’t available yet so check back for when they start.

I plan to attend virtually again this year. Will you be there?

Little Bricks Charity - The Mission Continues

I first mentioned Little Bricks Charity back in November 2021. With the Bricks for Bricks campaign to give funds to the Ronald McDonald House in Northwest Florida still going through the end of June 2023, I thought it would be a good opportunity to highlight others that are using the brick to give to those who could use a boost in life. Before I do that, just a quick plug for the Bricks for Bricks campaign. 15% of the profits from the Bricks for Bricks Bricklink shop will be donated to the Ronald McDonald House in Northwest Florida. No work or extra fees required on your part to participate. You buy retired sets and minifigures and we’ll send funds directly at the end of June 2023. This donation is timely as one of my co-workers at my non-LEGO job is using the House so it’s much appreciated. Okay, that was a long aside. Back to Mr. Cassevah… He is visiting BrickFest Live events around the country this year and making donations along the way. This past weekend, he was in Connecticut. Here are two news clips on the event. Number one and number two.

If you’d like to donate to his cause, you can find out more HERE.

Thanks for supporting and helping to give bricks!

Beware When Ordering LEGO from Walmart.com

I used to purchase a lot from Amazon.com here in the US. They had some great deals and the free shipping with orders over $35 was reasonable since it’s very easy to spend more than that amount on LEGO sets. Then Amazon just gave up on quality shipping. As I posted here, my orders arrive with little to no packaging in larger boxes and the sets looked like they had been used in a soccer game as the ball. The last straw was when I would order a larger set and they wouldn’t even put it in a box. They would just stick the shipping label on the outside and call it good. I went to the UPS Store to return one and the worker asked why I didn’t re-package it. It was because that’s how it was packaged when I received it. Needless to say, I think I purchased one or two LEGO sets from Amazon.com over the past year.

More of my orders went to Walmart. The discounts were often the same and the shipping quality was much better. I received well packaged sets in boxes that arrived looking brand new. This went on for a while, but has recently gone down hill. At first, I started receiving sets in padded packages. The items would get smashed and I had a lot of returns. The final straw came when I received this…

I’m sorry, but nothing in the item description said I was going to receive a set where the front packaging was peeled off. How did this even happen? My suspicion is that when Walmart does their pickup in store or home deliver orders, they typically put big stickers on the items. People didn’t want LEGO sets with big stickers on them so they return them. Apparently LEGO just recycles those sets back into their inventory and you get this. And get these…

It’s been a great run, but unless Walmart can guarantee that I am going to receive a new set or if they can tell me that the set will arrive damage (and give me a substantial discount for the damaged set), I’m not interested anymore.

Target has been the holdout so far. They continue to package items well and I don’t receive beat up sets. We’ll see how long that lasts. The unfortunate part is that Target has not had the sales that Walmart and Amazon have had.

Let met know in the comments what your experience has been. Have you found a way around receiving beat up sets from any of the big retailers? Have you received worse?

Set Review - #10312-1: Jazz Club - LEGO Icons - Modular Building

Thanks LEGO! You’ve hooked me onto the modular buildings and now I’m addicted. 2023’s modular building is #10312-1: Jazz Club. It was released on 15 December 2022 and it contains 2,899 pieces. The set retails for $229.99 and costs $0.079 per piece. It consists of a Jazz Club with an office on the second floor and a practice room on the third floor. To the side of the building is a small pizza parlor. Above it is a tailor shop. At the top of the smaller building is a green house. I’ve heard/read a number of reviews, but tried to go into it with an open mind. So here goes…

The front of the box shows the full set with a black background. It appears to be in a spot light. The set name is in the upper left with a number of architectural type drawn buildings and in small letters it says “modular buildings collection.” The Icons logo is on the bottom with the 18+ greebling in the same brick red color as the top two floors of the jazz club.

The back shows the set placed in-between #10278-1: Police Station and #10297-1: Boutique Hotel. In the upper right is a drawing of the set with dimensions. On the left side shows the different floors of the set. The bottom shows some of the details on the inside of the set.

Onto the build…

The set contains some parts bags and then a white box with parts bags. When you open up the box, there are 22 parts bags numbered one through 15. There is a light grey baseplate and then the instructions are in a cardboard envelope.

The instructions come in a white book which helps you see the set build better versus the previous darker colored instruction books. There is a page about the set inside before going into the build. Throughout this set, there are small references at the top of some pages about how certain parts of the build relate to previous modular buildings. This didn’t do too much for me and I could have done without the connective storyline LEGO tried to build. I like the modulars because they are fun to build and I can connect them up to make a larger city. I don’t need to know how the story goes between the minifigures who live there.

Bag one builds the floor of the buildings. You build the sidewalk and then you start building the flooring of each building.

Bag two adds to the walls of each building and finalizes the floor designs. You also build the stage with a drum set and a drummer. There’s a saxophone on a stand too. In the center of the building is a small bathroom. In this bag you build a small sink and a toilet.

Bag three builds the walls higher all around. You add in a door to the outside and in the back, you build a small case to put in “wood” pieces for the pizza shop store. Inside the Jazz Club, you add in some tables and chairs. There is also a string bass player with a bass, bow, and a backpack case. The pizza place has a wood stove and a chef minifigure who is working on a pizza with some toppings nearby. Instead of a 2x2 round printed pizza tile, the pizza is four quarter rounds placed together which is different from past sets. Above the bathroom are stairs that go up to the next floor.

The fourth bag tops off the walls and adds tiles with a few studs to connect to the second floor. You add in a front façade with windows, structural decorations, an advertisement on a window for an upcoming show, and some space for the entryway in a future bag. The pizza shop adds in some windows, a door, a light, and a small structure on the outside with plants growing on it.

The fifth bag finishes up the first floor. In the front of the Jazz Club, you add in the entryway. Instead of a flat space, you add in a 45 degree offset door area with a ticket booth and signage above. This is a neat design that helps to break away from the flat look of a normal façade. In the pizza shop, you add some awnings over the windows in the green, white, and red pattern potentially reminiscent of the Italian flag.

Inside the Jazz Club, you add the curtains around the stage and some spot lights to shine down on the stage. This section is easily removable if you want to change it up as it just clips into place.

Bag six starts the second floor. On the left side of the picture is the Club Manager’s office. There’s an opening in the floor so you can watch and listen to what’s going on below which is interesting. Not sure I’d want that in my office, but it works okay here. The right side has an opening for the stairs and then an opening to connect to the second floor above the Pizza Shop.

Bag seven continues this floor with some more office details to include a desk, lamp, phone, and record player. The manager minifigure also comes in this bag. I have her placed at her corner desk. The walls continue to get higher and you add in some Technic pins to connect to the other side of the modular. I was trying to figure out why this was done and I can only assume it’s because they wanted to keep the walls the same color on either side. I guess that works as the red and yellow sides are separate, but it’s not super sturdy. When you go to remove the second floor once the whole thing is finished, you need to make sure you grab it the right way or it will come apart pretty easily. The good part is that it’s easy to reassemble if it does come apart.

Bag eight just about finishes up this side of the second floor. The walls are higher, the windows are added in, there are some decorations on the front façade, there are doors between rooms, and then windows on the back.

The ninth bag starts assembly on the tailor shop which can only be reached by going through the Jazz Club section of the building. Not really a big deal, but interesting that they share a stairwell. The tailor shop is the same yellow as the pizza shop. Inside is a big sewing machine, some rolls of fabric, a mannequin, and the chimney from the pizza shop continues through this room. This bag comes with a minifigure to work as the tailor.

Bag ten wraps up this floor. You add tiles and a few studs around the tops of the walls to make for easy connections with the higher levels. You also finish up the front façade for the tailor shop with some windows and plants.

Bag 11 starts the third floor of the Jazz Club. Besides the floor and a start to the outer wall, you build a couch, music stand, plant, and a railing around the stairway entrance. This bag comes with the singer minifigure. She has a dress, microphone, and some big hair. The music stand comes with a printed tile with some music for her to practice.

Bag 12 builds up the walls and adds in some windows. Two of the front windows are made of translucent bricks and plates for a colored glass window. On the inside, you add a chair next to a table and mirror for the singer to use to put on makeup or fix her hair.

Bag 13 adds in some art on the wall of the practice room, the outer hallway gets a ladder to go up to the roof, and the entire floor gets more pieces for the walls, doors, windows, and tiling for the top of the walls. This bag comes with the magician who has a few parts for one of her tricks and a small bunny as well.

Bag 14 builds the roof of the Jazz Club. The details fit right into the rest of the build and while not overly complicated, the build was different using techniques you don’t usually see. For example, you attach a piece in upside down in the front of the roof, in the center section so you can attach a decoration piece. The back corner of the roof has a small nest for a squirrel to live in. A trap door opens up to the ladder in the hallway on the floor below.

This bag also builds the Jazz Club sign. I was thankful that the sign is printed and I like the yellow on the dark blue. The yellow rails along with the yellow sausage pieces really help to make it pop. I’ve seen a few reviews were people didn’t like the colors of the building, but I’m good with it. It looks awesome with the brick red color of the building.

The final bag, bag 15, adds in a small outdoor seating area in front of the pizza shop and includes a driver with a mini motor bike to deliver pizzas to customers. On top of the pizza shop is a green house. There are a few plants inside the greenhouse and then there’s an interesting design using clear door/wall pieces to let in light for the brick plants to grow. I followed the instructions, but there is space and some extra plant pieces to mix things up as desired.

The set comes with eight minifigures. Here they are in case you couldn’t see them well in the earlier pictures.

Here’s the final build. The sides don’t look that great, but that’s to be expected as you connect modulars to each other. The back is pretty boring as well, but that’s not too big of a deal to me. Overall, is this my favorite modular building ever? No. Was it a great build with a fun design? Yes. I enjoyed this one. I actually ended up building it with my 5-year old kiddo. He had some challenges with the harder sections, but he did great with a lot of the areas I didn’t think he’d be able to handle.

As for the price, I am not a fan that the price keeps going up for modulars, but I am glad the price per piece is still fairly reasonable. I used VIP points and purchased the set during a double VIP point period so that helped. If you’re a modular fan, you have to pick this one up. If you’re on the fence, I’d dive into this one. You’ll enjoy the build and if not, you get some fun pieces for future MOCs. Look for great GWPs or double VIP point options to get a better deal.

I think this is the first time that I’ve had another modular still built. Here is the Jazz Club next to #10297-1: Boutique Hotel. I think it looks better with the Jazz Club on the left side, but that’s just my opinion. Some day, I hope to have the time to rebuild them all and the space to put them all together for a photo shoot.

Happy building!

Bricklink Designer Program 2021 - Round 3 Sets are Here!

It’s 2023 and the 2021 Bricklink Designer Program is wrapping up (finally). I just received my round 3 orders and by the looks of it from looking online, most other folks have too. If you’re not familiar with the program, the 2021 version took non-licensed designs that reached 10K votes in LEGO Ideas and gave fans an opportunity to vote on their favorites. The top five in each round were turned into sets. After some mess ups in round one, LEGO/Bricklink got it together, but demand was high and the limits were reached on all sets fairly quickly. Now you can find some of the sets on places like the Bricks for Bricks Bricklink store. Also if you’re interested in participating again, there’s a new round of voting that ends soon. You can see my selections and some details on the program here.

I haven’t decided which sets to build or add to the store from round three, but here are my initial thoughts on the sets after receiving them. Let me know your thoughts in the comments below.


Not in any particular order, #910002-1: Studgate Train Station contains 4,062 pieces and retailed for $399.99. This worked out to $0.098 per piece which is right near the 10 cents per piece average that came out of some study. This set was designed by user BrickyBricks82. His real name is Pablo Sanchez Jimenez and you know him from his approved LEGO Ideas set #21322-1: Pirates of Barracuda Bay. It’s now retired, but you can find it on sale in the Bricks for Bricks Bricklink store.

As a train fan, I was super stoked to see this set. It looks incredible with dual tracks, two trains, the large roof/canopy structure over the rails, the clear parts over the roof, and some amazing details throughout. This one is a definite build for me. Sorry for those of you hoping I would put it in the store. I can’t pass this one up.


Next up is #910004-1: Winter Chalet. This one contains 2,705 pieces and retailed for $199.99. This worked out to $0.074 per piece. The set designer was user name sdrnet or Sandro Damiano. This one could be added to a Winter Village display pretty easily. Like most Winter Village sets, the front is fully decorated and the back is open for access to play in the building. There are a ton of details on the inside with multiple bedrooms and a full up kitchen and dining area. The floors are fully tiled too which helps to increase the piece count. This one is definitely more detailed than any of the $100 Winter Village sets and it has some European flare to it. I’m not sure if I’ll build this one or not. What do you think?


Going in number order, next is #910008-1: Modular Construction Site. This one contains 3,371 pieces and retails for 319.99 which works out to $0.095 per piece. The designer was user name ryantaggart whose real name is Ryan Taggart. We have a lot of modular sets and there are a lot of modulars on the Ideas platform and in the next Bricklink Designer Program. However, I have never seen one as a full up construction site with numerous workers and equipment. The working crane is one of the highlights for me. This one would go great in any city scene and could easily be modified to add or remove sections of the building. I like it!


Up next is #910011-1: 1950s Diner. It contains 1,379 pieces and retailed for $129.99. This worked out to $0.094 per piece. The designer was user name pix027 who is James Alan Cox. This design matches well with the shape of most diners out there from the 1950s and has some great details (and wait… stickers!?!?). The chef minifigure is a bit plain compared to some restaurant type sets out there, but it works. The car that comes with it is cool, but seems quite big considering the overall size of the diner. Maybe it’s just the picture? I don’t know.


The last one is #910027-1: Mountain View Observatory. This one has 3,889 pieces and retailed for $249.99. This worked out to $0.064/piece. The designer was user name ThomasW_BL or Thomas Wosch. I like the concept and the idea. The science museum and laboratory type theme is a great addition to any city and I think the design helps it fit in well versus just a plain building. This one has height and some plants which breaks things up a bit. You get a bunch of minifigures and a baby to take around the exhibits which is a bonus. I think I’ll be building this one.

Set Review - #21335-1: Motorized Lighthouse - Lego Ideas

Here is LEGO Ideas set #43, #21335-1: Motorized Lighthouse. This one was released in the US on 19 August 2022 and retails for $299.99. It contains 2,065 pieces and this works out to $0.145 per piece. Yikes! A lot, I know. It does come with a motor, battery box, and lights, but does that really raise the price by that much? I picked this one up during a double VIP point period and used some of my VIP points to discount the price. It’s a bit high in my opinion, but onto to the review.

The box for this one is rather large. The set arrived in a special outer box that UPS still somehow managed to damage so the set box showed up damaged too. Thanks! I think the box could have been a bit smaller, but I’m not a packaging expert. The box is dark with some blue greebling on the bottom for the 18+ design. The dark packaging works so LEGO can show off the light house functionality. I’m not sure the light looks exactly like they picture it, but I get the idea. The back of the box shows some additional set details and gives the dimensions of the set.

The box contains 18 parts bags. The bags are numbered one to 13 with one unnumbered bag for the larger pieces. You get a box for the battery box and the motor comes packaged separate too. The instructions and the base plate come in paperboard envelopes. Don’t forget about the stickers. I almost did.

You get two instruction booklets. There are some details about lighthouses, the Fresnel lens, the fan designer (Sandro Quattrini), and then info about the LEGO design team.

There are two small sticker sheets with 5 stickers total. Not bad I guess.

You get a dark blue baseplate which is a first for LEGO. We’ll see if it pops up again somewhere in the future.

The first bag starts the base of the build with the outline of the island area where the lighthouse is placed. This bag also comes with a male lighthouse keeper with a telescope and then a female lighthouse keeper. I have her in the row boat with the kitten.

The second bag adds up some more details along the base, but also installs the battery box and motor. Initially it looks like the wires are everywhere, but the designers did a good job keeping them contained.

The third bag adds more details and a bunch of the BURPs (big ugly rock pieces) to the build for height. While I’m not a fan of BURPs, I understand the usage of them as I’d probably still be sitting there attaching all the pieces to achieve the height needed to cover up the electronics. Not pictured well here, but there is a cave in the island. It is where the switch is located to turn the light on and then there’s a treasure chest as well.

The fourth bag adds plates to the top of the island covering it all with just an axle sticking up and the wire for the lights.

The fifth bag adds the base of the lighthouse structure and then adds some details to the top of the island which will allow us to install the little structure at the base of the lighthouse. The axle to turn the light is hidden pretty well already which is great.

I could look it up, but I like to call it swamp green. I’m sure there’s an official term for the green color. It’s a nice look for the set.

Bag six builds the small living quarters for the lighthouse. They managed to cram a lot in there to include a small kitchen space, a bed, a desk, and some decorations.

Bag seven adds some details to the outside of the structure and installs it to the lighthouse island at an angle which is a nice touch.

Bag eight builds the internal structure to the lighthouse and takes it up a few floors. There are ladders inside for minifigures to climb up to the top as needed.

The ninth bag starts to round out the lighthouse structure with curved pieces. To break things up a bit, you throw in a few pieces with studs to clip on plant pieces. The structure gets smaller as you get higher so thankfully it’s not a repetitive build.

Bag 10 rounds out most of the rest of the tower and adds in the windows. The lighthouse tower has a good look to it on the outside. It’s not completely round, but it works for being brick built. The placement of the windows with the small ledge at the bottom is simple, yet it fits in well.

Bag 11 adds the roof to the living quarters at the base of the lighthouse. You also add a door and connect a light to the fireplace. I didn’t get a picture of it, but you really can’t see the fireplace lit up well unless you take the roof off. It seems like they could have used the second light on the strand for something else. Maybe a lamp on the front of the building?

Bag 12 completes the lighthouse and starts to add details to the top of the tower. The parts to connect the motor to the top of the lighthouse are added as well. I was curious to see how the light and motor would be integrated in the next step with such limited hardware showing

Bag 13 finishes up the set and I really like how they did this. The railing on the outside with the bent tubes, the garage door pieces for the windows around the tower, and the motorization for the light. The light is installed and it shines on the silver/reflective sticker. That then shines the light through the Fresnel lens (the piece is pictured) and the whole assembly rotates around. The mechanics of this are simple, but they work. Nice job design team. To top it off, you get a lance/sword as the tip of the lighthouse.

Here are a few shots of the final build. Overall, it was an enjoyable build to assemble. Not a lot of repetition and some great parts usage. I enjoyed it despite the BURPs included. I already mentioned the cost as a negative, but it ranks right up there with #10268-1: Vestas Wind Turbine as cool looking, but overpriced. There’s a motor, a light, and a battery box and LEGO increases the price of the set because of this.

Do I recommend this set? This is a tough one. Great build, but high price. I don’t think I would have purchased it without VIP points to cut the price down. $300 for this set is a bit high in my opinion.

What are your thoughts? Pick this one up? Hope there is a sale? Use VIP points?

Happy building!

My Top Five 2023 Bricklink Designer Program Picks

In case you’ve missed it, the 2023 Bricklink Designer Program or Series 1 as they are calling it is open for selections. You can find the program details and submissions here. They are open for voting through the end of March 2023. The program has some big changes this time. Unlike previous rounds where they crowd funded designs and the sets with the highest number of pre-orders get made, this one gives you three voting options. For each submission, you can select an emoji. There is one for “not for me,” one for “like it,” and one for “love it.” You can vote on as many sets as you’d like (only one vote per submission) and the vote tallies are secret so there are no popularity contests.

Overall there are some great submissions in the program. There are a lot of castle, pirate, and classic space themed sets which would be great for fans hoping for more parts and minifigures. There are a ton of buildings of which many fit into the modular line.

One complaint I have of the program is that when I go to vote on a set and then go back to the submissions, it re-arranges the order of the submissions. This was annoying as I had to search around to find the ones that I wanted to vote on after voting on a submission.

I don’t know how many they will end up producing, but I voted on five as being “love it” sets for me. So here were my picks:


#5 - Florentine Palazzo by fan user name paupadros - This modular compatible building contains 3,511 pieces and I think it looks awesome. The different floors can be removed for access and there is plenty of detailing on the inside. The yellow color with the white looks really good and then the flowers help to make the set stand out. This would be a great set to go along with #910023-1: Venetian Houses from a previous Designer Program round. At over 3,000 pieces, this one would not be cheap in the end, So we’ll have to weigh the amazing details and lot of pieces against the potential cost.

Picture from Bricklink.com


#4 - Black Biplane by fan user name EmanueLego This set contains 2,408 pieces.and I think it looks stunning. Some of the commenters weren’t pleased that it was all black, but there could be a possibility to make it interchangeable with different colored parts. I think the designer captured a lot of great details on this one and I like the addition of the stand. I have a copy of #10226-1: Sopwith Camel .in my collection and I think it would be great to have another biplane to add to the mix.

Picture from Bricklink.com


#3 - Parisian Street by fan user name CARLIERTI1 - This set contains 3,465 parts and would look amazing in a city scene. It’s not fully modular compatible as it is just the front half of the buildings, but that could be remedied based on how you set it up in your city. This one has a ton of great details, but does have a sticker sheet so we’ll see if that’s an issue or not. . This would look great next to #10243-1: Parisian Restaurant.

Picture from Bricklink.com


#2 - P-51D Mustang “Red Tail” by fan user name brick_squadron. This set would contain 743 pieces and I think it would be another awesome addition to the limited number of aircraft models outside of the CITY line. This one is technically a weapon system so I’m not sure LEGO would produce it, but it is historical and we don’t seem to have a problem making weapons for Castle, Pirates, or even the new Lord of the Rings set. This set is a little smaller, but still has some great details and would be a great tribute to the Tuskegee Airmen.

Picture from Bricklink.com


#1 - Coral Reef Diorama by fan user name Falkorich. This set would contain 1,707 pieces and is jam packed with details. I’ve seen a few fans create their own coral reefs and I think it would be great to have one as a set. The minifigure divers and whale are an awesome addition to the set and if you look at the write up on Bricklink, it is modular as well so you can take it apart and re-assemble as desired. I also think this one is something completely out of the ordinary that LEGO hasn’t done before so let’s broaden out the set themes away from some of the standard themes we see all the time.

Picture from Bricklink.com

Happy voting!

Set Review - #80111-1: Lunar New Year Parade - Chinese Festival Special Edition

Here’s the second Chinese Festival Special Edition set for 2023. I reviewed #80110-1: Lunar New Year Display last week. This week it’s #80111-1: Lunar New Year Parade. It was released on 8 November 2022 in the US and retails for $129.99. It contains 1,653 pieces which works out to $0.079 per piece.

By the way, if you’ve missed any of the previous Chinese Festival sets, I have some in the Bricks for Bricks Bricklink store so check them out.

The box for this one shows the full set on the front with all the minifigures. The back shows some of the play details. You can connect each of the floats together and each of the floats has movement in it as you move it along a flat surface. I included a shot of the edge of the box as well as it shows the 18 minifigures that come in this set.

The box also has the “Build Together“ logo with an x3. The bags and instructions are split up so you can share the process. My NLS built the first set (rabbit float), my son and I built the second float (drum), and my daughter build the dragon float. It worked out pretty good in my house to split it up that way.

The set comes with 10 parts bags numbered one through 10 and then a paperboard envelope to protect the instructions. There are three sets of instructions and they are printed on white which makes it easier to see the darker pieces.

Unfortunately, there’s a sticker sheet in this one. Most of the stickers are transparent which isn’t a big issue, but can be a challenge if you get finger prints on them. We tend to use the piece separator method to transport and place the stickers so I think we’re good.

You also get a thicker plastic sheet of banners. While I like the additional detail, I wish there was a better way to do this with the set. I think they look odd and out of place, but that’s just my opinion.

Bags one and two kick off the rabbit float. My NLS built this one. Bag one builds the base and initial structure of the float. I didn’t take pictures during the build process, but you add in some Technic gearing which attaches to a wheel. Then when you move the float around on a flat surface, the wheel turns and causes the Technic bar to move which will eventually make the rabbit “hop.” Bag one comes with two parading minifigures. They are each holding banners with the plastic sheeting and then a pink head that can be used as a mask. They both come with a clear dish piece so you can pose them as they are moving along with the parade and you don’t have to worry about them toppling over with the weight they are carrying (banner and mask).

The second bag adds in some more details along the side of the float and then the stand where you can place a minifigure to wave at the parade goers. This bag comes with a girl holding a tablet and then a woman with a smart phone.

Bag three wraps up this float. The rabbit build is good, but the red eyes make it look rather creepy. The round printed tiles that look like Chinese coins are a fun detail and I like how they are placed to look as if they’ve been dropped on the float. This bag comes with the rabbit costume minifigure who can hold a lantern with printing similar to previous years. Last year we had a tiger print on the lantern. This year is a rabbit. If LEGO continues this, we’ll get a repeat eventually. Unless they re-design it after they’ve gone through all the animals.

Bags four and five start the next float. Bag four builds up the base of the float and the SNOT pieces to allow for decoration. The Technic pieces make an axle spin as you move the float on a flat surface. Bag four comes with two minifigures. One is an adult female with a beverage container. The other is a parade participant who comes with some cymbals to play. She also has a clear saucer piece to allow you to pose the minifigure without her toppling over.

Bag five adds some details along the sides of the vehicle. Both of my kids had to really focus on getting the piece placement to match the instructions as there are a lot of angles and curves that make assembling this portion a little tougher. This bag comes with two minifigures. One is playing a drum with two microphone pieces. The other has a gong to play.

The sixth bag wraps up this float. You add a lot of detail to this one to include a cloud type build in the front, various golden colored pieces for decoration, the giant plastic sheet for… whatever it is, some lanterns which look pretty good, and then a big drum. The action on this float is you can place the drummer minifigure on a little stand and she “hits” the drum as you move the float on a flat surface.

My 5-year old was able to build most of this, but there were a few parts that were challenging. The bluish-teal arch type assembly on the back was not easy and I built it for him. He also had trouble with the drum and getting everything angled up right. Still, he did pretty good with the build.

Bags seven and eight begin the third float. Bag seven starts the base of the vehicle and you can see better what the Technic assembly looks like under the float at the end of bag seven. This bag comes with a parade participant with fire crackers. This minifigure is also on a clear saucer which works out good as the fire crackers are a bit heavy and would make it challenging for the minifigure to stay standing without a support. You also get a boy minifigure holding a 1x2 red tile with a dragon printed on it. His torso is a festive print and different from some of the standard minifigure torsos.

Bag eight continues to build up the base and some of the SNOT pieces for adding decorations on the side. This one comes with a girl holding a… not sure what it is… food on a stick? a noise maker? This one also comes with the infamous purple space minifigure/parts to help you make a purple classic space minifigure. So you take the torso from the Series 22 Collectible Minifigures space creature, switch out the arms if you desire, and then use the helmet, pants, and air tank from this minifigure to get your purple classic space minifigure. Die hard space fans are all over it, but it’s quite the hefty spend to get a minifigure. I haven’t checked on Bricklink, but I’m sure it’s not cheap. I don’t have Series 22 in the store yet. Sorry.

Bag nine adds some details to the sides of the float. It also adds a crate with a top and then another box. One will hold fireworks. The other will hold some extra hats for minifigures. Towards the front of the float are some lime green plates and tiles that have “LEGO” stickers on them. This bag comes with two minifigures. One has a Castle type hat and the other has a pirate hat. They have the same red torso as the spaceman and one holds a banner while the other holds a… um… not sure.

Bag 10 is the last bag of set. It finalizes the details of the set to include a larger orange 2x2 brick on the front and two larger plates on the rotating part with a dragon. The dragon moves around 360 degrees unlike the other two floats that have very limited ranges of movement.

Here’s the final set assembled with all of the minifigures. Each float comes with pieces that can be used as clips to connect the floats and have them move as a train instead of individual vehicles. Overall, I think this is a great addition to the Chinese Festival theme. The price per piece isn’t bad, but it is still slightly expensive in my opinion considering what you get for $130. This set has some great build techniques and it was fun to put together as a family. I like the moving parts as well. This is a fun integration we don’t normally see in sets. As mentioned, I could do without the plastic flag/banner pieces.

I didn’t take a separate minifigure picture, but I think you get a good collection of minifigures with some different torsos and hats. Note, the 16x16 plate was from my own collection and was not included in the set.

If you’re a fan of this theme, I’d look to pick this one up. If you can get it on sale, definitely go for it. You might find it on sale closer to the end of it’s life if you’re willing to wait. Or take advantage of double VIP points or GWPs straight from LEGO Shop @ Home.

Happy building!